
|
首先感谢与非网STM32F3-Discover赠板活动,stm32f3控制器相比意法半导体前代的产品有很多创新之处,其中一个新的变化是把片内8K字节的SRAM连到了指令总线,可以用作执行关键程序,下面步骤是实现一个闪灯程序在片上RAM执行,通过和FLASH上执行指令的情况对比,我们可以直观感受下代码执行速度的提升情况。 1.首先下载STM32F3-Discovery的固件包,我们在包中的GPIO_IOToggle例子工程基础上修改。 2.在MDK软件中安装STLINK驱动,运行安装目录如C:\Keil\ARM\STLink\USBDriver的ST-Link_V2_USBdriver.exe。 3.连接STM32F3-Discovery评估板,计算机提示已找到ST_LINK驱动。 4.打开GPIO_IOToggle例子工程,完全编译后点击调试按钮,出现以下提示: 
这表示ST_LINK没有正确连接。 5.我们需要重新设置工程中的DEBUG工具,使用ST_Link Debugger SWD调试:如下图示: 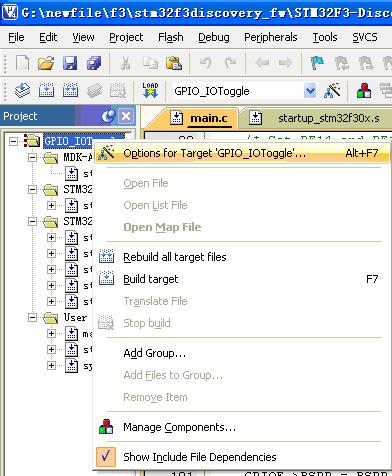
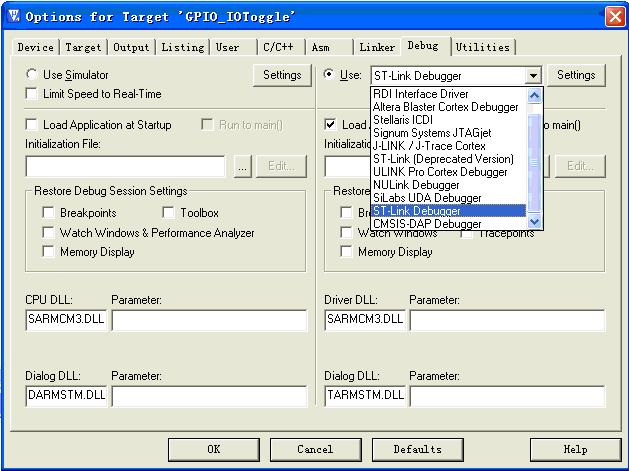
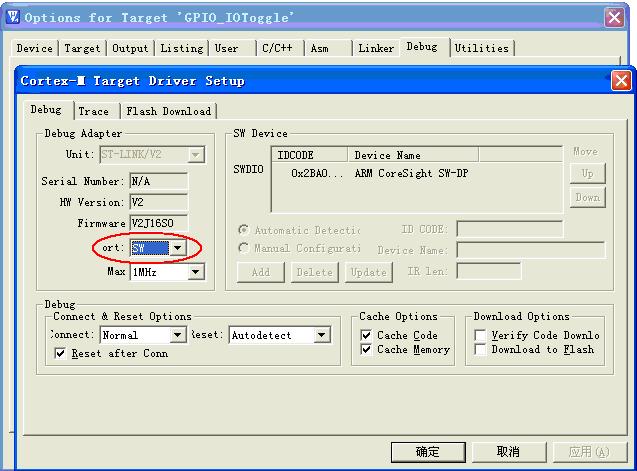
Flash烧录工具也使用ST_Link Debugger,添加STMF3 FALSH,如下图示: 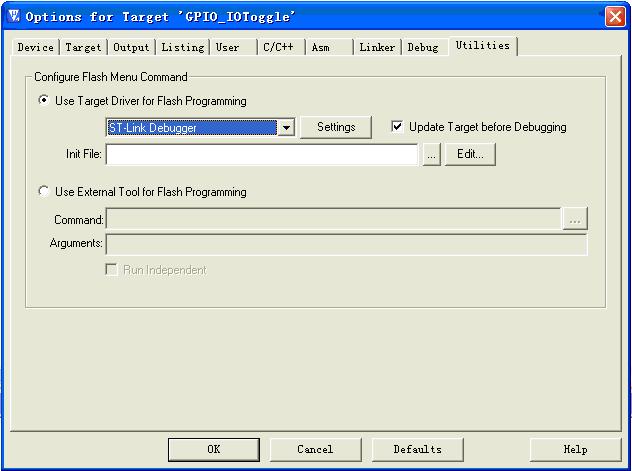
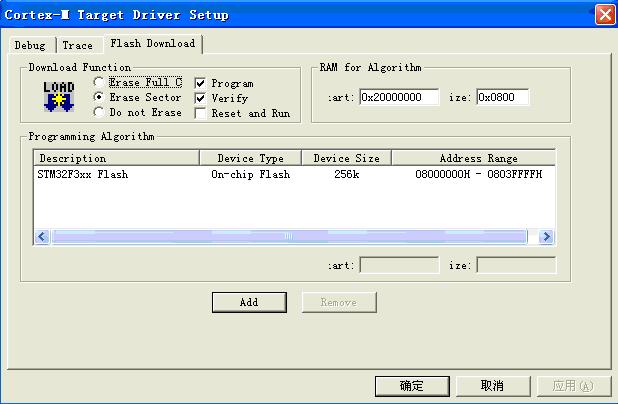
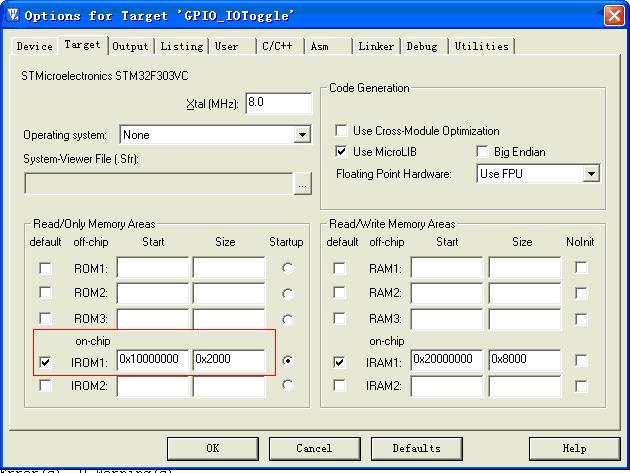
6.选择MDK软件IDE界面Flash—Download,此时已经可以成功下载程序了。 7.修改GPIO_IOToggle工程中的main.c文件中main()函数代码如下: int main(void) { /*!< At this stage the microcontroller clock setting is already configured, this is done through SystemInit() function which is called from startup file (startup_stm32f30x.s) before to branch to application main. To reconfigure the default setting of SystemInit() function, refer to system_stm32f30x.c file */ unsigned int i; /* GPIOE Periph clock enable */ RCC_AHBPeriphClockCmd(RCC_AHBPeriph_GPIOE, ENABLE); /* Configure PE14 and PE15 in output pushpull mode */ GPIO_InitStructure.GPIO_Pin = GPIO_Pin_15 | GPIO_Pin_14; GPIO_InitStructure.GPIO_Mode = GPIO_Mode_OUT; GPIO_InitStructure.GPIO_OType = GPIO_OType_PP; GPIO_InitStructure.GPIO_Speed = GPIO_Speed_50MHz; GPIO_InitStructure.GPIO_PuPd = GPIO_PuPd_NOPULL; GPIO_Init(GPIOE, &GPIO_InitStructure); /* To achieve GPIO toggling maximum frequency, the following sequence is mandatory. You can monitor PE14 and PE15 on the scope to measure the output signal. If you need to fine tune this frequency, you can add more GPIO set/reset cycles to minimize more the infinite loop timing. This code needs to be compiled with high speed optimization option. */ while (1) { /* Set PE14 and PE15 */ GPIOE->BSRR = BSRR_VAL; for(i=0; iBRR = BSRR_VAL; <span lang="EN-US"> for(i=0; i 10.新建一个CpuRAM.ini 的文件,编辑其内容如下: FUNC void Setup (void) { SP = _RDWORD(0x10000000); PC = _RDWORD(0x10000004); _WDWORD(0xE000ED08, 0x10000000); } LOAD GPIO_IOToggle\GPIO_IOToggle.axf INCREMENTAL Setup(); g, main 把这文件放在GPIO_IOToggle工程文件夹下。 11.设置Debug 调试接口,取消“Load Application at Startup”前面的钩。在CpuRAM.ini 初始化脚本中自动装入程序。界面如下: 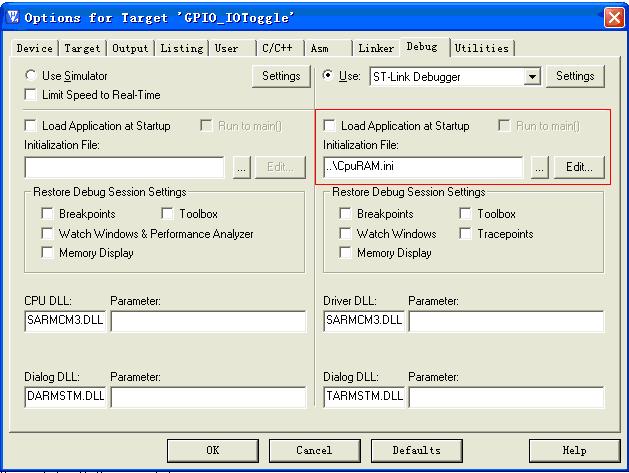
12.在Utilities 栏设置里取消Update Target before Debugging, 如下图示: 
13.C/C++配置栏加上VECT_TAB_SRAM定义: 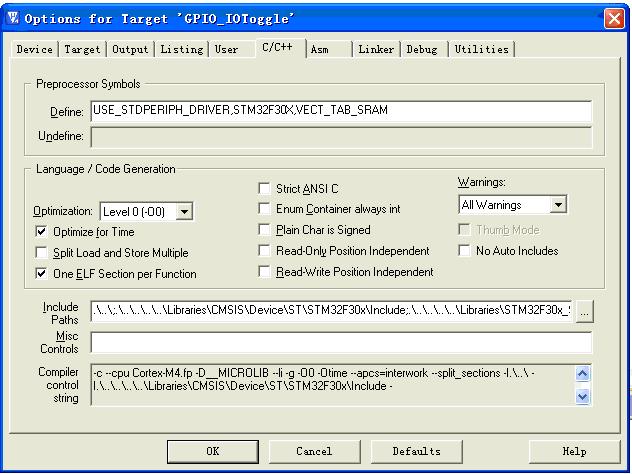
14.全部编译用调试按钮把程序下到SRAM内,实际测试LED闪烁20次的时间大概为24秒,可以得出一个结论:在片内指令SRAM执行代码时速度要大约提高一倍。 以上抛砖引玉,如有问题欢迎联系。 |
 微信公众号
微信公众号
 手机版
手机版

RE:stm32f3片上RAM执行指令测试
回复:stm32f3片上RAM执行指令测试
能够在运行中吧flash内的程序转移到RAM中运行吗?
这个不是问题啊