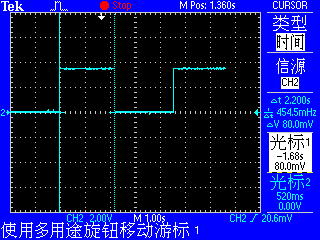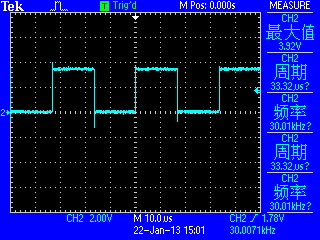
|
bsp.c主要是对板载外设进行初始化 /** ****************************************************************************** * @file bsp.c * @author wangfei * @date 13-April-2012 * @e-mail wfmjj@hotmail.com * @brief Initialize peripherals. *****************************************************************************/ /* Includes ------------------------------------------------------------------*/ #include "stm32f4xx.h" #include "bsp.h" /* Private typedef -----------------------------------------------------------*/ /* Private define ------------------------------------------------------------*/ /* Private macro -------------------------------------------------------------*/ /* Private variables ---------------------------------------------------------*/ /* Private function prototypes -----------------------------------------------*/ /* Private functions ---------------------------------------------------------*/ /** * @brief This function handles NMI exception. * @param None * @retval None */ void Bsp_Init(void) { Bsp_GPIO_Config(); Bsp_TIM1_Config(); Bsp_TIM3_Config(); Bsp_NVIC_Config(); Bsp_USART3_Config(); } /** * @brief This function config GPIO. * @param None * @retval None */ void Bsp_GPIO_Config(void) { GPIO_InitTypeDef GPIO_InitStructure; RCC_AHB1PeriphClockCmd(RCC_AHB1Periph_GPIOE,ENABLE); //打开外设GPIOE的时钟 RCC_AHB1PeriphClockCmd(RCC_AHB1Periph_GPIOC,ENABLE); //turn on gpioc clock RCC_AHB1PeriphClockCmd(RCC_AHB1Periph_GPIOA,ENABLE); //turn on GPIOA clock GPIO_InitStructure.GPIO_Pin=(GPIO_Pin_0|GPIO_Pin_1|GPIO_Pin_2|GPIO_Pin_3); //led口配置 GPIO_InitStructure.GPIO_Mode=GPIO_Mode_OUT; GPIO_InitStructure.GPIO_Speed=GPIO_Speed_50MHz; GPIO_InitStructure.GPIO_OType=GPIO_OType_PP; GPIO_InitStructure.GPIO_PuPd=GPIO_PuPd_NOPULL; GPIO_Init(GPIOE, &GPIO_InitStructure); GPIO_PinAFConfig(GPIOC,GPIO_PinSource10,GPIO_AF_USART3); //Connect USART3 pins to AF7 GPIO_PinAFConfig(GPIOC,GPIO_PinSource11,GPIO_AF_USART3); GPIO_InitStructure.GPIO_Pin=GPIO_Pin_10 | GPIO_Pin_11; GPIO_InitStructure.GPIO_Mode = GPIO_Mode_AF; GPIO_InitStructure.GPIO_Speed = GPIO_Speed_50MHz; GPIO_InitStructure.GPIO_OType = GPIO_OType_PP; GPIO_InitStructure.GPIO_PuPd = GPIO_PuPd_UP; GPIO_Init(GPIOC, &GPIO_InitStructure); //Connect TIM3 Pin to AF2 GPIO_PinAFConfig(GPIOC,GPIO_PinSource6,GPIO_AF_TIM3); //TIM3_Ch1 GPIO_PinAFConfig(GPIOC,GPIO_PinSource7,GPIO_AF_TIM3); //TIM3_Ch2 GPIO_PinAFConfig(GPIOC,GPIO_PinSource8,GPIO_AF_TIM3); //TIM3_Ch3 GPIO_PinAFConfig(GPIOC,GPIO_PinSource9,GPIO_AF_TIM3); //TIM3_Ch4 // Config TIM3 Pin GPIO_InitStructure.GPIO_Pin=(GPIO_Pin_6|GPIO_Pin_7|GPIO_Pin_8|GPIO_Pin_9); GPIO_InitStructure.GPIO_Mode=GPIO_Mode_AF; GPIO_InitStructure.GPIO_Speed=GPIO_Speed_50MHz; GPIO_InitStructure.GPIO_OType = GPIO_OType_PP; GPIO_InitStructure.GPIO_PuPd = GPIO_PuPd_UP ; GPIO_Init(GPIOC, &GPIO_InitStructure); GPIO_PinAFConfig(GPIOA,GPIO_PinSource9,GPIO_AF_TIM1); //PA9--TIM1_CH2 GPIO_InitStructure.GPIO_Pin=GPIO_Pin_9; GPIO_InitStructure.GPIO_Mode=GPIO_Mode_AF; GPIO_InitStructure.GPIO_Speed = GPIO_Speed_50MHz; GPIO_InitStructure.GPIO_OType = GPIO_OType_PP; GPIO_InitStructure.GPIO_PuPd = GPIO_PuPd_UP; GPIO_Init(GPIOA, &GPIO_InitStructure); } /** * @brief This function config timer1. * @param None * @retval None */ void Bsp_TIM1_Config(void) { TIM_TimeBaseInitTypeDef TIM_TimeBaseStructure; RCC_APB2PeriphClockCmd(RCC_APB2Periph_TIM1,ENABLE); //turn on timer1 clock TIM_DeInit(TIM1); TIM_TimeBaseStructure.TIM_Prescaler=0; TIM_TimeBaseStructure.TIM_CounterMode=TIM_CounterMode_Up; //定时器1向上计数 TIM_TimeBaseStructure.TIM_Period=0xffff; TIM_TimeBaseStructure.TIM_ClockDivision = 0; TIM_TimeBaseInit(TIM1, &TIM_TimeBaseStructure); TIM1->CCMR1|=0X0100; //配置定时器1为外部时钟模式1 TIM1->CCER&=0XFF5F; TIM1->SMCR|=0X0067; TIM_ClearFlag(TIM1,(TIM_FLAG_Update|TIM_FLAG_Trigger)); } /** * @brief This function config timer3. * @param None * @retval None */ void Bsp_TIM3_Config(void) { TIM_TimeBaseInitTypeDef TIM_TimeBaseStructure; TIM_OCInitTypeDef TIM_OCInitStructure; RCC_APB1PeriphClockCmd(RCC_APB1Periph_TIM3, ENABLE); //Open TIM3 Clock TIM_TimeBaseStructure.TIM_Prescaler=3; //clk_cnt prescale TIM_TimeBaseStructure.TIM_CounterMode=TIM_CounterMode_Up; //TIM3 Count mode TIM_TimeBaseStructure.TIM_Period=699; //Fout_clk=Fclk_cnt/(ARR+1)=21000000/700=30KHZ TIM_TimeBaseStructure.TIM_ClockDivision=0; TIM_TimeBaseInit(TIM3, &TIM_TimeBaseStructure); /* PWM1 Mode configuration: TIM3_Ch1 */ TIM_OCInitStructure.TIM_OCMode=TIM_OCMode_PWM1; //select PWM1 mode TIM_OCInitStructure.TIM_OutputState = TIM_OutputState_Enable; //config oc1 as output TIM_OCInitStructure.TIM_Pulse=350; //config TIM3_CCR1 vaule TIM_OCInitStructure.TIM_OCPolarity = TIM_OCPolarity_High; //config oc1 high level avaliable TIM_OC1Init(TIM3, &TIM_OCInitStructure); TIM_OC1PreloadConfig(TIM3, TIM_OCPreload_Enable); // turn on oc1 preload /* PWM1 Mode configuration: TIM3_Ch2 */ TIM_OCInitStructure.TIM_OCMode=TIM_OCMode_PWM1; //select PWM1 mode TIM_OCInitStructure.TIM_OutputState = TIM_OutputState_Enable; //config oc2 as output TIM_OCInitStructure.TIM_Pulse=200; //config TIM3_CCR2 vaule TIM_OCInitStructure.TIM_OCPolarity = TIM_OCPolarity_High; //config oc2 high level avaliable TIM_OC2Init(TIM3, &TIM_OCInitStructure); TIM_OC2PreloadConfig(TIM3, TIM_OCPreload_Enable); // turn on oc2 preload /* PWM1 Mode configuration: TIM3_CH3 */ TIM_OCInitStructure.TIM_OCMode=TIM_OCMode_PWM1; //select PWM1 mode TIM_OCInitStructure.TIM_OutputState = TIM_OutputState_Enable; //config oc3 as output TIM_OCInitStructure.TIM_Pulse=100; //config TIM3_CCR1 vaule TIM_OCInitStructure.TIM_OCPolarity = TIM_OCPolarity_High; //config oc3 high level avaliable TIM_OC3Init(TIM3, &TIM_OCInitStructure); TIM_OC3PreloadConfig(TIM3, TIM_OCPreload_Enable); // turn on oc3 preload /* PWM1 Mode configuration: TIM3_CH4 */ TIM_OCInitStructure.TIM_OCMode=TIM_OCMode_PWM1; //select PWM1 mode TIM_OCInitStructure.TIM_OutputState = TIM_OutputState_Enable; //config oc4 as output TIM_OCInitStructure.TIM_Pulse=500; //config TIM3_CCR1 vaule TIM_OCInitStructure.TIM_OCPolarity = TIM_OCPolarity_High; //config oc4 high level avaliable TIM_OC4Init(TIM3, &TIM_OCInitStructure); TIM_OC4PreloadConfig(TIM3, TIM_OCPreload_Enable); // turn on oc4 preload TIM_ARRPreloadConfig(TIM3, ENABLE); /* TIM3 enable counter */ TIM_Cmd(TIM3, ENABLE); } /** * @brief This function config usart3. * @param None * @retval None */ void Bsp_USART3_Config(void) { USART_InitTypeDef USART_InitStructure; RCC_APB1PeriphClockCmd(RCC_APB1Periph_USART3,ENABLE); //turn on usart3 clock USART_InitStructure.USART_BaudRate =115200 ; //波特率设置 USART_InitStructure.USART_WordLength = USART_WordLength_8b; USART_InitStructure.USART_StopBits = USART_StopBits_1; USART_InitStructure.USART_Parity = USART_Parity_No; USART_InitStructure.USART_HardwareFlowControl = USART_HardwareFlowControl_None; USART_InitStructure.USART_Mode = USART_Mode_Rx | USART_Mode_Tx; USART_Init(USART3, &USART_InitStructure); //USART_ITConfig(USART3,USART_IT_RXNE,ENABLE); USART_Cmd(USART3,ENABLE); USART_ClearFlag(USART3, USART_FLAG_TC); //清除发送完成标志位 } /** * @brief This function config nvic. * @param None * @retval None */ void Bsp_NVIC_Config(void) { NVIC_InitTypeDef NVIC_InitStructure; NVIC_PriorityGroupConfig(NVIC_PriorityGroup_0); NVIC_InitStructure.NVIC_IRQChannel=TIM1_TRG_COM_TIM11_IRQn; NVIC_InitStructure.NVIC_IRQChannelPreemptionPriority = 0; NVIC_InitStructure.NVIC_IRQChannelSubPriority = 0; NVIC_InitStructure.NVIC_IRQChannelCmd = ENABLE; NVIC_Init(&NVIC_InitStructure); NVIC_InitStructure.NVIC_IRQChannel=TIM1_UP_TIM10_IRQn; NVIC_InitStructure.NVIC_IRQChannelPreemptionPriority = 0; NVIC_InitStructure.NVIC_IRQChannelSubPriority = 2; NVIC_InitStructure.NVIC_IRQChannelCmd = ENABLE; NVIC_Init(&NVIC_InitStructure); } app.c为函数 /** ****************************************************************************** * @file app.c * @author wangfei * @date 13-April-2012 * @e-mail wfmjj@hotmail.com * @brief Initialize peripherals. *****************************************************************************/ /* Includes ------------------------------------------------------------------*/ #include "stm32f4xx.h" #include "app.h" #include "bsp.h" /* Private typedef -----------------------------------------------------------*/ /* Private define ------------------------------------------------------------*/ /* Private macro -------------------------------------------------------------*/ /* Private variables ---------------------------------------------------------*/ extern uint8_t TimeFlag; /* Private function prototypes -----------------------------------------------*/ /* Private functions ---------------------------------------------------------*/ /** * @brief This function handles NMI exception. * @param None * @retval None */ int main(void) { GPIO_ResetBits(GPIOE,(GPIO_Pin_0|GPIO_Pin_1|GPIO_Pin_2|GPIO_Pin_3)); //可以通过观察LED口高电平时间 Bsp_Init(); while(1) { TIM_ITConfig(TIM1,TIM_IT_Trigger,ENABLE); //允许定时器1的触发中断 GPIO_SetBits(GPIOE,(GPIO_Pin_0|GPIO_Pin_1|GPIO_Pin_2|GPIO_Pin_3)); TIM_Cmd(TIM1,ENABLE); //打开定时器1,当检测到TIM1_CH1通道的上升沿后立即触发中断 while(TimeFlag==0); //等待定时器1溢出中断 TIM1->DIER&=0X0000; //失能定时器1的所有中断 GPIO_ResetBits(GPIOE,(GPIO_Pin_0|GPIO_Pin_1|GPIO_Pin_2|GPIO_Pin_3)); //可以通过观察LED口高电平时间 TimeFlag=0; //定时器1溢出标志置0 Delay(100000000); } } /** * @brief Delay Function. * @param nCount:specifies the Delay time length. * @retval None */ void Delay(__IO uint32_t nCount) { while(nCount--) { } } 定时器1的触发中断和溢出中断函数 /** * @brief This function handles TIM1 Update and TIM10. * @param None * @retval None */ void TIM1_UP_TIM10_IRQHandler(void) { if(TIM_GetITStatus(TIM1,TIM_IT_Update)==SET) //检查定时器1溢出标志位是否置1 { TIM1->CR1&=0XFFFE; //关闭定时器1 TIM1->CNT&=0X0000; //清除计数器2计数寄存器的值 TimeFlag=1; //1s标志位置1 TIM1->SR&=0XFFFE; //退出定时器1溢出中断之前,必须清除定时器1的溢出标志位 } } /** * @brief This function handles TIM1 Trigger and Commutation and TIM11. * @param None * @retval None * @note 定时器1打开后,当检测到TIM1_CH1通道出现上升沿时立即进入此中断。 */ void TIM1_TRG_COM_TIM11_IRQHandler(void) { if(TIM_GetITStatus(TIM1,TIM_IT_Trigger)==SET) //检查是否为触发中断 { TIM1->DIER&=0XFFBF; //清除定时器1的触发中断 TIM1->DIER|=0X0001; //使能定时器1的溢出中断 TIM1->SR&=0XFFBF; //在退出中断之前必须清除其中断标志位 } } |


 微信公众号
微信公众号
 手机版
手机版
