本帖最后由 creep 于 2017-2-19 21:36 编辑
虽然STM32F769-Discovery的论坛评测活动早就结束了,但是截止到目前STM32F769-Discovery 依然是ST的开发板中可玩性和综合性能比较高的,其中的独有或者新增的外设都值得好好学习一下,下面就简单看下板载的LCD相关的内容。
1、DSI和LTDC
STM32F769-Discovery上面的LCD是一个分辨率为800*480的电容触摸屏,驱动接口为DSI-MIPI模式,这种模式是手机行业比较常用的驱动模式,最近几年才出现在ST的高端MCU上面,其特点是接口简单占用IO口少但是速度非常快,但是配置可能比较复杂一些。在此之前ST的比较方便使用的LCD接口是以STM32F429上的LTDC接口为代表,现在的出现的DSI-MIPI是在LTDC的基础上增添了MIPI相关的协议,所以如果比较熟悉LTDC相关的使用对学习STM32D769上的DIS-MIPI有很大的帮助。
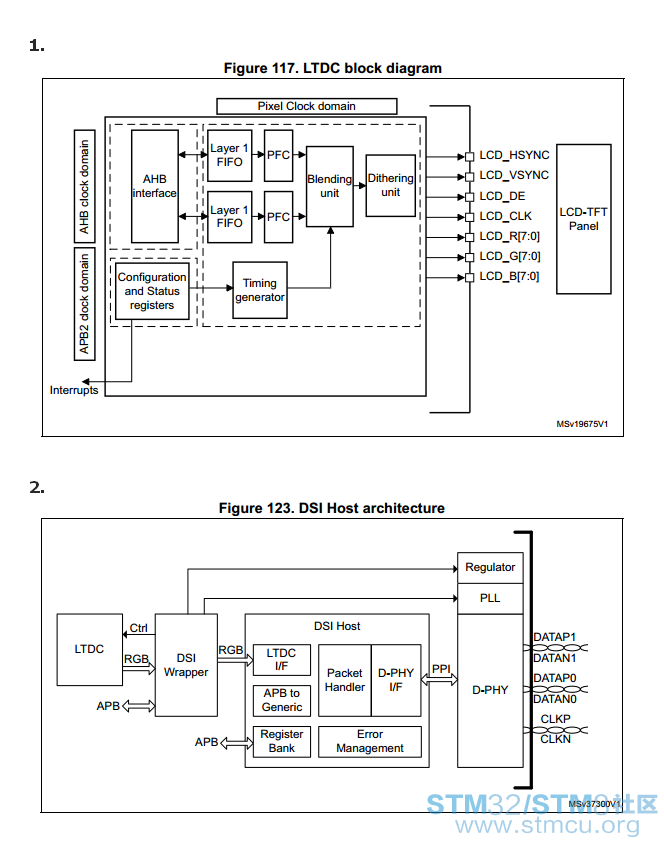
DSI-MIPI接口驱动LCD主要涉及到了外设有DSIHOST、LTDC、FMC(SDRAM)、DMA2D等。前2个外设DSIHOST、LTDC主要是数据传输控制接口;FMC(SDRAM)主要用于LCD的缓存使用;DMA2D是一个LCD专用的DMA,可实现方便快速的图像图层显示控制,在不占用CPU的情况话显示图片、文字等功能。虽然看起来可能设置比较复杂但是好在ST的开发包里面提供很多详细的配置例子,除此之外使用CubeMX也能通过图形的界面进行LCD驱动的配置,这都给我们入门学习这些新的外设提供了很多便捷。
通过下面的DSIHOST和LTDC的框图可以总体上对这个接口有个大致的了解:

LCD的初始化就说对DSI、LTDC、SDRAM、DMA2D进行初始化的配置,大致如下:
1)DSI
- /*************************DSI Initialization***********************************/
- /* Base address of DSI Host/Wrapper registers to be set before calling De-Init */
- hdsi_discovery.Instance = DSI;
- HAL_DSI_DeInit(&(hdsi_discovery));
- dsiPllInit.PLLNDIV = 100;
- dsiPllInit.PLLIDF = DSI_PLL_IN_DIV5;
- dsiPllInit.PLLODF = DSI_PLL_OUT_DIV1;
- laneByteClk_kHz = 62500; /* 500 MHz / 8 = 62.5 MHz = 62500 kHz */
- /* Set number of Lanes */
- hdsi_discovery.Init.NumberOfLanes = DSI_TWO_DATA_LANES;
- /* TXEscapeCkdiv = f(LaneByteClk)/15.62 = 4 */
- hdsi_discovery.Init.TXEscapeCkdiv = laneByteClk_kHz/15620;
- HAL_DSI_Init(&(hdsi_discovery), &(dsiPllInit));
- /* Timing parameters for all Video modes
- * Set Timing parameters of LTDC depending on its chosen orientation
- */
- if(orientation == LCD_ORIENTATION_PORTRAIT)
- {
- lcd_x_size = OTM8009A_480X800_WIDTH; /* 480 */
- lcd_y_size = OTM8009A_480X800_HEIGHT; /* 800 */
- }
- else
- {
- /* lcd_orientation == LCD_ORIENTATION_LANDSCAPE */
- lcd_x_size = OTM8009A_800X480_WIDTH; /* 800 */
- lcd_y_size = OTM8009A_800X480_HEIGHT; /* 480 */
- }
- HACT = lcd_x_size;
- VACT = lcd_y_size;
- /* The following values are same for portrait and landscape orientations */
- VSA = OTM8009A_480X800_VSYNC; /* 12 */
- VBP = OTM8009A_480X800_VBP; /* 12 */
- VFP = OTM8009A_480X800_VFP; /* 12 */
- HSA = OTM8009A_480X800_HSYNC; /* 63 */
- HBP = OTM8009A_480X800_HBP; /* 120 */
- HFP = OTM8009A_480X800_HFP; /* 120 */
- hdsivideo_handle.VirtualChannelID = LCD_OTM8009A_ID;
- hdsivideo_handle.ColorCoding = LCD_DSI_PIXEL_DATA_FMT_RBG888;
- hdsivideo_handle.VSPolarity = DSI_VSYNC_ACTIVE_HIGH;
- hdsivideo_handle.HSPolarity = DSI_HSYNC_ACTIVE_HIGH;
- hdsivideo_handle.DEPolarity = DSI_DATA_ENABLE_ACTIVE_HIGH;
- hdsivideo_handle.Mode = DSI_VID_MODE_BURST; /* Mode Video burst ie : one LgP per line */
- hdsivideo_handle.NullPacketSize = 0xFFF;
- hdsivideo_handle.NumberOfChunks = 0;
- hdsivideo_handle.PacketSize = HACT; /* Value depending on display orientation choice portrait/landscape */
- hdsivideo_handle.HorizontalSyncActive = (HSA * laneByteClk_kHz)/LcdClock;
- hdsivideo_handle.HorizontalBackPorch = (HBP * laneByteClk_kHz)/LcdClock;
- hdsivideo_handle.HorizontalLine = ((HACT + HSA + HBP + HFP) * laneByteClk_kHz)/LcdClock; /* Value depending on display orientation choice portrait/landscape */
- hdsivideo_handle.VerticalSyncActive = VSA;
- hdsivideo_handle.VerticalBackPorch = VBP;
- hdsivideo_handle.VerticalFrontPorch = VFP;
- hdsivideo_handle.VerticalActive = VACT; /* Value depending on display orientation choice portrait/landscape */
- /* Enable or disable sending LP command while streaming is active in video mode */
- hdsivideo_handle.LPCommandEnable = DSI_LP_COMMAND_ENABLE; /* Enable sending commands in mode LP (Low Power) */
- /* Largest packet size possible to transmit in LP mode in VSA, VBP, VFP regions */
- /* Only useful when sending LP packets is allowed while streaming is active in video mode */
- hdsivideo_handle.LPLargestPacketSize = 16;
- /* Largest packet size possible to transmit in LP mode in HFP region during VACT period */
- /* Only useful when sending LP packets is allowed while streaming is active in video mode */
- hdsivideo_handle.LPVACTLargestPacketSize = 0;
- /* Specify for each region of the video frame, if the transmission of command in LP mode is allowed in this region */
- /* while streaming is active in video mode */
- hdsivideo_handle.LPHorizontalFrontPorchEnable = DSI_LP_HFP_ENABLE; /* Allow sending LP commands during HFP period */
- hdsivideo_handle.LPHorizontalBackPorchEnable = DSI_LP_HBP_ENABLE; /* Allow sending LP commands during HBP period */
- hdsivideo_handle.LPVerticalActiveEnable = DSI_LP_VACT_ENABLE; /* Allow sending LP commands during VACT period */
- hdsivideo_handle.LPVerticalFrontPorchEnable = DSI_LP_VFP_ENABLE; /* Allow sending LP commands during VFP period */
- hdsivideo_handle.LPVerticalBackPorchEnable = DSI_LP_VBP_ENABLE; /* Allow sending LP commands during VBP period */
- hdsivideo_handle.LPVerticalSyncActiveEnable = DSI_LP_VSYNC_ENABLE; /* Allow sending LP commands during VSync = VSA period */
- /* Configure DSI Video mode timings with settings set above */
- HAL_DSI_ConfigVideoMode(&(hdsi_discovery), &(hdsivideo_handle));
- /*************************End DSI Initialization*******************************/
- /************************LTDC Initialization***********************************/
- /* Timing Configuration */
- hltdc_discovery.Init.HorizontalSync = (HSA - 1);
- hltdc_discovery.Init.AccumulatedHBP = (HSA + HBP - 1);
- hltdc_discovery.Init.AccumulatedActiveW = (lcd_x_size + HSA + HBP - 1);
- hltdc_discovery.Init.TotalWidth = (lcd_x_size + HSA + HBP + HFP - 1);
- /* Initialize the LCD pixel width and pixel height */
- hltdc_discovery.LayerCfg->ImageWidth = lcd_x_size;
- hltdc_discovery.LayerCfg->ImageHeight = lcd_y_size;
- /** LCD clock configuration
- * Note: The following values should not be changed as the PLLSAI is also used
- * to clock the USB FS
- * PLLSAI_VCO Input = HSE_VALUE/PLL_M = 1 Mhz
- * PLLSAI_VCO Output = PLLSAI_VCO Input * PLLSAIN = 384 Mhz
- * PLLLCDCLK = PLLSAI_VCO Output/PLLSAIR = 384 MHz / 7 = 54.85 MHz
- * LTDC clock frequency = PLLLCDCLK / LTDC_PLLSAI_DIVR_2 = 54.85 MHz / 2 = 27.429 MHz
- */
- PeriphClkInitStruct.PeriphClockSelection = RCC_PERIPHCLK_LTDC;
- PeriphClkInitStruct.PLLSAI.PLLSAIN = 384;
- PeriphClkInitStruct.PLLSAI.PLLSAIR = 7;
- PeriphClkInitStruct.PLLSAIDivR = RCC_PLLSAIDIVR_2;
- HAL_RCCEx_PeriphCLKConfig(&PeriphClkInitStruct);
- /* Background value */
- hltdc_discovery.Init.Backcolor.Blue = 0;
- hltdc_discovery.Init.Backcolor.Green = 0;
- hltdc_discovery.Init.Backcolor.Red = 0;
- hltdc_discovery.Init.PCPolarity = LTDC_PCPOLARITY_IPC;
- hltdc_discovery.Instance = LTDC;
- /* Get LTDC Configuration from DSI Configuration */
- HAL_LTDC_StructInitFromVideoConfig(&(hltdc_discovery), &(hdsivideo_handle));
- /* Initialize the LTDC */
- HAL_LTDC_Init(&hltdc_discovery);
- /* Enable the DSI host and wrapper after the LTDC initialization
- To avoid any synchronization issue, the DSI shall be started after enabling the LTDC */
- HAL_DSI_Start(&hdsi_discovery);
- #if !defined(DATA_IN_ExtSDRAM)
- /* Initialize the SDRAM */
- BSP_SDRAM_Init();
- #endif /* DATA_IN_ExtSDRAM */
- /* Initialize the font */
- BSP_LCD_SetFont(&LCD_DEFAULT_FONT);
- /************************End LTDC Initialization*******************************/
-
-
- /***********************OTM8009A Initialization********************************/
- /* Initialize the OTM8009A LCD Display IC Driver (KoD LCD IC Driver)
- * depending on configuration set in 'hdsivideo_handle'.
- */
- OTM8009A_Init(OTM8009A_FORMAT_RGB888, orientation);
- /***********************End OTM8009A Initialization****************************/
- /**
- * @brief Draws a pixel on LCD.
- * @param Xpos: X position
- * @param Ypos: Y position
- * @param RGB_Code: Pixel color in ARGB mode (8-8-8-8)
- */
- void BSP_LCD_DrawPixel(uint16_t Xpos, uint16_t Ypos, uint32_t RGB_Code)
- {
- /* Write data value to all SDRAM memory */
- *(__IO uint32_t*) (hltdc_discovery.LayerCfg[ActiveLayer].FBStartAdress + (4*(Ypos*BSP_LCD_GetXSize() + Xpos))) = RGB_Code;
- }

我们通过串口发送2个“弹幕”试下:分别为 “2017-02-19 16:17:33” “Hi,this message is from sscom...”
串口的接收函数使用的是前面帖子介绍的 超时中断接收不定长字符串。

2、QUADSPI 和中文字库
板载上有个NorFlash使用QUADSPI 接口可用于汉字库和图片的存储,我们将汉字库存在Norflash总然后利用QUADSPI 接口的memory-map 功能可以直接读取汉字进行显示,在程序中初始化后NorFlash之后通过内部的FLASH将汉字库写入到NorFlash之中然后在进行验证字库是否正确。
- BSP_QSPI_Init();
- CopyFont2NorFlash();
- BSP_QSPI_EnableMemoryMappedMode();
- CheckGBKFont4NorFlash();
- uint8_t BSP_QSPI_EnableMemoryMappedMode(void)
- {
- QSPI_CommandTypeDef s_command;
- QSPI_MemoryMappedTypeDef s_mem_mapped_cfg;
- /* Configure the command for the read instruction */
- s_command.InstructionMode = QSPI_INSTRUCTION_4_LINES;
- s_command.Instruction = QPI_READ_4_BYTE_ADDR_CMD;
- s_command.AddressMode = QSPI_ADDRESS_4_LINES;
- s_command.AddressSize = QSPI_ADDRESS_32_BITS;
- s_command.AlternateByteMode = QSPI_ALTERNATE_BYTES_NONE;
- s_command.DataMode = QSPI_DATA_4_LINES;
- s_command.DummyCycles = MX25L512_DUMMY_CYCLES_READ_QUAD_IO;
- s_command.DdrMode = QSPI_DDR_MODE_DISABLE;
- s_command.DdrHoldHalfCycle = QSPI_DDR_HHC_ANALOG_DELAY;
- s_command.SIOOMode = QSPI_SIOO_INST_EVERY_CMD;
- /* Configure the memory mapped mode */
- s_mem_mapped_cfg.TimeOutActivation = QSPI_TIMEOUT_COUNTER_DISABLE;
- s_mem_mapped_cfg.TimeOutPeriod = 0;
- if(HAL_QSPI_MemoryMapped(&QSPIHandle, &s_command, &s_mem_mapped_cfg) != HAL_OK)
- {
- return QSPI_ERROR;
- }
- return QSPI_OK;
- }

我们发送2个中文字符串试下:

3、手机发送“弹幕”
如果只能用电脑发送不能用手机发送弹幕,那绝对不是一个好弹幕,之前的帖子里面我们介绍了板载有个wifi模块的接口,通过这个接口我们
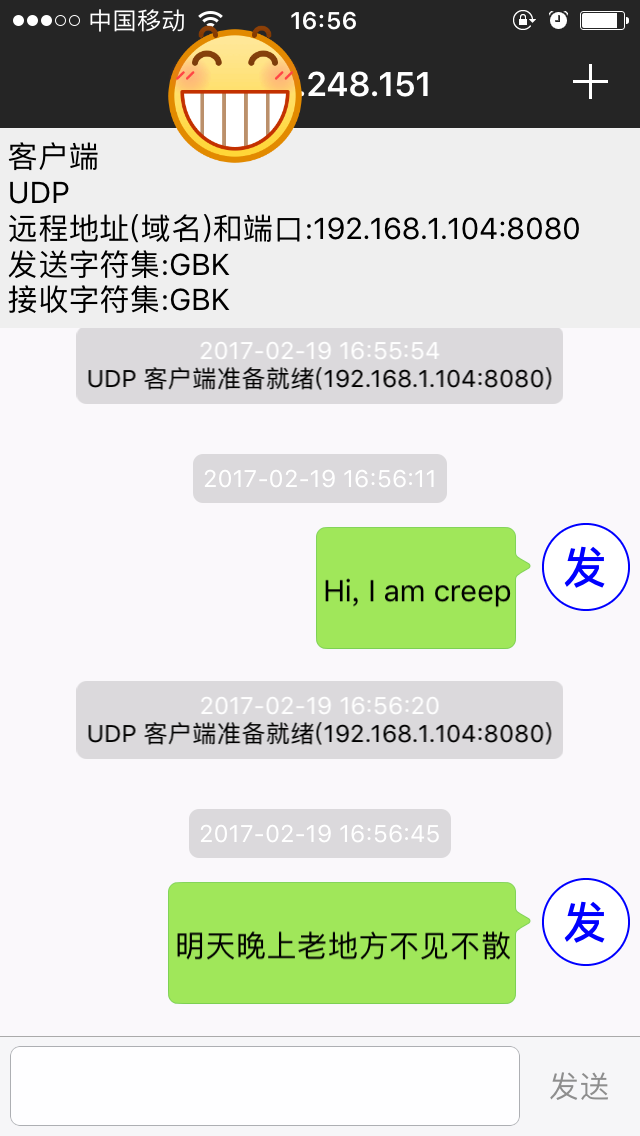
可以发送数据到LCD显示,我是通过建立一个UDP连接进行数据通信的。关于esp8266的AT命令和使用方法可以参考前面的帖子 。同样wifi接口的串口也是使用超时中断完成的。具体代码如下;
- void WIFI_ReceiverTimeOut_Callback(UART_HandleTypeDef *huart)
- {
- uint16_t len;
- uint32_t tmp1 = 0;
- tmp1 = __HAL_UART_GET_FLAG(huart, UART_FLAG_RTOF);
- if((tmp1 != RESET))
- {
- __HAL_UART_CLEAR_IT(huart, UART_CLEAR_RTOF);
- /* set uart state ready*/
- huart->RxState = HAL_UART_STATE_READY;
- /* Disable the rx DMA peripheral */
- __HAL_DMA_DISABLE(huart->hdmarx);
- /*Clear the DMA Stream pending flags.*/
- __HAL_DMA_CLEAR_FLAG(huart->hdmarx, __HAL_DMA_GET_TC_FLAG_INDEX(huart->hdmarx));
- /* get rx data len */
- len = huart->hdmarx->Instance->NDTR;
- WIFI_Rxlen = RXBUFFLENGTH - len;
- if(WIFI_Rxlen && WIFI_Init_Sta)
- {
- if(strlen((char*)WIFI_RxBuff))
- {
- if(WIFI_Rxlen > RXASCIIMAX) WIFI_Rxlen = RXBUFFLENGTH;
- if(Display_pos_dn == 0)Display_pos_dn = 14;
- Display_pos_dn--;
- memset(Display_Buff[Display_pos_dn],0,101);
- memcpy(Display_Buff[Display_pos_dn],WIFI_RxBuff,WIFI_Rxlen);
- }
- }
- /* Process Unlocked */
- __HAL_UNLOCK(huart->hdmarx);
-
- huart->hdmarx->State = HAL_DMA_STATE_READY;
- HAL_UART_Receive_DMA(huart, WIFI_RxBuff, RXBUFFLENGTH);
- WIFI_CMD_Response_Sta = ENABLE;
- }
- }
手机发送的“弹幕“如下;

LCD 显示如下:

当然截止到目前这还不算是个好的弹幕,这只能一个人自娱自乐,好的弹幕应该是很多人都能发。其实这样也不是很难,如果有个公网IP然后在路由器中做个端口映射那就在外面直接连上wiif模块发送弹幕了。上面有些GIF图片可能较大会加载较慢。
4、总结
最后我们看下main 函数:
- int main(void)
- {
- uint16_t x0,t;
- CPU_CACHE_Enable();
- HAL_Init();
- SystemClock_Config();
- USART1_Init();
- My_ESP8266_Init();
- HAL_Delay(200);
- ESP8266_Establish_UDP();
- ResetReciverBuff();
- BSP_LCD_Init();
- BSP_LCD_LayerDefaultInit(0, LCD_FB_START_ADDRESS);
- BSP_LCD_SetTextColor(LCD_COLOR_RED);
- BSP_LCD_Clear(LCD_COLOR_BLACK);
- BSP_LCD_SetBackColor(LCD_COLOR_BLACK);
- BSP_QSPI_Init();
- CopyFont2NorFlash();
- BSP_QSPI_EnableMemoryMappedMode();
- CheckGBKFont4NorFlash();
- HAL_Delay(500);
- BSP_LCD_Clear(LCD_COLOR_BLACK);
-
- for(t = 0;t < 14;t++)
- {
- memcpy(Display_Buff[t],TextBuff[t],strlen((const char*)TextBuff[t]));
- }
- while (1)
- {
- for(x0 = 0;x0 < 800;x0++)
- {
- for(t = 0;t < 14;t++)
- {
- BSP_LCD_SlideShow(x0,10 + 30*t,t);
- }
- }
- }
- }
帖子中用到的2个串口超时中断以及WIFI模块的AT命令可以参考下面的推荐阅读中详细内容。
推荐阅读:
串口接收超时中断和字符匹配中断
ESP8266简单上手
测试代码:
 Bullset screen_WIFI.rar
(2.32 MB, 下载次数: 70)
|


 Bullset screen_WIFI.rar
(2.32 MB, 下载次数: 70)
 微信公众号
微信公众号
 手机版
手机版

队长好
ios客户端
Windows客户端
gif动画怎么弄的?