|
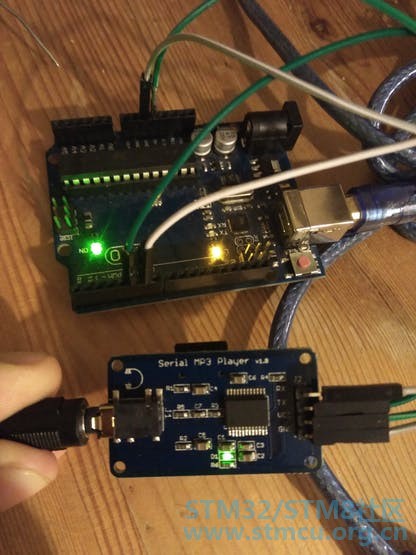
本帖最后由 点点&木木 于 2019-4-12 20:30 编辑 硬件组件 Arduino UNO和Genuino UNO × 1 catalex的串口MP3播放器 × 1 一些不错的朋克音乐 介绍 file:///C:/Users/ADMINI~1/AppData/Local/Temp/msohtmlclip1/01/clip_image001.png

arduino uno,mp3模块 如何使用CATALEX的SERIAL MP3PLAYER V1.0: 首先,像往常一样下载库: #include <SoftwareSerial.h> 现在我们选择将哪些Arduino引脚连接到mp3播放器并初始化串行协议。 #define ARDUINO_TX 6//connect to RX of the module SoftwareSerial mySerial(ARDUINO_RX, ARDUINO_TX);//init the serial protocol, tell to myserial wich pins are TX and RX 在这里,我只是从数据表翻译成#define //////////////////////////////////////////////////////////////////////////////////// //all the commands needed in the datasheet(http://geekmatic.in.ua/pdf/Catalex_MP3_board.pdf) static int8_t Send_buf[8] = {0} ;//The MP3 player undestands orders in a 8 int string //0X7E FF 06 command 00 00 00 EF;(if command =01 next song order) #define NEXT_SONG 0X01 #define PREV_SONG 0X02 #define CMD_PLAY_W_INDEX 0X03 //DATA IS REQUIRED (number of song) #define VOLUME_UP_ONE 0X04 #define VOLUME_DOWN_ONE 0X05 #define CMD_SET_VOLUME 0X06//DATA IS REQUIRED (number of volume from 0 up to 30(0x1E)) #define SET_DAC 0X17 #define CMD_PLAY_WITHVOLUME 0X22 //data is needed 0x7E 06 22 00 xx yy EF;(xx volume)(yy number of song) #define CMD_SEL_DEV 0X09 //SELECT STORAGE DEVICE, DATA IS REQUIRED #define DEV_TF 0X02 //HELLO,IM THE DATA REQUIRED #define SLEEP_MODE_START 0X0A #define SLEEP_MODE_WAKEUP 0X0B #define CMD_RESET 0X0C//CHIP RESET #define CMD_PLAY 0X0D //RESUME PLAYBACK #define CMD_PAUSE 0X0E //PLAYBACK IS PAUSED #define CMD_PLAY_WITHFOLDER 0X0F//DATA IS NEEDED, 0x7E 06 0F 00 01 02 EF;(play the song with the directory \01\002xxxxxx.mp3 #define STOP_PLAY 0X16 #define PLAY_FOLDER 0X17// data is needed 0x7E 06 17 00 01 XX EF;(play the 01 folder)(value xx we dont care) #define SET_CYCLEPLAY 0X19//data is needed 00 start; 01 close #define SET_DAC 0X17//data is needed 00 start DAC OUTPUT;01 DAC no output //////////////////////////////////////////////////////////////////////////////////// MP3芯片不符合使用此格式的int数组[8]的命令 0x7E FF aa bb 00 xx yy EF 哪里: 第一个和最后一个int用0x7E和0xEF值固定 aa 是版本号,只需输入0x06; bb 是前一点中列出的实际控制命令 xx 首先是数据的b int yy 是数据的第二个int 这是构建数组的实际函数。我们只需要选择其中一个#defined命令并输入数据的值。 void sendCommand(int8_t command, int16_t dat) { delay(20); Send_buf[0] = 0x7e; //starting byte Send_buf[1] = 0xff; //version Send_buf[2] = 0x06; //the number of bytes of the command without starting byte and ending byte Send_buf[3] = command; // Send_buf[4] = 0x00;//0x00 = no feedback, 0x01 = feedback Send_buf[5] = (int8_t)(dat >> 8);//datah Send_buf[6] = (int8_t)(dat); //datal Send_buf[7] = 0xef; //ending byte for(uint8_t i=0; i<8; i++)// { mySerial.write(Send_buf) ; } } 进入设置功能,我们需要为TF选择合适的设备并给它时间来解决: mySerial.begin(9600); //Start our Serial coms for our serial monitor! delay(500); //Wait chip initialization is complete sendCommand(CMD_SEL_DEV, DEV_TF); //select the TF card delay(200); //wait for 200ms } 在循环中,我做了一个简单的播放标记为001的歌曲: void loop() { sendCommand(CMD_PLAY_WITHVOLUME, 0X0F01);//play the first song with volume 15 class delay(1000000);//the programm will send the play option each 100 seconds to the catalex chip } 如何将歌曲上传到SD卡: 正如他们在数据表中所说的英语非常糟糕: file:///C:/Users/ADMINI~1/AppData/Local/Temp/msohtmlclip1/01/clip_image001.png

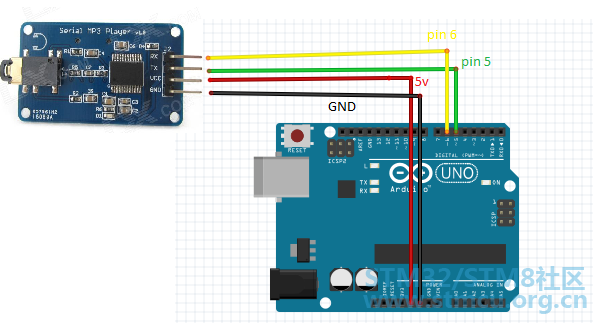
我在这里做得很好 Mp3芯片读取.mp3或.wav按字母顺序索引,因此如果我们创建名称为01,02的文件夹,并且带有名称的歌曲001xxxxx.mp3,002xxxx.mp3。我们可以确定我们正在使用的歌曲/文件夹。 EXTRA: 相同的代码,但使用硬件序列(我不得不用我的STM32板) 原理图 
代码 //code rearranged by Javier Muñoz10/11/2016 ask me at javimusama@hotmail.com #include <SoftwareSerial.h> #define ARDUINO_RX 5//should connect to TX of the Serial MP3 Player module #define ARDUINO_TX 6//connect to RX of the module SoftwareSerial mySerial(ARDUINO_RX, ARDUINO_TX);//init the serial protocol, tell tomyserial wich pins are TX and RX //////////////////////////////////////////////////////////////////////////////////// //all the commands needed in thedatasheet(http://geekmatic.in.ua/pdf/Catalex_MP3_board.pdf) static int8_t Send_buf[8] = {0} ;//The MP3 player undestands orders in a 8 int string //0X7E FF 06 command 00 00 00 EF;(if command =01 nextsong order) #define NEXT_SONG 0X01 #define PREV_SONG 0X02 #define CMD_PLAY_W_INDEX 0X03 //DATA IS REQUIRED (number of song) #define VOLUME_UP_ONE 0X04 #define VOLUME_DOWN_ONE 0X05 #define CMD_SET_VOLUME 0X06//DATA IS REQUIRED (number of volume from 0 up to30(0x1E)) #define SET_DAC 0X17 #define CMD_PLAY_WITHVOLUME 0X22 //data is needed 0x7E 06 22 00 xx yy EF;(xx volume)(yy number of song) #define CMD_SEL_DEV 0X09 //SELECT STORAGE DEVICE, DATA IS REQUIRED #define DEV_TF 0X02 //HELLO,IM THE DATAREQUIRED #define SLEEP_MODE_START 0X0A #define SLEEP_MODE_WAKEUP 0X0B #define CMD_RESET 0X0C//CHIP RESET #define CMD_PLAY 0X0D //RESUME PLAYBACK #define CMD_PAUSE 0X0E //PLAYBACK IS PAUSED #define CMD_PLAY_WITHFOLDER 0X0F//DATA IS NEEDED, 0x7E 06 0F 00 01 02 EF;(play the songwith the directory \01\002xxxxxx.mp3 #define STOP_PLAY 0X16 #define PLAY_FOLDER 0X17// data is needed 0x7E 06 17 00 01 XX EF;(play the 01folder)(value xx we dont care) #define SET_CYCLEPLAY 0X19//data is needed 00 start; 01 close #define SET_DAC 0X17//data is needed 00 start DAC OUTPUT;01 DAC no output //////////////////////////////////////////////////////////////////////////////////// void setup() { Serial.begin(9600);//Start our Serial coms for serial monitor in our pc mySerial.begin(9600);//Start our Serial coms for THE MP3 delay(500);//Wait chip initialization is complete sendCommand(CMD_SEL_DEV, DEV_TF);//select the TF card delay(200);//wait for 200ms } void loop() { sendCommand(CMD_PLAY_WITHVOLUME, 0X0F01);//play the first song with volume 15 class delay(1000000);//the programm will send the play optioneach 100 seconds to the catalex chip } void sendCommand(int8_t command, int16_t dat) { delay(20); Send_buf[0] = 0x7e; //starting byte Send_buf[1] = 0xff; //version Send_buf[2] = 0x06; //the number of bytes of the command without startingbyte and ending byte Send_buf[3] = command; // Send_buf[4] = 0x00;//0x00 = no feedback, 0x01 = feedback Send_buf[5] = (int8_t)(dat >> 8);//datah Send_buf[6] = (int8_t)(dat); //datal Send_buf[7] = 0xef; //ending byte for(uint8_t i=0; i<8; i++)// { mySerial.write(Send_buf) ;//send bit to serial mp3 Serial.print(Send_buf,HEX);//send bit to serial monitor in pc } Serial.println(); } |
 微信公众号
微信公众号
 手机版
手机版
