|
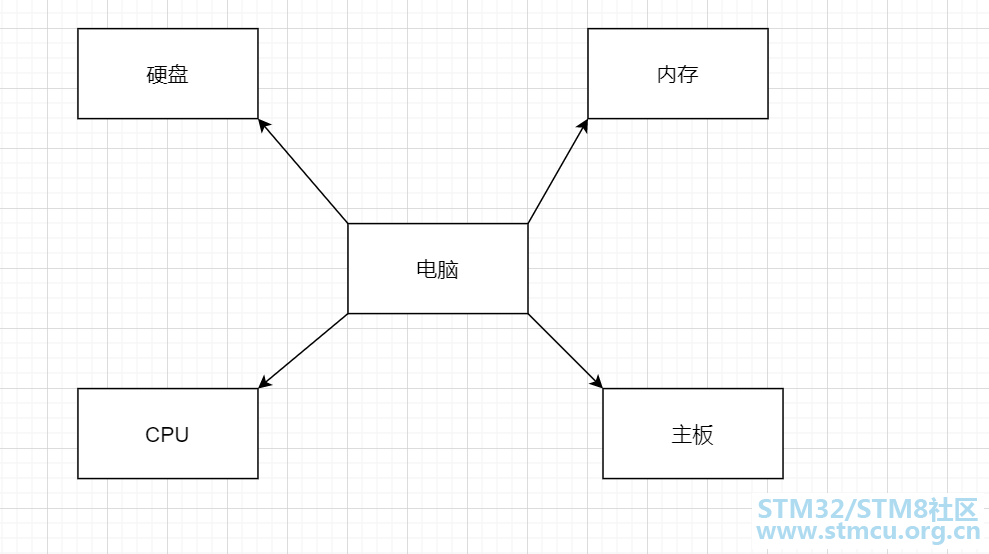
一、类的组合关系: 1、整体与部分的关系 组合关系,从字面上来理解的话,就是谁也离不开谁,必须相互组合在一起才行,例如我们生活当中的电脑组成: 
代码示例: #include <iostream>#include <string> using namespace std; class Memory { public: Memory() { cout << "Memory()" << endl; } ~Memory() { cout << "~Memory()" << endl; } }; class Disk { public: Disk() { cout << "Disk()" << endl; } ~Disk() { cout << "~Disk()" << endl; } }; class CPU { public: CPU() { cout << "CPU()" << endl; } ~CPU() { cout << "~CPU()" << endl; } }; class MainBoard { public: MainBoard() { cout << "MainBoard()" << endl; } ~MainBoard() { cout << "~MainBoard()" << endl; } }; class Computer // 这个地方不仅描述了事物,也还描述了关系,里面只要有一个类不存在,电脑这个类也就不复存在了。 { Memory mMem; Disk mDisk; CPU mCPU; MainBoard mMainBoard; public: Computer()// 这里会先调用类成员的构造函数,之后调用电脑类的构造函数,这说明了组合关系;电脑类对象的创建,要依赖上述四个类的对象的创建。 { cout << "Computer()" << endl; } void power() { cout << "power()" << endl; } void reset() { cout << "reset()" << endl; } ~Computer()// 电脑类析构的时候,也会将对应的类成员析构,这说明同生死;说明了电脑类对象的存在完全依赖于类成员对象的存在。 { { cout << "~Computer()" << endl; } }; int main() { Computer c; return 0; } 运行结果: root@txp-virtual-machine:/home/txp# ./a.outMemory() Disk() CPU() MainBoard() Computer() ~Computer() ~MainBoard() ~CPU() ~Disk() ~Memory() 2、组合关系的特点:
二、类的继承关系: 说到这个继承,你可以把它类比成生活当中的父亲和儿子,儿子继承的父亲的长相特征。那么在我们面向对象中继的承又是指什么呢? 1、面向对象中的继承是指类之间的父子关系
2、继承代码描述形式: class Parent{ int mv; public: void method() { } }; class Child : public Parent//描述继承关系 { }; 代码示例: #include <iostream>#include <string> using namespace std; class Parent { int mv; public: Parent() { cout << "Parent()" << endl; mv = 100; } void method() { cout << "mv = " << mv << endl; } }; class Child : public Parent { public: void hello() { cout << "I'm Child calss!" << endl; } }; int main() { Child c; c.hello(); c.method(); return 0; } 运行结果: root@txp-virtual-machine:/home/txp# ./a.outParent() I'm Child class! mv= 10 3、继承规则:
说明:继承是c++中代码复用的重要手段。通过继承,可以获得父类的所有功能,并且可以在子类中重写已有的功能,或者添加新功能。 代码示例: #include <iostream>#include <string> using namespace std; class Memory { public: Memory() { cout << "Memory()" << endl; } ~Memory() { cout << "~Memory()" << endl; } }; class Disk { public: Disk() { cout << "Disk()" << endl; } ~Disk() { cout << "~Disk()" << endl; } }; class CPU { public: CPU() { cout << "CPU()" << endl; } ~CPU() { cout << "~CPU()" << endl; } }; class MainBoard { public: MainBoard() { cout << "MainBoard()" << endl; } ~MainBoard() { cout << "~MainBoard()" << endl; } }; class Computer { Memory mMem; Disk mDisk; CPU mCPU; MainBoard mMainBoard; public: Computer() { cout << "Computer()" << endl; } void power() { cout << "power()" << endl; } void reset() { cout << "reset()" << endl; } ~Computer() { cout << "~Computer()" << endl; } }; class HPBook : public Computer { string mOS; public: HPBook() { mOS = "Windows 8"; } void install(string os) { mOS = os; } void OS() { cout << mOS << endl; } }; class MacBook : public Computer { public: void OS() { cout << "Mac OS" << endl; } }; int main() { HPBook hp; hp.power(); hp.install("Ubuntu 16.04 LTS"); hp.OS(); cout << endl; MacBook mac; mac.OS(); return 0; } 运行结果: root@txp-virtual-machine:/home/txp# ./a.outMemory() Disk() CPU() MainBoard() Computer() power() Ubuntu 16.04 LTS Memory() Disk() CPU() MainBoard() Computer() Mac OS ~Computer() ~MainBoard() ~CPU() ~Disk() ~Memory() ~Computer() ~MainBoard() ~CPU() ~Disk() ~Memory() 4、小结:
三、总结: 好了,今天的分享就到这里,如果文章中有错误或者不理解的地方,可以交流互动,一起进步。 |
 微信公众号
微信公众号
 手机版
手机版
