记录学习

点灯大师
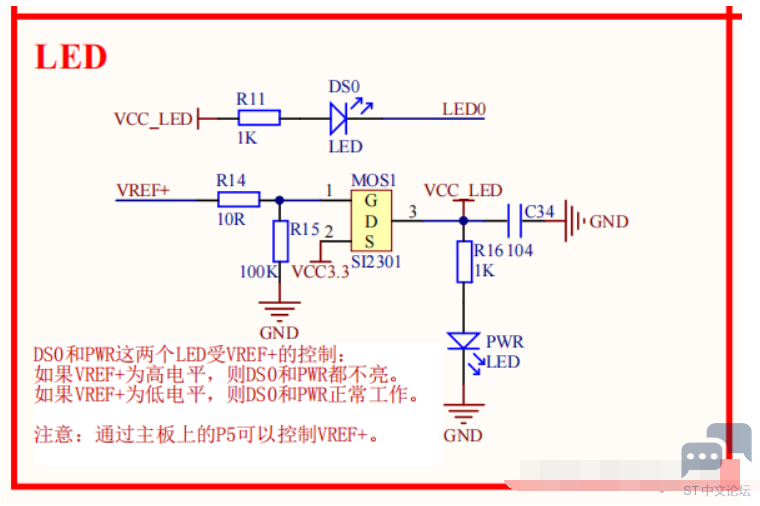
原理图:


工程
![8H_H)6MMGRJ8PJJDX]ECH`5.png 8H_H)6MMGRJ8PJJDX]ECH`5.png](data/attachment/forum/202205/07/180740tllzzfql4fn22rly.png)
在自定义库文件中新建led,c和,h文件(文件名字和存放位置根据自己喜好和习惯)
编程逻辑
1.使能 GPIO 端口时钟;
2.初始化 GPIO 目标引脚为推挽输出模式;
3.编写简单测试程序,控制 GPIO 引脚输出高、低电平;
源代码
led.h
- #ifndef __LED_H
- #define __LED_H
- #include "stm32f4xx.h"
- //引脚定义
- // 绿色灯
- #define LED1_PIN GPIO_Pin_0
- #define LED1_GPIO_PORT GPIOB
- #define LED1_GPIO_CLK RCC_AHB1Periph_GPIOB
- // 红色灯
- #define LED0_PIN GPIO_Pin_1
- #define LED0_GPIO_PORT GPIOB
- #define LED0_GPIO_CLK RCC_AHB1Periph_GPIOB
- /************************************************************/
- /** 控制LED灯亮灭的宏
- * LED低电平亮,设置ON=0,OFF=1
- * 若LED高电平亮,把宏设置成ON=1,OFF=0
- */
- #define ON 0
- #define OFF 1
- /* 带参宏 像内联函数一样使用*/
- #define LED0(a) if (a) \
- GPIO_SetBits(LED0_GPIO_PORT,LED0_PIN);\
- else \
- GPIO_ResetBits(LED0_GPIO_PORT,LED0_PIN)
- #define LED1(a) if (a) \
- GPIO_SetBits(LED1_GPIO_PORT,LED1_PIN);\
- else \
- GPIO_ResetBits(LED1_GPIO_PORT,LED1_PIN)
- /* Ö±½Ó²Ù×÷¼Ä´æÆ÷µÄ·½·¨¿ØÖÆIO */
- #define digitalHi(p,i) {p->BSRRL=i;} //设置为高电平
- #define digitalLo(p,i) {p->BSRRH=i;} //输出低电平
- #define digitalToggle(p,i) {p->ODR ^=i;} //输出反转状态
- /* ¶¨Òå¿ØÖÆIOµÄºê */
- #define LED0_TOGGLE digitalToggle(LED0_GPIO_PORT,LED0_PIN)
- #define LED0_OFF digitalHi(LED0_GPIO_PORT,LED0_PIN)
- #define LED0_ON digitalLo(LED0_GPIO_PORT,LED0_PIN)
- #define LED1_TOGGLE digitalToggle(LED1_GPIO_PORT,LED1_PIN)
- #define LED1_OFF digitalHi(LED1_GPIO_PORT,LED1_PIN)
- #define LED1_ON digitalLo(LED1_GPIO_PORT,LED1_PIN)
- #define LED_RED \
- LED0_ON;\
- LED1_OFF;\
-
- //ÂÌ
- #define LED_GREEN \
- LED0_OFF;\
- LED1_ON;\
-
- //全部点亮
- #define LED_all \
- LED0_ON;\
- LED1_ON;\
-
- //全部点灭
- #define LED_allOFF \
- LED0_OFF;\
- LED1_OFF;\
-
- void LED_GPIO_Config(void);
- #endif /* __LED_H */
led.c
- #include "led.h"
- void LED_GPIO_Config(void)
- {
- /* 定义一个GPIO_InitTypeDef类型的结构体 初始化*/
- GPIO_InitTypeDef GPIO_InitStructure;
- /* 开启LED相关的GPIO外设时钟 */
- RCC_AHB1PeriphClockCmd ( LED0_GPIO_CLK|
- LED1_GPIO_CLK, ENABLE);
-
- GPIO_InitStructure.GPIO_Pin = LED0_PIN; //选择要控制的GPIO引脚
- GPIO_InitStructure.GPIO_Mode = GPIO_Mode_OUT; //设置引脚模式为输出模式
- GPIO_InitStructure.GPIO_OType = GPIO_OType_PP; //设置引脚的输出类型为推挽输出
- GPIO_InitStructure.GPIO_PuPd = GPIO_PuPd_UP; //设置引脚为上拉模式
- GPIO_InitStructure.GPIO_Speed = GPIO_Speed_2MHz; //设置引脚速率为2MHz
-
- GPIO_Init(LED0_GPIO_PORT, &GPIO_InitStructure);
-
- GPIO_InitStructure.GPIO_Pin = LED1_PIN;
- GPIO_Init(LED1_GPIO_PORT, &GPIO_InitStructure);
-
- }
main.c
- #include "stm32f4xx.h"
- #include "led.h"
- void Delay(__IO u32 nCount);
- int main(void)
- {
- /* LED 端口初始化 */
- LED_GPIO_Config();
- /* 控制LED灯 */
- while (1)
- {
- LED0( ON ); //点亮
- Delay(0xFFFFFF);
- LED0( OFF ); //熄灭
-
- LED1( ON ); //点亮
- Delay(0xFFFFFF);
- LED1( OFF ); //熄灭
-
- }
- }
- void Delay(__IO uint32_t nCount) //简单的延时函数
- {
- for(; nCount != 0; nCount--);
- }
- /********************************************* END ******************************************/
|

.png) STMCU小助手
发布时间:2022-5-8 17:00
STMCU小助手
发布时间:2022-5-8 17:00


![8H_H)6MMGRJ8PJJDX]ECH`5.png 8H_H)6MMGRJ8PJJDX]ECH`5.png](data/attachment/forum/202205/07/180740tllzzfql4fn22rly.png)
 微信公众号
微信公众号
 手机版
手机版
