最近在学习STM8,和大家分享一个将串口重定向到printf的程序,在程序中可以直接使用pfintf打印注释,在不使用串口的情况下可以使用。开发环境是IAR FOR STM8 使用的库函数,代码有点粗糙,大家可以在此基础是进行优化,我只是做个例子。首先使内部高速16M时钟- CLK_HSICmd(ENABLE);
- CLK_HSIPrescalerConfig(CLK_PRESCALER_HSIDIV1);
串口2初始化
- /*1位起始位 8位数据位 结束位由CR3设置 不使用奇偶校验 不使能奇偶校验中断*/
- /*使能发送和接收 接收中断使能 禁止发送中断*/
- /*设置1位停止位 不使能SCLK,波特率115200*/
- void uart2Init()
- {
- UART2_DeInit();
- UART2_Init((uint32_t)115200, UART2_WORDLENGTH_8D, UART2_STOPBITS_1, \
- UART2_PARITY_NO , UART2_SYNCMODE_CLOCK_DISABLE , UART2_MODE_TXRX_ENABLE);
- UART2_ITConfig(UART2_IT_RXNE_OR,ENABLE );
- UART2_Cmd(ENABLE );
- }
全能中断
关于串口发送与接收的一些函数
- //串口发送一个字节
- void uart2SendByte(uint8_t data)
- {
- UART2->DR=data;
- /* Loop until the end of transmission */
- while (!(UART2->SR & UART2_FLAG_TXE));
- }
- //串口改善字符串
- void uart2SendString(uint8_t* Data,uint16_t len)
- {
- uint16_t i=0;
- for(;i<len;i++)
- uart2SendByte(Data[i]);
- }
- //串口接收一个字节
- uint8_t uart2ReceiveByte(void)
- {
- uint8_t USART2_RX_BUF;
- while (!(UART2->SR & UART2_FLAG_RXNE));
- USART2_RX_BUF=(uint8_t)UART2->DR;
- return USART2_RX_BUF;
- }
- /*将Printf内容发往串口*/
- int fputc(int ch, FILE *f)
- {
- UART2->DR=(unsigned char)ch;
- while (!(UART2->SR & UART2_FLAG_TXE));
- return (ch);
- }
- INTERRUPT_HANDLER(UART2_RX_IRQHandler, 21)
- {
- /* In order to detect unexpected events during development,
- it is recommended to set a breakpoint on the following instruction.
- */
- uint8_t Res;
- if(UART2->SR & UART2_FLAG_RXNE)
- {/*接收中断(接收到的数据必须是0x0d 0x0a结尾)*/
- Res =(uint8_t)UART2->DR;
- /*(USART1->DR);读取接收到的数据,当读完数据后自动取消RXNE的中断标志位*/
- if(( UART_RX_NUM&0x80)==0)/*接收未完成*/
- {
- if( UART_RX_NUM&0x40)/*接收到了0x0d*/
- {
- if(Res!=0x0a) UART_RX_NUM=0;/*接收错误,重新开始*/
- else UART_RX_NUM|=0x80; /*接收完成了 */
- }
- else /*还没收到0X0D*/
- {
- if(Res==0x0d) UART_RX_NUM|=0x40;
- else
- {
- RxBuffer[ UART_RX_NUM&0X3F]=Res ;
- UART_RX_NUM++;
- if( UART_RX_NUM>63) UART_RX_NUM=0;/*接收数据错误,重新开始接收*/
- }
- }
- }
- }
- }
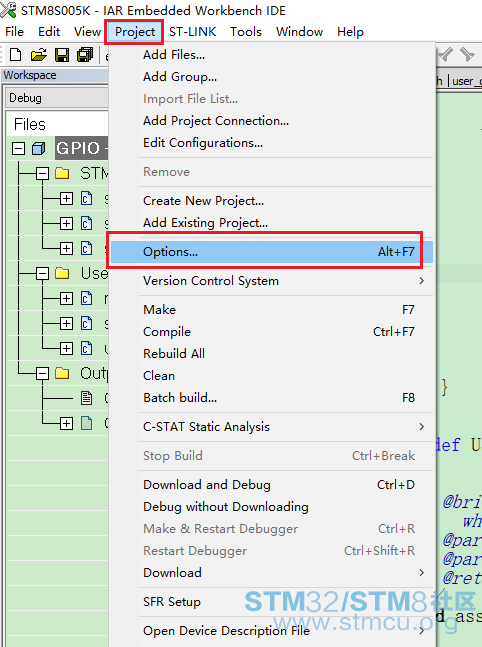
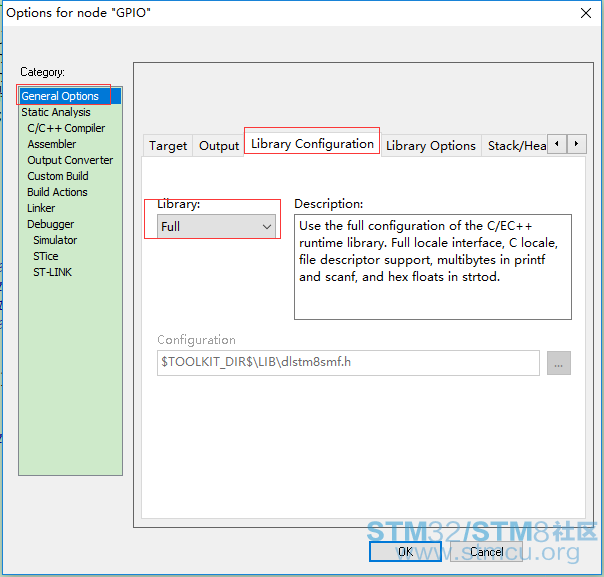
再将IAR设置一下


这样就可以使用printf函数了
- while(1)
- {
- /*
- GPIO_WriteLow(GPIOD,GPIO_PIN_2);
- if(++ii>250)
- ii=0;
- printf("\r\n ii=%3d",ii);
- delay(9000);
- GPIO_WriteReverse(GPIOA,GPIO_PIN_1);
- delay(9000);
- */
- if(UART_RX_NUM&0x80)
- {
- len=UART_RX_NUM&0x3f;/*得到此次接收到的数据长度*/
- uart2SendString("You sent the messages is:",sizeof("You sent the messages is"));
- uart2SendString(RxBuffer,len);
- printf("\r\n得到此次接收到的数据长度:%dByte\r\n",len);
- UART_RX_NUM=0;
- }
- }
下面附上工程代码。
 STM8S005K_printf.zip
(5.11 MB, 下载次数: 76)
|


 STM8S005K_printf.zip
(5.11 MB, 下载次数: 76)
 微信公众号
微信公众号
 手机版
手机版

https://www.stmcu.org.cn/module/forum/thread-615497-1-1.html