本帖最后由 anobodykey 于 2018-5-15 14:03 编辑
主机环境:Windows 7 SP1 编译器版本:gcc-arm-none-eabi-7-2017-q4-major-win32 目标板:STM32F103C8T6单板 STM32库版本:STM32Cube_FW_F1_V1.6.0 XMAKE版本:2.1.9 之前一段时间一直在思索跨平台开发的问题,以前开发STM32用的是MDK开发环境,但该软件又只能在Windows平台使用,跨平台的集成开发环境有SW4STM32(支持windows、macos、linux),TureStudio(支持windows、linux),以及Embeded Studio(支持windows、macos、linux),最后的选择就是gcc了。其实SW4STM32和TureStudio也都是基于gcc的,两者基本类似,而Embeded Studio之前用过几次版本更新的也挺快的,就是现在要申请license才能编译,懒得弄了,刚好借此来学习一下gcc,网上大多数gcc历程都是gcc+eclipse+makefile的组合。之前申请了一块NXP的54608板卡,在SDK中有提到CMake,就去网上了解了一下,是一个挺好的工具,同时又知晓了另一个构建工具,即今天的主题-XMake,网址如下:http://xmake.io,有兴趣的可以去了解一下,xmake与cmake的区别是它不是生成工程文件为主,而是直接去编译,采用lua语言,支持三大平台,目前我也只是去官网学习了一下,还是处于一知半解的状态,因此用它来构建一下STM32来学习一下xmake和gcc,可谓是一举两得。
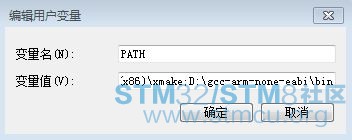
首先是安装xmake以及gcc工具链,并把它们添加到PATH中,如下:
接下来是编辑好我们的源码文件,由于只是学习,只需要很简单的功能即可,这里就以串口为例,进行简单的输出,拷贝UART_TwoBoards_ComPolling工程,命名为UART_Xmake,组织如下:
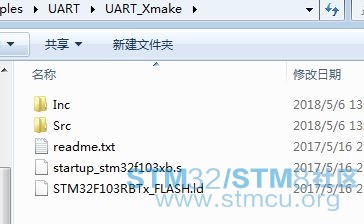
其中启动文件以及链接文件是从SW4STM32示例中拷贝出来的,主程序如下: - /**
- ******************************************************************************
- * @file UART/UART_TwoBoards_ComPolling/Src/main.c
- * @author MCD Application Team
- * @version V1.5.0
- * @date 14-April-2017
- * @brief This sample code shows how to use UART HAL API to transmit
- * and receive a data buffer with a communication process based on
- * polling transfer.
- * The communication is done using 2 Boards.
- ******************************************************************************
- * @attention
- *
- * <h2><center>© COPYRIGHT(c) 2016 STMicroelectronics</center></h2>
- *
- * Redistribution and use in source and binary forms, with or without modification,
- * are permitted provided that the following conditions are met:
- * 1. Redistributions of source code must retain the above copyright notice,
- * this list of conditions and the following disclaimer.
- * 2. Redistributions in binary form must reproduce the above copyright notice,
- * this list of conditions and the following disclaimer in the documentation
- * and/or other materials provided with the distribution.
- * 3. Neither the name of STMicroelectronics nor the names of its contributors
- * may be used to endorse or promote products derived from this software
- * without specific prior written permission.
- *
- * THIS SOFTWARE IS PROVIDED BY THE COPYRIGHT HOLDERS AND CONTRIBUTORS "AS IS"
- * AND ANY EXPRESS OR IMPLIED WARRANTIES, INCLUDING, BUT NOT LIMITED TO, THE
- * IMPLIED WARRANTIES OF MERCHANTABILITY AND FITNESS FOR A PARTICULAR PURPOSE ARE
- * DISCLAIMED. IN NO EVENT SHALL THE COPYRIGHT HOLDER OR CONTRIBUTORS BE LIABLE
- * FOR ANY DIRECT, INDIRECT, INCIDENTAL, SPECIAL, EXEMPLARY, OR CONSEQUENTIAL
- * DAMAGES (INCLUDING, BUT NOT LIMITED TO, PROCUREMENT OF SUBSTITUTE GOODS OR
- * SERVICES; LOSS OF USE, DATA, OR PROFITS; OR BUSINESS INTERRUPTION) HOWEVER
- * CAUSED AND ON ANY THEORY OF LIABILITY, WHETHER IN CONTRACT, STRICT LIABILITY,
- * OR TORT (INCLUDING NEGLIGENCE OR OTHERWISE) ARISING IN ANY WAY OUT OF THE USE
- * OF THIS SOFTWARE, EVEN IF ADVISED OF THE POSSIBILITY OF SUCH DAMAGE.
- *
- ******************************************************************************
- */
- /* Includes ------------------------------------------------------------------*/
- #include "main.h"
- /** @addtogroup STM32F1xx_HAL_Examples
- * @{
- */
- /** @addtogroup UART_TwoBoards_ComPolling
- * @{
- */
- /* Private typedef -----------------------------------------------------------*/
- /* Private define ------------------------------------------------------------*/
- //#define TRANSMITTER_BOARD
- /* Private macro -------------------------------------------------------------*/
- /* Private variables ---------------------------------------------------------*/
- /* UART handler declaration */
- UART_HandleTypeDef UartHandle;
- /* Buffer used for transmission */
- uint8_t aTxBuffer[] = " **** UART_Xmake sample ****";
- /* Private function prototypes -----------------------------------------------*/
- void SystemClock_Config(void);
- static void Error_Handler(void);
- /* Private functions ---------------------------------------------------------*/
- /**
- * @brief Main program
- * @param None
- * @retval None
- */
- int main(void)
- {
- /* STM32F103xB HAL library initialization:
- - Configure the Flash prefetch
- - Systick timer is configured by default as source of time base, but user
- can eventually implement his proper time base source (a general purpose
- timer for example or other time source), keeping in mind that Time base
- duration should be kept 1ms since PPP_TIMEOUT_VALUEs are defined and
- handled in milliseconds basis.
- - Set NVIC Group Priority to 4
- - Low Level Initialization
- */
- HAL_Init();
- /* Configure the system clock to 64 MHz */
- SystemClock_Config();
- /*##-1- Configure the UART peripheral ######################################*/
- /* Put the USART peripheral in the Asynchronous mode (UART Mode) */
- /* UART configured as follows:
- - Word Length = 8 Bits
- - Stop Bit = One Stop bit
- - Parity = None
- - BaudRate = 9600 baud
- - Hardware flow control disabled (RTS and CTS signals) */
- UartHandle.Instance = USARTx;
- UartHandle.Init.BaudRate = 9600;
- UartHandle.Init.WordLength = UART_WORDLENGTH_8B;
- UartHandle.Init.StopBits = UART_STOPBITS_1;
- UartHandle.Init.Parity = UART_PARITY_NONE;
- UartHandle.Init.HwFlowCtl = UART_HWCONTROL_NONE;
- UartHandle.Init.Mode = UART_MODE_TX_RX;
- if(HAL_UART_DeInit(&UartHandle) != HAL_OK)
- {
- Error_Handler();
- }
- if(HAL_UART_Init(&UartHandle) != HAL_OK)
- {
- Error_Handler();
- }
-
- /*##-2- Start the transmission process #####################################*/
- /* While the UART in reception process, user can transmit data through
- "aTxBuffer" buffer */
- if(HAL_UART_Transmit(&UartHandle, (uint8_t*)aTxBuffer, TXBUFFERSIZE, 5000)!= HAL_OK)
- {
- Error_Handler();
- }
- /* Infinite loop */
- while (1)
- {
- }
- }
- /**
- * @brief System Clock Configuration
- * The system Clock is configured as follow :
- * System Clock source = PLL (HSI)
- * SYSCLK(Hz) = 64000000
- * HCLK(Hz) = 64000000
- * AHB Prescaler = 1
- * APB1 Prescaler = 2
- * APB2 Prescaler = 1
- * PLLMUL = 16
- * Flash Latency(WS) = 2
- * @param None
- * @retval None
- */
- void SystemClock_Config(void)
- {
- RCC_ClkInitTypeDef clkinitstruct = {0};
- RCC_OscInitTypeDef oscinitstruct = {0};
-
- /* Configure PLL ------------------------------------------------------*/
- /* PLL configuration: PLLCLK = (HSI / 2) * PLLMUL = (8 / 2) * 16 = 64 MHz */
- /* PREDIV1 configuration: PREDIV1CLK = PLLCLK / HSEPredivValue = 64 / 1 = 64 MHz */
- /* Enable HSI and activate PLL with HSi_DIV2 as source */
- oscinitstruct.OscillatorType = RCC_OSCILLATORTYPE_HSI;
- oscinitstruct.HSEState = RCC_HSE_OFF;
- oscinitstruct.LSEState = RCC_LSE_OFF;
- oscinitstruct.HSIState = RCC_HSI_ON;
- oscinitstruct.HSICalibrationValue = RCC_HSICALIBRATION_DEFAULT;
- oscinitstruct.HSEPredivValue = RCC_HSE_PREDIV_DIV1;
- oscinitstruct.PLL.PLLState = RCC_PLL_ON;
- oscinitstruct.PLL.PLLSource = RCC_PLLSOURCE_HSI_DIV2;
- oscinitstruct.PLL.PLLMUL = RCC_PLL_MUL16;
- if (HAL_RCC_OscConfig(&oscinitstruct)!= HAL_OK)
- {
- /* Initialization Error */
- while(1);
- }
- /* Select PLL as system clock source and configure the HCLK, PCLK1 and PCLK2
- clocks dividers */
- clkinitstruct.ClockType = (RCC_CLOCKTYPE_SYSCLK | RCC_CLOCKTYPE_HCLK | RCC_CLOCKTYPE_PCLK1 | RCC_CLOCKTYPE_PCLK2);
- clkinitstruct.SYSCLKSource = RCC_SYSCLKSOURCE_PLLCLK;
- clkinitstruct.AHBCLKDivider = RCC_SYSCLK_DIV1;
- clkinitstruct.APB2CLKDivider = RCC_HCLK_DIV1;
- clkinitstruct.APB1CLKDivider = RCC_HCLK_DIV2;
- if (HAL_RCC_ClockConfig(&clkinitstruct, FLASH_LATENCY_2)!= HAL_OK)
- {
- /* Initialization Error */
- while(1);
- }
- }
- /**
- * @brief UART error callbacks
- * @param UartHandle: UART handle
- * @note This example shows a simple way to report transfer error, and you can
- * add your own implementation.
- * @retval None
- */
- void HAL_UART_ErrorCallback(UART_HandleTypeDef *UartHandle)
- {
- Error_Handler();
- }
- /**
- * @brief This function is executed in case of error occurrence.
- * @param None
- * @retval None
- */
- static void Error_Handler(void)
- {
- while(1)
- {
- HAL_Delay(1000);
- }
- }
- #ifdef USE_FULL_ASSERT
- /**
- * @brief Reports the name of the source file and the source line number
- * where the assert_param error has occurred.
- * @param file: pointer to the source file name
- * @param line: assert_param error line source number
- * @retval None
- */
- void assert_failed(uint8_t* file, uint32_t line)
- {
- /* User can add his own implementation to report the file name and line number,
- ex: printf("Wrong parameters value: file %s on line %d\r\n", file, line) */
- /* Infinite loop */
- while (1)
- {
- }
- }
- #endif
- /**
- * @}
- */
- /**
- * @}
- */
- /************************ (C) COPYRIGHT STMicroelectronics *****END OF FILE****/
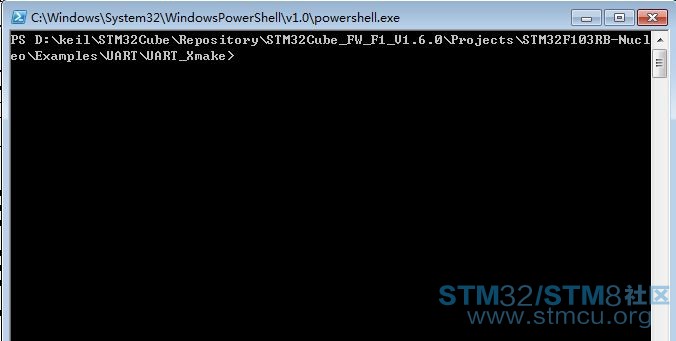
打开Powershell进入到该目录中,如下:
xmake构建程序需要一个名为xmake.lua的文件,该文件可以自动生成,输入xmake后会提示你找不到xmake.lua文件,输入y来生成该文件,或是从xmake安装目录下拷贝一个示例的xmake.lua文件,两种方式都可以。我使用的第一种方式,有了xmake.lua文件后我们就可以在上面添加一下配置信息来构建我们的STM32程序,关于xmake.lua的信息可以去官网上查看手册来了解它.
此外,我们还需要对xmake做一些配置,xmake是支持多平台的构建,包括windows、linux、macos、cross、android等,这里我们需要配置为cross即跨平台,输入xmake f --menu会弹出配置对话框,如下:
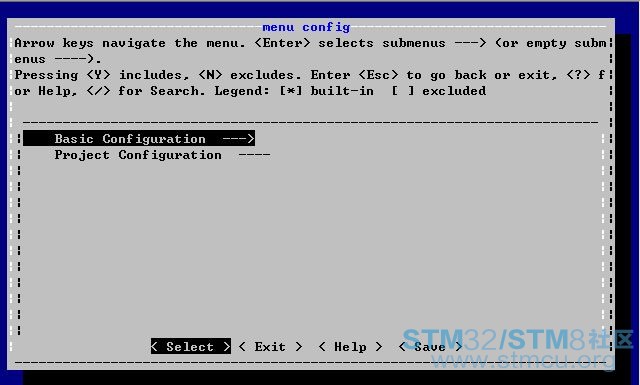
进入第一项Basic Configuration,配置平台、体系架构、以及目标类型,如下:
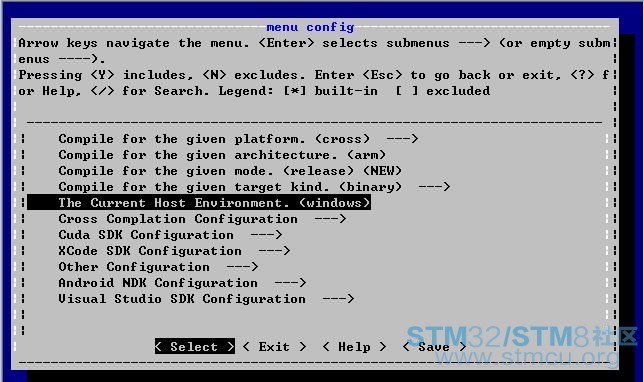
这里我们需要配置前6项,前5项配置很容易,做一些选择即可,接下来配置第6项,如下:
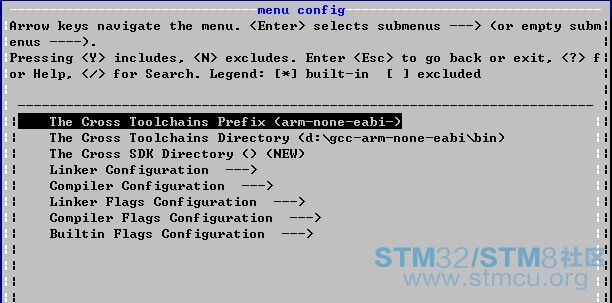
设置工具链前缀以及目录,后面还需要配置编译器以及连接器,如下:
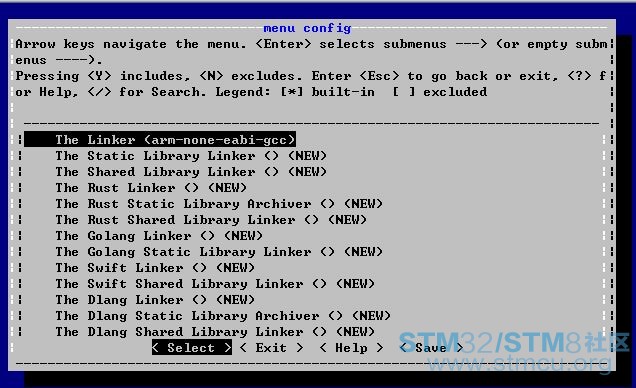
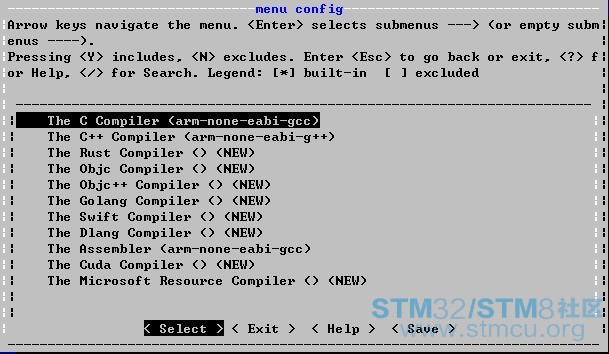
配置完后保存退出,会发现当前目录下多了一个.xmake文件夹
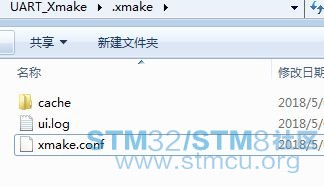
其中xmake.conf就包含了刚才我们的配置信息:
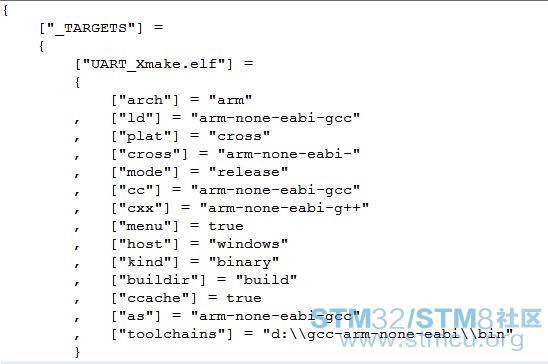
其他文件的信息,可以多去官网查看,.xmake文件夹下的文件是xmake自动生成的,直接修改配置文件是不行的。
接下来就是更改我们的xmake.lua文件,该文件主要是添加源文件,设置头文件搜索路径、添加宏定义、以及设置编译和链接选项,该文件内容如下: - -- the debug mode
- if is_mode("debug") then
-
- -- enable the debug symbols
- set_symbols("debug")
- -- disable optimization
- set_optimize("none")
- end
- -- the release mode
- if is_mode("release") then
- -- set the symbols visibility: hidden
- set_symbols("hidden")
- -- enable fastest optimization
- set_optimize("fastest")
- -- strip all symbols
- set_strip("all")
- end
- -- define target
- target("UART_Xmake.elf")
- -- set kind
- set_kind("binary")
- -- add files
- add_files("startup_stm32f103xb.s")
- add_files("Src/*.c")
- add_files("../../../../../Drivers/BSP/STM32F1xx_Nucleo/stm32f1xx_nucleo.c")
- add_files("../../../../../Drivers/STM32F1xx_HAL_Driver/Src/stm32f1xx_hal.c")
- add_files("../../../../../Drivers/STM32F1xx_HAL_Driver/Src/stm32f1xx_hal_rcc.c")
- add_files("../../../../../Drivers/STM32F1xx_HAL_Driver/Src/stm32f1xx_hal_cortex.c")
- add_files("../../../../../Drivers/STM32F1xx_HAL_Driver/Src/stm32f1xx_hal_uart.c")
- add_files("../../../../../Drivers/STM32F1xx_HAL_Driver/Src/stm32f1xx_hal_dma.c")
- add_files("../../../../../Drivers/STM32F1xx_HAL_Driver/Src/stm32f1xx_hal_rcc_ex.c")
- add_files("../../../../../Drivers/STM32F1xx_HAL_Driver/Src/stm32f1xx_hal_gpio.c")
- add_files("../../../../../Drivers/STM32F1xx_HAL_Driver/Src/stm32f1xx_hal_gpio.c")
-
- --add include search directories
- add_includedirs("Inc")
- add_includedirs("../../../../../Drivers/CMSIS/Device/ST/STM32F1xx/Include")
- add_includedirs("../../../../../Drivers/CMSIS/Include")
- add_includedirs("../../../../../Drivers/STM32F1xx_HAL_Driver/Inc")
- add_includedirs("../../../../../Drivers/BSP/STM32F1xx_Nucleo")
-
- --add macro defination
- add_defines("USE_HAL_DRIVER","STM32F103xB","USE_STM32F1xx_NUCLEO")
-
- -- set warning all as error
- set_warnings("all", "error")
-
- -- set language: c99
- set_languages("c99")
-
- add_cxflags("-mcpu=cortex-m3 -mthumb -mfloat-abi=soft --specs=nano.specs -ffunction-sections -fdata-sections")
- add_ldflags("-mcpu=cortex-m3 -mthumb -mfloat-abi=soft --specs=nosys.specs --specs=nano.specs -T"STM32F103RBTx_FLASH.ld" -Wl,--gc-sections")
- after_build(function(target)
- os.exec("arm-none-eabi-objcopy -O binary .\\build\\UART_Xmake.elf .\\build\\UART_Xmake.bin")
- end)
- -- FAQ
- --
- -- You can enter the project directory firstly before building project.
- --
- -- $ cd projectdir
- --
- -- 1. How to build project?
- --
- -- $ xmake
- --
- -- 2. How to configure project?
- --
- -- $ xmake f -p [macosx|linux|iphoneos ..] -a [x86_64|i386|arm64 ..] -m [debug|release]
- --
- -- 3. Where is the build output directory?
- --
- -- The default output directory is `./build` and you can configure the output directory.
- --
- -- $ xmake f -o outputdir
- -- $ xmake
- --
- -- 4. How to run and debug target after building project?
- --
- -- $ xmake run [targetname]
- -- $ xmake run -d [targetname]
- --
- -- 5. How to install target to the system directory or other output directory?
- --
- -- $ xmake install
- -- $ xmake install -o installdir
- --
- -- 6. Add some frequently-used compilation flags in xmake.lua
- --
- -- @code
- -- -- add macro defination
- -- add_defines("NDEBUG", "_GNU_SOURCE=1")
- --
- -- -- set warning all as error
- -- set_warnings("all", "error")
- --
- -- -- set language: c99, c++11
- -- set_languages("c99", "cxx11")
- --
- -- -- set optimization: none, faster, fastest, smallest
- -- set_optimize("fastest")
- --
- -- -- add include search directories
- -- add_includedirs("/usr/include", "/usr/local/include")
- --
- -- -- add link libraries and search directories
- -- add_links("tbox", "z", "pthread")
- -- add_linkdirs("/usr/local/lib", "/usr/lib")
- --
- -- -- add compilation and link flags
- -- add_cxflags("-stdnolib", "-fno-strict-aliasing")
- -- add_ldflags("-L/usr/local/lib", "-lpthread", {force = true})
- --
- -- @endcode
- --
- -- 7. If you want to known more usage about xmake, please see http://xmake.io/#/home
- --
-
至此,xmake配置就算完成了,在当前目录下输入xmake会自动编译该工程,最后会在build目录下生成UART_Xmake.bin文件,烧录该文件到目标板中运行,结果如下:

好了,使用xmake来构建STM32程序的示例就完成了。
|

 微信公众号
微信公众号
 手机版
手机版

不需要的,除非你要扩展插件之类的
[00%]: compiling.release Src\system_stm32f1xx.c
[20%]: compiling.release Src\stm32f1xx_hal_msp.c
[40%]: compiling.release Src\stm32f1xx_it.c
[60%]: compiling.release Src\main.c
error: arm-none-eabi-gcc: error: unrecognized command line option '-Qunused-arguments'
看名字是提示你命令行参数无法识别,你把这个参数去掉再重新编译下