- int main(void)
- {
- uint8_t a=0;//LED高低电压控制
- /* System Clocks Configuration */
- RCC_Configuration(); //系统时钟设置
- /*嵌套向量中断控制器
- 说明了USART1抢占优先级级别0(最多1位) ,和子优先级级别0(最多7位) */
- NVIC_Configuration(); //中断源配置
- /*对控制LED指示灯的IO口进行了初始化,将端口配置为推挽上拉输出,口线速度为50Mhz。PA9,PA10端口复用为串口1的TX,RX。
- 在配置某个口线时,首先应对它所在的端口的时钟进行使能。否则无法配置成功,由于用到了端口B, 因此要对这个端口的时钟
- 进行使能,同时由于用到复用IO口功能用于配置串口。因此还要使能AFIO(复用功能IO)时钟。*/
- GPIO_Configuration(); //端口初始化
- USART_Config(USART1); //串口1初始化
- while (1)
- {
- if(rec_f == 1)
- {
- //判断是否收到一帧有效数据
- rec_f = 0;
- for(i=0; i<sizeof(TxBuffer1); i++) //发送字符串
- {
- USART_SendChar(USART1,TxBuffer1[i]);
- Delay(0x0000ff0);
- }
- /*for(i=0;i<TxCounter1;i++)//发送字符串
- {
- USART_SendChar(USART1,RxBuffer1[i]);
- } */
- if(a==0)
- {
- GPIO_SetBits(GPIOD, GPIO_Pin_2); //LED1 明暗闪烁
- a=1;
- }
- else
- {
- GPIO_ResetBits(GPIOD, GPIO_Pin_2);
- a=0;
- }
- }
- }
- }
main函数如上。 相关变量 - uint8_t TxBuffer1[] = "USART Interrupt Example: This is USART1 DEMO";
- uint8_t RxBuffer1[], rec_f, tx_flag, i;
- __IO uint8_t TxCounter1 = 0x00;
- __IO uint8_t RxCounter1 = 0x00;
- uint32_t Rec_Len;
串口中断函数配置如下所示: - //--------------------------------------------------------------------------------------
- void USART_SendChar(USART_TypeDef* USARTx,uint8_t data)
- {
- USART_SendData(USARTx,data);
- while(USART_GetFlagStatus(USARTx,USART_FLAG_TC)==RESET);
- }
- //--------------------------------------------------------------------------------------
- void USART_Config(USART_TypeDef* USARTx)
- {
- USART_InitStructure.USART_BaudRate = 19200; //速率19200bps
- USART_InitStructure.USART_WordLength = USART_WordLength_8b; //数据位8位
- USART_InitStructure.USART_StopBits = USART_StopBits_1; //停止位1位
- USART_InitStructure.USART_Parity = USART_Parity_No; //无校验位
- USART_InitStructure.USART_HardwareFlowControl = USART_HardwareFlowControl_None; //无硬件流控
- USART_InitStructure.USART_Mode = USART_Mode_Rx | USART_Mode_Tx; //收发模式
- /* Configure USARTx */
- USART_Init(USARTx, &USART_InitStructure); //配置串口参数函数
- /* Enable USARTx Receive and Transmit interrupts */
- USART_ITConfig(USARTx, USART_IT_RXNE, ENABLE); //使能接收中断
- USART_ITConfig(USARTx, USART_IT_TXE, ENABLE); //使能发送缓冲空中断
- /* Enable the USARTx */
- USART_Cmd(USARTx, ENABLE);
- }
- //--------------------------------------------------------------------------------------
- void Delay(__IO uint32_t nCount)
- {
- for(; nCount!=0; nCount--);
- }
- /*--------------------------------------------------------------------------------------
- 系统时钟配置为72MHZ+外设时钟配置*/
- void RCC_Configuration(void)
- {
- SystemInit();
- RCC_APB2PeriphClockCmd( RCC_APB2Periph_USART1 | RCC_APB2Periph_GPIOD |RCC_APB2Periph_GPIOA, ENABLE);
- }
- //--------------------------------------------------------------------------------------
- void GPIO_Configuration(void)
- {
- GPIO_InitStructure.GPIO_Pin = GPIO_Pin_2; //LED1控制--PD2
- GPIO_InitStructure.GPIO_Mode = GPIO_Mode_Out_PP; //推挽输出
- GPIO_InitStructure.GPIO_Speed = GPIO_Speed_50MHz;
- GPIO_Init(GPIOD, &GPIO_InitStructure);
- GPIO_InitStructure.GPIO_Pin = GPIO_Pin_9; //USART1 TX
- GPIO_InitStructure.GPIO_Mode = GPIO_Mode_AF_PP; //复用推挽输出
- GPIO_Init(GPIOA, &GPIO_InitStructure); //A端口
- GPIO_InitStructure.GPIO_Pin = GPIO_Pin_10; //USART1 RX
- GPIO_InitStructure.GPIO_Mode = GPIO_Mode_IN_FLOATING; //复用开漏输入
- GPIO_Init(GPIOA, &GPIO_InitStructure); //A端口
- }
- //--------------------------------------------------------------------------------------
- void NVIC_Configuration(void)
- {
- /* 结构声明*/
- NVIC_InitTypeDef NVIC_InitStructure;
- /* Configure the NVIC Preemption Priority Bits */
- /* Configure one bit for preemption priority */
- /* 优先级组 说明了抢占优先级所用的位数,和子优先级所用的位数 在这里是1, 7 */
- NVIC_PriorityGroupConfig(NVIC_PriorityGroup_0);
- NVIC_InitStructure.NVIC_IRQChannel = USART1_IRQn; //设置串口1中断
- NVIC_InitStructure.NVIC_IRQChannelPreemptionPriority = 0; //抢占优先级 0
- NVIC_InitStructure.NVIC_IRQChannelSubPriority = 0; //子优先级为0
- NVIC_InitStructure.NVIC_IRQChannelCmd = ENABLE; //使能
- NVIC_Init(&NVIC_InitStructure);
- }
在中断服务函数中编写usart函数。 - //串口1 中断服务程序
- void USART1_IRQHandler(void)
- {
- unsigned int i;
-
- //判断读寄存器是否非空
- if(USART_GetITStatus(USART1, USART_IT_RXNE) != RESET)
- {
- //将读寄存器的数据缓存到接收缓冲区里
- RxBuffer1[RxCounter1++] = USART_ReceiveData(USART1);
- //判断结束标志是否是0x0d 0x0a
- if(RxBuffer1[RxCounter1-2] == 0x0d && RxBuffer1[RxCounter1-1] == 0x0a)
- {
- for(i=0; i< RxCounter1; i++)
- TxBuffer1[i] = RxBuffer1[i]; //将接收缓冲器的数据转到发送缓冲区,准备转发
-
- //接收成功标志
- rec_f = 1;
-
- //发送缓冲区结束符
- TxBuffer1[RxCounter1] = 0;
- TxCounter1 = RxCounter1;
- RxCounter1 = 0;
- }
- }
- //这段是为了避免STM32 USART 第一个字节发不出去的BUG
- if(USART_GetITStatus(USART1, USART_IT_TXE) != RESET)
- {
- //禁止发缓冲器空中断,
- USART_ITConfig(USART1, USART_IT_TXE, DISABLE);
- }
- }
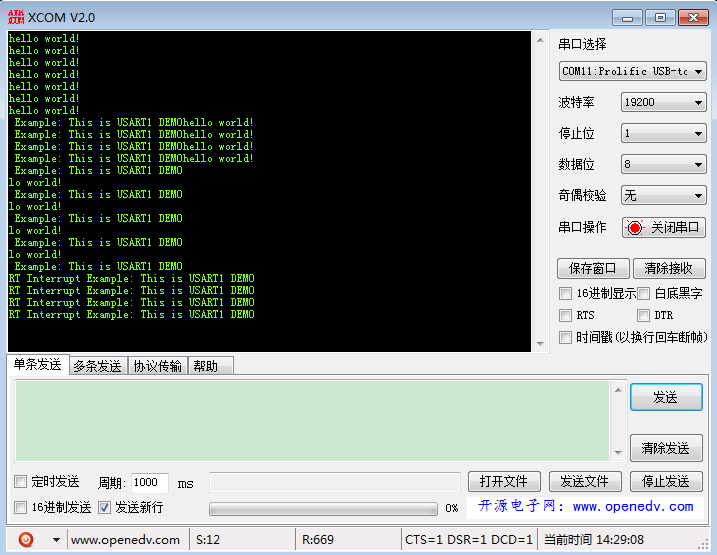
运行结果如下,在发送去不填写任何字符,直接发送,显示RT Interrupt Example: This is USART1 DEMO,说明前三个字符已经被占用替换了。
|





.png) STMCU小助手
发布时间:2022-2-6 22:00
STMCU小助手
发布时间:2022-2-6 22:00
 微信公众号
微信公众号
 手机版
手机版