- // 添加这个函数
- int fputc(int ch,FILE *f)
- {
- uint8_t temp[1]={ch};
- HAL_UART_Transmit(&UartHandle,temp,1,2);
- }
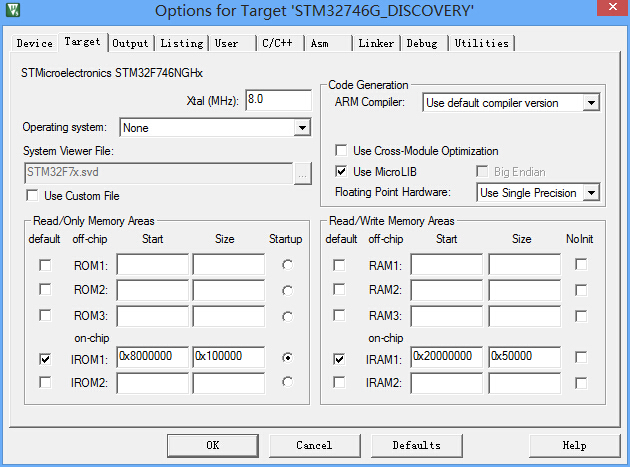
MDK设置:勾选Use Micro LIB
测试板子:STM32F746NG-DISCOVERY main.c文件 - /* Includes ------------------------------------------------------------------*/
- #include "main.h"
- #include <stdio.h>
- /** @addtogroup STM32F7xx_HAL_Examples
- * @{
- */
- /** @addtogroup UART_TwoBoards_ComDMA
- * @{
- */
- /* Private typedef -----------------------------------------------------------*/
- /* Private define ------------------------------------------------------------*/
- #define TRANSMITTER_BOARD
- /* Private macro -------------------------------------------------------------*/
- /* Private variables ---------------------------------------------------------*/
- /* UART handler declaration */
- UART_HandleTypeDef UartHandle;
- __IO ITStatus UartReady = RESET;
- __IO uint32_t UserButtonStatus = 0; /* set to 1 after User Button interrupt */
- /* Buffer used for transmission */
- uint8_t aTxBuffer[] = " ****UART_TwoBoards communication based on DMA**** ****UART_TwoBoards communication based on DMA**** ****UART_TwoBoards communication based on DMA**** ";
- /* Buffer used for reception */
- uint8_t aRxBuffer[RXBUFFERSIZE];
- /* Private function prototypes -----------------------------------------------*/
- void SystemClock_Config(void);
- static void Error_Handler(void);
- static uint16_t Buffercmp(uint8_t* pBuffer1, uint8_t* pBuffer2, uint16_t BufferLength);
- static void MPU_Config(void);
- static void CPU_CACHE_Enable(void);
- /* Private functions ---------------------------------------------------------*/
- UART_HandleTypeDef UartHandle;
- uint8_t sendbuf[]="send ok ";
- // 添加这个函数
- int fputc(int ch,FILE *f)
- {
- uint8_t temp[1]={ch};
- HAL_UART_Transmit(&UartHandle,temp,1,2);
- }
- /**
- * @brief Main program
- * @param None
- * @retval None
- */
- int main(void)
- {
- /* Configure the MPU attributes as Write Through */
- MPU_Config();
- /* Enable the CPU Cache */
- CPU_CACHE_Enable();
- /* STM32F7xx HAL library initialization:
- - Configure the Flash ART accelerator
- - Systick timer is configured by default as source of time base, but user
- can eventually implement his proper time base source (a general purpose
- timer for example or other time source), keeping in mind that Time base
- duration should be kept 1ms since PPP_TIMEOUT_VALUEs are defined and
- handled in milliseconds basis.
- - Set NVIC Group Priority to 4
- - Low Level Initialization
- */
- HAL_Init();
- /* Configure the system clock to 216 MHz */
- SystemClock_Config();
-
- /* Configure LED1 */
- BSP_LED_Init(LED1);
-
- UartHandle.Instance = DISCOVERY_COM1;
- UartHandle.Init.BaudRate = 9600;
- UartHandle.Init.WordLength = UART_WORDLENGTH_8B;
- UartHandle.Init.StopBits = UART_STOPBITS_1;
- UartHandle.Init.Parity = UART_PARITY_NONE;
- UartHandle.Init.HwFlowCtl = UART_HWCONTROL_NONE;
- UartHandle.Init.Mode = UART_MODE_TX_RX;
- BSP_COM_DeInit(COM1,&UartHandle);
- BSP_COM_Init(COM1,&UartHandle);
-
- // HAL_UART_Transmit(&UartHandle,sendbuf,sizeof(sendbuf),10);
- /* Configure User push-button in Interrupt mode */
- BSP_PB_Init(BUTTON_KEY, BUTTON_MODE_EXTI);
-
- /* Wait for User push-button press before starting the Communication.
- In the meantime, LED1 is blinking */
- printf("hello");
-
-
- while(UserButtonStatus == 0)
- {
- /* Toggle LED1*/
- BSP_LED_Toggle(LED1);
- HAL_Delay(100);
- }
- /* Turn on LED1 if test passes then enter infinite loop */
- BSP_LED_On(LED1);
- /* Infinite loop */
- while (1)
- {
- }
- }
- /**
- * @brief System Clock Configuration
- * The system Clock is configured as follow :
- * System Clock source = PLL (HSE)
- * SYSCLK(Hz) = 216000000
- * HCLK(Hz) = 216000000
- * AHB Prescaler = 1
- * APB1 Prescaler = 4
- * APB2 Prescaler = 2
- * HSE Frequency(Hz) = 25000000
- * PLL_M = 25
- * PLL_N = 432
- * PLL_P = 2
- * PLL_Q = 9
- * VDD(V) = 3.3
- * Main regulator output voltage = Scale1 mode
- * Flash Latency(WS) = 7
- * @param None
- * @retval None
- */
- void SystemClock_Config(void)
- {
- RCC_ClkInitTypeDef RCC_ClkInitStruct;
- RCC_OscInitTypeDef RCC_OscInitStruct;
- HAL_StatusTypeDef ret = HAL_OK;
- /* Enable HSE Oscillator and activate PLL with HSE as source */
- RCC_OscInitStruct.OscillatorType = RCC_OSCILLATORTYPE_HSE;
- RCC_OscInitStruct.HSEState = RCC_HSE_ON;
- RCC_OscInitStruct.PLL.PLLState = RCC_PLL_ON;
- RCC_OscInitStruct.PLL.PLLSource = RCC_PLLSOURCE_HSE;
- RCC_OscInitStruct.PLL.PLLM = 25;
- RCC_OscInitStruct.PLL.PLLN = 432;
- RCC_OscInitStruct.PLL.PLLP = RCC_PLLP_DIV2;
- RCC_OscInitStruct.PLL.PLLQ = 9;
-
- ret = HAL_RCC_OscConfig(&RCC_OscInitStruct);
- if(ret != HAL_OK)
- {
- while(1) { ; }
- }
-
- /* Activate the OverDrive to reach the 216 MHz Frequency */
- ret = HAL_PWREx_EnableOverDrive();
- if(ret != HAL_OK)
- {
- while(1) { ; }
- }
-
- /* Select PLL as system clock source and configure the HCLK, PCLK1 and PCLK2 clocks dividers */
- RCC_ClkInitStruct.ClockType = (RCC_CLOCKTYPE_SYSCLK | RCC_CLOCKTYPE_HCLK | RCC_CLOCKTYPE_PCLK1 | RCC_CLOCKTYPE_PCLK2);
- RCC_ClkInitStruct.SYSCLKSource = RCC_SYSCLKSOURCE_PLLCLK;
- RCC_ClkInitStruct.AHBCLKDivider = RCC_SYSCLK_DIV1;
- RCC_ClkInitStruct.APB1CLKDivider = RCC_HCLK_DIV4;
- RCC_ClkInitStruct.APB2CLKDivider = RCC_HCLK_DIV2;
-
- ret = HAL_RCC_ClockConfig(&RCC_ClkInitStruct, FLASH_LATENCY_7);
- if(ret != HAL_OK)
- {
- while(1) { ; }
- }
- }
- /**
- * @brief Tx Transfer completed callback
- * @param UartHandle: UART handle.
- * @note This example shows a simple way to report end of DMA Tx transfer, and
- * you can add your own implementation.
- * @retval None
- */
- void HAL_UART_TxCpltCallback(UART_HandleTypeDef *UartHandle)
- {
- /* Set transmission flag: trasfer complete*/
- UartReady = SET;
-
- }
- /**
- * @brief Rx Transfer completed callback
- * @param UartHandle: UART handle
- * @note This example shows a simple way to report end of DMA Rx transfer, and
- * you can add your own implementation.
- * @retval None
- */
- void HAL_UART_RxCpltCallback(UART_HandleTypeDef *UartHandle)
- {
- /* Set transmission flag: trasfer complete*/
- UartReady = SET;
-
- }
- /**
- * @brief UART error callbacks
- * @param UartHandle: UART handle
- * @note This example shows a simple way to report transfer error, and you can
- * add your own implementation.
- * @retval None
- */
- void HAL_UART_ErrorCallback(UART_HandleTypeDef *UartHandle)
- {
- Error_Handler();
- }
- /**
- * @brief EXTI line detection callbacks
- * @param GPIO_Pin: Specifies the pins connected EXTI line
- * @retval None
- */
- void HAL_GPIO_EXTI_Callback(uint16_t GPIO_Pin)
- {
- if(GPIO_Pin == KEY_BUTTON_PIN)
- {
- UserButtonStatus = 1;
- }
- }
- /**
- * @brief Compares two buffers.
- * @param pBuffer1, pBuffer2: buffers to be compared.
- * @param BufferLength: buffer's length
- * @retval 0 : pBuffer1 identical to pBuffer2
- * >0 : pBuffer1 differs from pBuffer2
- */
- static uint16_t Buffercmp(uint8_t* pBuffer1, uint8_t* pBuffer2, uint16_t BufferLength)
- {
- while (BufferLength--)
- {
- if ((*pBuffer1) != *pBuffer2)
- {
- return BufferLength;
- }
- pBuffer1++;
- pBuffer2++;
- }
- return 0;
- }
- /**
- * @brief This function is executed in case of error occurrence.
- * @param None
- * @retval None
- */
- static void Error_Handler(void)
- {
- /* Turn LED1 on */
- BSP_LED_On(LED1);
- while(1)
- {
- /* Error if LED1 is slowly blinking (1 sec. period) */
- BSP_LED_Toggle(LED1);
- HAL_Delay(1000);
- }
- }
- #ifdef USE_FULL_ASSERT
- /**
- * @brief Reports the name of the source file and the source line number
- * where the assert_param error has occurred.
- * @param file: pointer to the source file name
- * @param line: assert_param error line source number
- * @retval None
- */
- void assert_failed(uint8_t* file, uint32_t line)
- {
- /* User can add his own implementation to report the file name and line number,
- ex: printf("Wrong parameters value: file %s on line %d\r\n", file, line) */
- /* Infinite loop */
- while (1)
- {
- }
- }
- #endif
- /**
- * @brief Configure the MPU attributes as Write Through for SRAM1/2.
- * @note The Base Address is 0x20010000 since this memory interface is the AXI.
- * The Region Size is 256KB, it is related to SRAM1 and SRAM2 memory size.
- * @param None
- * @retval None
- */
- static void MPU_Config(void)
- {
- MPU_Region_InitTypeDef MPU_InitStruct;
-
- /* Disable the MPU */
- HAL_MPU_Disable();
- /* Configure the MPU attributes as WT for SRAM */
- MPU_InitStruct.Enable = MPU_REGION_ENABLE;
- MPU_InitStruct.BaseAddress = 0x20010000;
- MPU_InitStruct.Size = MPU_REGION_SIZE_256KB;
- MPU_InitStruct.AccessPermission = MPU_REGION_FULL_ACCESS;
- MPU_InitStruct.IsBufferable = MPU_ACCESS_NOT_BUFFERABLE;
- MPU_InitStruct.IsCacheable = MPU_ACCESS_CACHEABLE;
- MPU_InitStruct.IsShareable = MPU_ACCESS_NOT_SHAREABLE;
- MPU_InitStruct.Number = MPU_REGION_NUMBER0;
- MPU_InitStruct.TypeExtField = MPU_TEX_LEVEL0;
- MPU_InitStruct.SubRegionDisable = 0x00;
- MPU_InitStruct.DisableExec = MPU_INSTRUCTION_ACCESS_ENABLE;
- HAL_MPU_ConfigRegion(&MPU_InitStruct);
- /* Enable the MPU */
- HAL_MPU_Enable(MPU_PRIVILEGED_DEFAULT);
- }
- /**
- * @brief CPU L1-Cache enable.
- * @param None
- * @retval None
- */
- static void CPU_CACHE_Enable(void)
- {
- /* Enable I-Cache */
- SCB_EnableICache();
- /* Enable D-Cache */
- SCB_EnableDCache();
- }
- /**
- * @}
- */
- /**
- * @}“stdio.h”
- */
- /************************ (C) COPYRIGHT STMicroelectronics *****END OF FILE****/
今天调试了stm32f407的ADC,一切顺利,然而用串口发送ADC结果时都是16进制数,看着很不爽。于是打算用用牛B的“printf”函数,按照以前的做法,在main文件中添加了“stdio.h”,写好了“printf”函数,沏杯茶,打算边品茶边坐等结果,然而这一坐竟坐了半天也没见结果  。一调试发现程序停在了printf函数处,百思不得其解,百度之,得答案,不敢独享,分享如下: 。一调试发现程序停在了printf函数处,百思不得其解,百度之,得答案,不敢独享,分享如下:
STM32串口通信中使用printf发送数据配置方法(开发环境 Keil RVMDK) 标签: STM32 串口通信 printf方法 2011-06-29 23:29 在STM32串口通信程序中使用printf发送数据,非常的方便。可在刚开始使用的时候总是遇到问题,常见的是硬件访真时无法进入main主函数,其实只要简单的配置一下就可以了。
下面就说一下使用printf需要做哪些配置。
有两种配置方法: 一、对工程属性进行配置,详细步骤如下 1、首先要在你的main 文件中 包含“stdio.h” (标准输入输出头文件)。 2、在main文件中重定义<fputc>函数 如下: // 发送数据 int fputc(int ch, FILE *f) { USART_SendData(USART1, (unsigned char) ch);// USART1 可以换成 USART2 等 while (!(USART1->SR & USART_FLAG_TXE)); return (ch); } // 接收数据 int GetKey (void) { while (!(USART1->SR & USART_FLAG_RXNE)); return ((int)(USART1->DR & 0x1FF)); } 这样在使用printf时就会调用自定义的fputc函数,来发送字符。 3、在工程属性的 “Target" -> "Code Generation" 选项中勾选 "Use MicroLIB"” MicroLIB 是缺省C的备份库,关于它可以到网上查找详细资料。
至此完成配置,在工程中可以随意使用printf向串口发送数据了。
二、第二种方法是在工程中添加“Regtarge.c”文件 1、在main文件中包含 “stdio.h” 文件 2、在工程中创建一个文件保存为 Regtarge.c , 然后将其添加工程中 在文件中输入如下内容(直接复制即可) #include <stdio.h> #include <rt_misc.h> #pragma import(__use_no_semihosting_swi) extern int SendChar(int ch); // 声明外部函数,在main文件中定义 extern int GetKey(void); struct __FILE { int handle; // Add whatever you need here }; FILE __stdout; FILE __stdin; int fputc(int ch, FILE *f) { return (SendChar(ch)); } int fgetc(FILE *f) { return (SendChar(GetKey())); } void _ttywrch(int ch) { SendChar (ch); } int ferror(FILE *f) { // Your implementation of ferror return EOF; } void _sys_exit(int return_code) { label: goto label; // endless loop }
3、在main文件中添加定义以下两个函数 int SendChar (int ch) { while (!(USART1->SR & USART_FLAG_TXE)); // USART1 可换成你程序中通信的串口 USART1->DR = (ch & 0x1FF); return (ch); } int GetKey (void) { while (!(USART1->SR & USART_FLAG_RXNE)); return ((int)(USART1->DR & 0x1FF)); }
| .png) STMCU小助手
发布时间:2022-2-7 21:10
STMCU小助手
发布时间:2022-2-7 21:10

 微信公众号
微信公众号
 手机版
手机版


