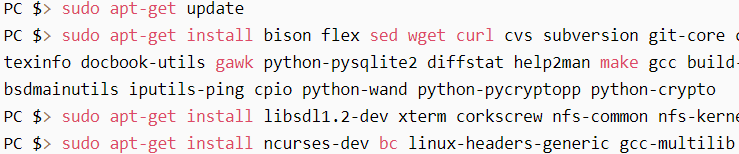
1.必须的依赖包
- PC gt; sudo apt-get update
- PC gt; sudo apt-get install bison flex sed wget curl cvs subversion git-core coreutils unzip texi2html
- texinfo docbook-utils gawk python-pysqlite2 diffstat help2man make gcc build-essential g++ desktop-file-utils chrpath libxml2-utils xmlto docbook
- bsdmainutils iputils-ping cpio python-wand python-pycryptopp python-crypto
- PC gt; sudo apt-get install libsdl1.2-dev xterm corkscrew nfs-common nfs-kernel-server device-tree-compiler mercurial u-boot-tools libarchive-zip-perl
- PC gt; sudo apt-get install ncurses-dev bc linux-headers-generic gcc-multilib libncurses5-dev libncursesw5-dev lrzsz dos2unix lib32ncurses5 repo libssl-dev
2.repo 获取源码
#repo init -u -b refs/tags/openstlinux-5.4-dunfell-mp1-20-06-24
- repo init -u -b refs/tags/openstlinux-20-02-19
fatal: Cannot get
fatal: error [Errno 101] Network is unreachable
解决方法:先单独克隆repo
- git clone
- mkdir .repo
- mv git-repo/ repo
- mv repo .repo
- repo sync -c -j8
单独更新
- repo sync --force-sync layers/meta-openembedded/
- repo sync --force-sync layers/meta-openembedded/
- repo sync --force-sync layers/meta-st/meta-st-openstlinux/
- repo sync --force-sync layers/openembedded-core/
- repo sync --force-sync layers/openembedded-core/bitbake/
- repo sync
源码获取完成,编译Distribution Package。
- PC gt; DISTRO=openstlinux-weston MACHINE=stm32mp1 source layers/meta-st/scripts/envsetup.sh
- PC gt; bitbake st-image-wseton //编译镜像PC gt; bitbake st-image-weston -c fetchall //编译镜像
4.bitbake常用的一些命令
- bitbake st-image-wseton -f //忽略某个包的错误,执行下去。可以减少编译等待时间。
- bitbake st-image-wseton -c fetchall //-C用于执行特定命令,这里fetchall.
- bitbake -e linux-imx | grep ^SRC_URI= //软件包下载地址
- bitbake -s | grep linux //查找所有包并显示包含有linux名字的包
- bitbake -e linux-imx | grep ^S= //编译目录
- bitbake linux-imx -C compile //编译内核和dtb,-C的C是大写
- bitbake opencv -c fetch
- bitbake opencv -c clean
- bitbake -k core-image-minimal
- bitbake xx-image -c listtasks
- bitbake -s | grep packagename
- bitbake -e xxx-image | grep ^SRC_URI=
- 查看软件依赖
- bitbake -g packagename
- bitbake -c clean -v u-boot
- bitbake -c cleanall xx-image #清除所有编译中间
- bitbake -c cleansstate xx-image #清除编译
- 生成编译中的配置文件和类文件
- bitbake -e > mybuild.log
- bitbake -b 加上.bb文件的路径,即可以直接执行这个.bb文件
- #查找包的原路径
- bitbake -e linux-stm32mp | grep ^SRC_URI=
- #查找包的bblayer
- bitbake -e linux-stm32mp | grep ^S
5.bitbake 命令续
- bitbake -e linux-stm32mp | grep ^S=
- S="/home/fdw/32mp1/openstlinux-200219/build-openstlinuxweston-stm32mp1/tmp-glibc/work/stm32mp1-ostl-linux-gnueabi/linux-stm32mp/4.19-r0/linux-4.19.94"
- bitbake -e m4projects-stm32mp1 | grep ^S=
- S="/home/fdw/32mp1/openstlinux-200219/build-openstlinuxweston-stm32mp1/tmp-glibc/work/stm32mp1-ostl-linux-gnueabi/m4projects-stm32mp1/1.2.0-r0/git
- bitbake -s | grep opencv
- PC gt; find . -type f -iname "opencv*.bb"
- ./layers/meta-openembedded/meta-oe/recipes-support/opencv/opencv_3.4.3.bb
6.linux 内核实例
- PC gt; devtool modify virtual/kernel
- PC gt; ls workspace/sources/linux-stm32mp/
- Board gt; dmesg | grep -i cma
- PC gt;grep -i CONFIG_CMA_SIZE_MBYTES ./workspace/sources/linux-stm32mp/ -nr
- PC gt; bitbake virtual/kernel -c menuconfig
- PC gt; bitbake virtual/kernel -C compile
- $ bitbake -c menuconfig virtual/kernel
- $ bitbake -c compile -f -v virtual/kernel 单独编译内核
- $ bitbake -c compile_kernelmodules -f -v virtual/kernel 单独编译模块
- $ bitbake -c deploy -f -v virtual/kernel 然后部署编译输出镜像
- #devtool build because the build makes compile,
- #compile_kernemodules and install commands
- Board gt; mount /dev/mmcblk0p4 /boot
- PC gt; scp <build dir>/../../*.dtb root@<board ip address>:/boot
- Board gt; cd /boot; sync; systemctl reboot
- vim workspace/sources/linux-stm32mp/arch/arm/boot/dts/stm32mp157a-dk1.dts
- bitbake virtual/kernel -C compile
- PC gt; vim workspace/sources/linux-stm32mp/drivers/media/platform/vivid/vivid-core.c
- PC gt; bitbake virtual/kernel -C compile
- #Update the vivid kernel module on the board
- PC gt; devtool deploy-target -Ss linux-stm32mp :/
- Board gt; /sbin/depmod -a
- Board gt; sync
- Board gt; modprobe vivid
- scp tmp-glibc/deploy/images/stm32mp1/stm32mp157*.dtb :/boot
- scp tmp-glibc/deploy/images/stm32mp1/uImage*:/boot
- rm -rf /home/fdw/.ssh/known_hosts
6.uboot实例
- PC gt; devtool search u-boot*
- PC gt; devtool modify u-boot-stm32mp
- #cd <build dir>/workspace/sources/u-boot-stm32mp
- PC gt; devtool build u-boot-stm32mp
- PC gt; bitbake u-boot-stm32mp -c deploy
- #ums 0 mmc 0
- PC gt; dd if=u-boot-<board name>-trusted.stm32 of=/dev/sdc3 bs=1M conv=fdatasync
7.tf-A实例
- PC gt; devtool search tf-a*
- PC gt; devtool modify tf-a-stm32mp
- #PC gt; cd <build dir>/workspace/sources/tf-a-stm32mp
- PC gt; vim ./plat/st/stm32mp1/bl2_io_storage.c
- PC gt; devtool build tf-a-stm32mp
- #bitbake tf-a-stm32mp
- PC gt; bitbake tf-a-stm32mp -c deploy
- PC gt; dd if=tf-a-<board name>-trusted.stm32 of=/dev/sdc1 bs=1M conv=fdatasync
8.应用程序 “hello world”
- PC gt; mkdir hello_world_example
- PC gt; cd hello_world_example
- PC gt; vim hello_world_example.c
- PC gt; cd <build dir>
- #Add a new recipe to the workspace
- PC gt; devtool add myhelloworld hello_world_example/
- #Adapt recipe
- PC gt; devtool edit-recipe myhelloworld
- PC gt; devtool build myhelloworld
- PC gt; devtool deploy-target -s myhelloworld
9.m4projects-stm32
- Board gt; cd <path_to_your_workspace>/build-<name_of_distro>
- Clean the m4projects build folder
- Board gt; bitbake m4projects-stm32mp1 -f -c cleanall
- Rebuild the recipe m4projects
- Board gt; bitbake m4projects-stm32mp1
- Rebuild the image
- Board gt; bitbake st-image-weston
二.devtool的总结
- devtool modify tf-a-stm32mp
- bitbake tf-a-stm32mp
- devtool search u-boot*
- devtool modify u-boot-stm32mp
- bitbake u-boot-stm32mp
- devtool modify linux-stm32mp
- bitbake linux-stm32mp
- NOTE: Starting bitbake server...
- usage: devtool [--basepath BASEPATH] [--bbpath BBPATH] [-d] [-q]
- [--color COLOR] [-h]
- <subcommand> ...
- OpenEmbedded development tool
- options:
- --basepath BASEPATH Base directory of SDK / build directory
- --bbpath BBPATH Explicitly specify the BBPATH, rather than getting it
- from the metadata
- -d, --debug Enable debug output
- -q, --quiet Print only errors
- --color COLOR Colorize output (where COLOR is auto, always, never)
- -h, --help show this help message and exit
- subcommands:
- Beginning work on a recipe:
- add Add a new recipe
- modify Modify the source for an existing recipe
- upgrade Upgrade an existing recipe
- Getting information:
- status Show workspace status
- search Search available recipes
- Working on a recipe in the workspace:
- build Build a recipe
- rename Rename a recipe file in the workspace
- edit-recipe Edit a recipe file in your workspace
- find-recipe Find a recipe file in your workspace
- configure-help Get help on configure script options
- update-recipe Apply changes from external source tree to recipe
- reset Remove a recipe from your workspace
- finish Finish working on a recipe in your workspace
- Testing changes on target:
- deploy-target Deploy recipe output files to live target machine
- undeploy-target Undeploy recipe output files in live target machine
- build-image Build image including workspace recipe packages
- Advanced:
- create-workspace Set up workspace in an alternative location
- import Import exported tar archive into workspace
- extract Extract the source for an existing recipe
- sync Synchronize the source tree for an existing recipe
- export Export workspace into a tar archive
- Use devtool <subcommand> --help to get help on a specific command
————————————————
版权声明:jacob杰克爸
|
.png) STMCU小助手
发布时间:2022-10-3 22:00
STMCU小助手
发布时间:2022-10-3 22:00
 微信公众号
微信公众号
 手机版
手机版