一、事有蹊跷
接篇一,前面提到在使用cube.AI生成的c语言神经网络模型API调用时,输入数据数量是24,输出数据数量是4,但上文设想采集了三轴加速度传感器的x/y/z三个各数据,按Jogging(慢跑),Walking(走了)两种态势采集了两组数据.csv,那么在实际中应该是输入数据数量是3(x/y/x-value),输出数据数量是2(Jogging,Walking两种类别)。
由于模型API是cube.AI基于训练输出的神经网络模型而生成的,想必应该是训练神经网络模型时参数设置问题,因此我们重新回顾HAR训练项目.
进入“STM32CubeFunctionPack_SENSING1_V4.0.3\Utilities\AI_Ressources\Training Scripts\HAR”目录,运行 python .\RunMe.py -h命令,查看参数设置指令帮助,可以看到--seqLength和--stepSize参数设置都和input有关,默认数值是24,就可以笃定在API中调用时,输入数据数量是24就来自于此。
- PS D:\tools\arm_tool\STM32CubeIDE\STM32CubeFunctionPack_SENSING1_V4.0.3\Utilities\AI_Ressources\Training Scripts\HAR> python3 .\RunMe.py -h
- Using TensorFlow backend.
- usage: RunMe.py [-h] [--model MODEL] [--dataset DATASET] [--dataDir DATADIR]
- [--seqLength SEQLENGTH] [--stepSize STEPSIZE] [-m MERGE]
- [--preprocessing PREPROCESSING] [--trainSplit TRAINSPLIT]
- [--validSplit VALIDSPLIT] [--epochs N] [--lr LR]
- [--decay DECAY] [--batchSize N] [--verbose N]
- [--nrSamplesPostValid NRSAMPLESPOSTVALID]
-
- Human Activity Recognition (HAR) in Keras with Tensorflow as backend on WISDM
- and WISDM + self logged datasets
-
- optional arguments:
- -h, --help show this help message and exit
- --model MODEL choose one of the two availavle choices, IGN or GMP, (
- default = IGN )
- --dataset DATASET choose a dataset to use out of two choices, WISDM or
- AST, ( default = WISDM )
- --dataDir DATADIR path to new data collected using STM32 IoT board
- recorded at 26Hz as sampling rate, (default = )
- --seqLength SEQLENGTH
- input sequence lenght (default:24)
- --stepSize STEPSIZE step size while creating segments (default:24, equal
- to seqLen)
- -m MERGE, --merge MERGE
- if to merge activities (default: True)
- --preprocessing PREPROCESSING
- gravity rotation filter application (default = True)
- --trainSplit TRAINSPLIT
- train and test split (default = 0.6 (60 precent for
- train and 40 precent for test))
- --validSplit VALIDSPLIT
- train and validation data split (default = 0.7 (70
- percent for train and 30 precent for validation))
- --epochs N number of total epochs to run (default: 20)
- --lr LR initial learning rate
- --decay DECAY decay in learning rate, (default = 1e-6)
- --batchSize N mini-batch size (default: 64)
- --verbose N verbosity of training and test functions in keras, 0,
- 1, or 2. Verbosity mode. 0 = silent, 1 = progress bar,
- 2 = one line per epoch (default: 1)
- --nrSamplesPostValid NRSAMPLESPOSTVALID
- Number of samples to save from every class for post
- training and CubeAI conversion validation. (default =
- 2)
- PS D:\tools\arm_tool\STM32CubeIDE\STM32CubeFunctionPack_SENSING1_V4.0.3\Utilities\AI_Ressources\Training Scripts\HAR>
而输出数据数量是4的原因追踪源码可以看到,来自于PrepareDataset.py(数据集预处理源文件),由于在参数--dataset默认设置是WISDM,因此分类输出即为'Jogging', 'Stationary', 'Stairs', 'Walking',即输出数据数量为4:

下面来深入了解HAR(Human Activity Recognition,人类行为识别)案例为何会有这样的设置。
二、HAR训练项目分析
由于前文仅仅采集Jogging(慢跑),Walking(走了)两种态势数据,但通常Stationary(站立不动)态势更常见和默认姿态,因此本文按篇一方法再采集一组Stationary姿态日志数据。

并同样拷贝到HAR/Log_data目录下,数据如下:

在PrepareDataset.py文件中,read_dataset( self )和preprocess_data( self, data )是用来处理WISDM数据集的,而get_data_from_file( self, fileName, preparedDataFileName )和prepare_self_logged_data( self )函数是用来处理自行采集数据集的。

read_dataset会读取WISDM数据集的datasets/WISDM_ar_v1.1_raw.txt文件

这些数据是已经做了转换预处理的数据集,见下图红线标注部分。

而get_data_from_file( self, fileName, preparedDataFileName )函数读取自行采集数据集(.csv)文件时,做了转换预处理,确保和WISDM数据集一致。

同时项目还把预处理过的自行采集数据集与训练好的模型一并以csv格式输出到目录中,以源数据目录命名,例如Log_data.csv。

下来就是输入数据数量问题,由于在FP-AI-SENSING1案例项目,数据采集是按一定时间间隔连续实时采集的,采集间隔也很短(毫秒级别)

因此get_segment_indices和get_data_segments函数就是将采集到的连续数据处理成一个长度为seqLength的窗口的输入数据集,即每次输入数据是一段24组(一组3个数据值,x/y/z)数据,也就对应了我们前文定义输入数据缓存是static ai_float in_data[AI_HAR_IGN_IN_1_SIZE=24*3*1];,共72个float 数据。显然HAR项目做法是通过一组连续数据集作为输入比单个态势数据更能反应人类行为姿态的持续性,更贴近实际。

在read_dataset函数加入打印读取的WISDM数据集语句。

在prepare_self_logged_data函数加入打印读取自行采集数据集语句

因为打印输出依据后,后续会打印数据按输入数据长度来分段的信息,暂时保持seqLength和stepSize为默认的24数值,运行python3 .\RunMe.py --dataDir=Log_data命令:
- PS D:\tools\arm_tool\STM32CubeIDE\STM32CubeFunctionPack_SENSING1_V4.0.3\Utilities\AI_Ressources\Training Scripts\HAR> python3 .\RunMe.py --dataDir=Log_data
- Using TensorFlow backend.
- Running HAR on WISDM dataset, with following variables
- merge = True
- modelName = IGN,
- segmentLength = 24
- stepSize = 24
- preprocessing = True
- trainTestSplit = 0.6
- trainValidationSplit = 0.7
- nEpochs = 20
- learningRate = 0.0005
- decay =1e-06
- batchSize = 64
- verbosity = 1
- dataDir = Log_data
- nrSamplesPostValid = 2
- User Activity_Label Arrival_Time x y z
- 0 33 Jogging 49105962326000 -0.694638 12.680544 0.50395286;
- 1 33 Jogging 49106062271000 5.012288 11.264028 0.95342433;
- 2 33 Jogging 49106112167000 4.903325 10.882658 -0.08172209;
- 3 33 Jogging 49106222305000 -0.612916 18.496431 3.0237172;
- 4 33 Jogging 49106332290000 -1.184970 12.108489 7.205164;
- ... ... ... ... ... ... ...
- 1098199 19 Sitting 131623331483000 9.000000 -1.570000 1.69;
- 1098200 19 Sitting 131623371431000 9.040000 -1.460000 1.73;
- 1098201 19 Sitting 131623411592000 9.080000 -1.380000 1.69;
- 1098202 19 Sitting 131623491487000 9.000000 -1.460000 1.73;
- 1098203 19 Sitting 131623531465000 8.880000 -1.330000 1.61;
-
- [1098204 rows x 6 columns]
- Segmenting Train data
- Segments built : 100%|███████████████████████████████████████████████████| 27456/27456 [00:28<00:00, 954.67 segments/s]
- Segmenting Test data
- Segments built : 100%|██████████████████████████████████████████████████| 18304/18304 [00:14<00:00, 1298.22 segments/s]
- Segmentation finished!
- preparing data file from all the files in directory Log_data
- parsing data from IoT01-MemsAnn_11_Jan_23_16h_57m_17s.csv
- parsing data from IoT01-MemsAnn_11_Jan_23_16h_57m_53s.csv
- parsing data from IoT01-MemsAnn_26_Jan_23_15h_51m_01s.csv
- x y z Activity_Label
- 0 -1.965414 -0.143890 9.367359 Walking
- 1 -1.629783 0.664754 9.618931 Walking
- 2 -1.720833 0.384629 9.492079 Walking
- 3 -1.681419 0.534637 9.648173 Walking
- 4 -1.729849 0.421650 9.557259 Walking
- ... ... ... ... ...
- 2639 -1.171046 0.033572 9.746819 Stationary
- 2640 -1.212873 0.007256 9.759376 Stationary
- 2641 -1.212011 0.019485 9.753982 Stationary
- 2642 -1.172311 -0.004511 9.734770 Stationary
- 2643 -1.175431 0.035787 9.753447 Stationary
-
- [2644 rows x 4 columns]
- Segmenting the AI logged Train data
- Segments built : 100%|████████████████████████████████████████████████████████| 67/67 [00:00<00:00, 2795.31 segments/s]
- Segmenting the AI logged Test data
- Segments built : 100%|████████████████████████████████████████████████████████| 45/45 [00:00<00:00, 2370.94 segments/s]
- Segmentation finished!
- _________________________________________________________________
- Layer (type) Output Shape Param #
- =================================================================
- conv2d_1 (Conv2D) (None, 9, 3, 24) 408
- _________________________________________________________________
- max_pooling2d_1 (MaxPooling2 (None, 3, 3, 24) 0
- _________________________________________________________________
- flatten_1 (Flatten) (None, 216) 0
- _________________________________________________________________
- dense_1 (Dense) (None, 12) 2604
- _________________________________________________________________
- dropout_1 (Dropout) (None, 12) 0
- _________________________________________________________________
- dense_2 (Dense) (None, 4) 52
- =================================================================
- Total params: 3,064
- Trainable params: 3,064
- Non-trainable params: 0
- _________________________________________________________________
- Train on 19288 samples, validate on 8233 samples
- Epoch 1/20
- 2023-01-26 17:12:56.882726: I tensorflow/core/platform/cpu_feature_guard.cc:142] Your CPU supports instructions that this TensorFlow binary was not compiled to use: AVX2
- 19288/19288 [==============================] - 1s 54us/step - loss: 1.2022 - acc: 0.5290 - val_loss: 0.7089 - val_acc: 0.7409
- Epoch 2/20
- 19288/19288 [==============================] - 1s 41us/step - loss: 0.7520 - acc: 0.7017 - val_loss: 0.5342 - val_acc: 0.7985
- Epoch 3/20
- 19288/19288 [==============================] - 1s 41us/step - loss: 0.6079 - acc: 0.7571 - val_loss: 0.4573 - val_acc: 0.8153
- Epoch 4/20
- ... ...
- 19288/19288 [==============================] - 1s 39us/step - loss: 0.3306 - acc: 0.8899 - val_loss: 0.2669 - val_acc: 0.9113
- Epoch 20/20
- 19288/19288 [==============================] - 1s 40us/step - loss: 0.3194 - acc: 0.8913 - val_loss: 0.2646 - val_acc: 0.9168
- 12831/12831 [==============================] - 0s 22us/step
- Accuracy for each class is given below.
- Jogging : 97.51 %
- Stationary : 98.63 %
- Stairs : 70.94 %
- Walking : 81.55 %
- PS D:\tools\arm_tool\STM32CubeIDE\STM32CubeFunctionPack_SENSING1_V4.0.3\Utilities\AI_Ressources\Training Scripts\HAR>
读取到的WISDM数据集大小是1098204≈24*(27456+18304),而27456+18304是按--trainSplit参数默认值0.6:0.4比例切分的。读取到的自行采集数据大小是2644≈24*(67+45)。

三、工程调整
从前面分析来看,输入数据数量还是采用默认数值24问题不大(各位粉丝可以自行调整其大小来测试及观察效果),输出数据数量由于有WISDM数据集参与,保持'Jogging', 'Stationary', 'Stairs', 'Walking'是中分类也OK。现注意到,其实输入数据是经过了预处理转换实际加速度值,而非是传感器原始输出数值。
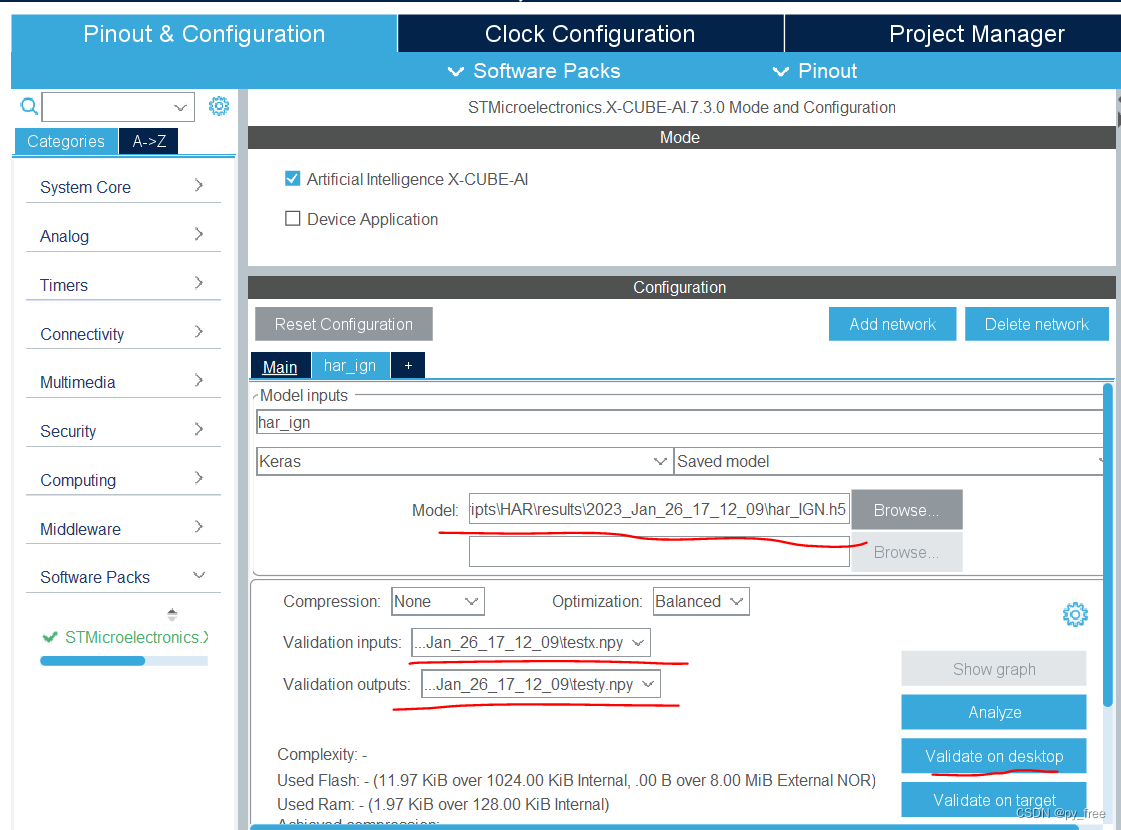
由于自行采集数据增加了Stationary数据文件,因此在cubeMX上采用新的训练模型文件重新生成c语言的神经网络模型。

然后调整输入数据及预处理函数acquire_and_process_data,采用真实数据来测试

该函数有原来的随机赋值,
- int acquire_and_process_data(void *in_data,int factor)
- {
- printf("in_data:");
- for (int i=0; i<AI_HAR_IGN_IN_1_SIZE; i++)
- {
- switch(i%3){
- case 0:
- ((ai_float*)in_data)[i] = -175+(ai_float)(i*factor*1.2)/10.0;
- break;
- case 1:
- ((ai_float*)in_data)[i] = 50+(ai_float)(i*factor*0.6)/100.0;
- break;
- case 2:
- ((ai_float*)in_data)[i] = 975-(ai_float)(i*factor*1.8)/100.0;
- break;
- default:
- break;
- }
- printf("%.4f ",((ai_float*)in_data)[i]);
- }
- printf("\n");
-
- return 0;
- }
调整为
- ai_float in_buf[] =
- {
- -1.9654135467252831,-0.14388957575400915,9.36735860765576,
- -1.6297827960727935,0.6647544204312931,9.618930851170278,
- -1.7208332169161387,0.38462856310059845,9.492079217583663,
- -1.6814190066807724,0.5346365723749872,9.648173176699613,
- -1.7298486510592452,0.42164964981080416,9.557259289818587,
- -1.7618787694384546,0.45864558999786653,9.653153776935605,
- -1.7410197123193858,0.4236369742675384,9.55486293595946,
- -1.7600076822930908,0.46214612481362705,9.594426626710453,
- -1.5761631958773263,0.3715109598910308,9.436853714636964,
- -1.5920827364351244,0.37070313540523914,9.66189484448469,
- -1.6178308849438598,0.37500917334673567,9.695719226290015,
- -1.4388296833472143,0.6108605310285585,9.464814699883437,
- -1.5651621282887258,0.5691273914891515,9.513897717476588,
- -1.4637992479412343,0.5105873209777632,9.501636895304161,
- -0.6794677157685166,0.5024637601753793,8.96404801376064,
- 0.2600149177042748,0.6699546179356337,8.903349009412763,
- 1.0712686735261918,1.4889662656074603,9.520348132500752,
- 0.3914123345764725,1.4210706041563634,10.557387805652848,
- 1.0779003359396493,1.0582703827741018,10.454469820960814,
- 0.12433283758079197,-0.27273511643713033,10.328552286632643,
- -0.010219096051988997,0.2961821896002729,9.483084545625971,
- -1.6910112286007235,-0.2898761724876157,9.704755735796937,
- -2.693651827312974,-0.41126025575408387,9.825328217800239,
- -2.8416981790648177,-0.14586229740441406,9.880552703938179
- };
-
- int acquire_and_process_data(void *in_data,int factor)
- {
- printf("in_data:");
- for (int i=0; i<AI_HAR_IGN_IN_1_SIZE; i++)
- {
- ((ai_float*)in_data)[i] =in_buf[i];
- printf("%.4f ",((ai_float*)in_data)[i]);
- }
- printf("\n");
-
- return 0;
- }
重新编辑及加载到开发板,打开串口助手,输入test*,查看测试效果如下,显然和期待有很大出入:

四、测试有误问题
上述结果和HAR项目中的PrepareDataset.py分类似乎并没匹配上,那么就要分析PrepareDataset.py分类和生成后的c语言模型时如何对应的,以及用来测试的数据是否符合模型要求。

为此,再次回到HAR训练模型项目,在RunMe.py文件中追加以下语句:
- print("TestX:")
- print(TestX[0:1])
- print("TestY:")
- print(TestY[0:1])
以获取用来测试的真实模拟数据,再次运行python3 .\RunMe.py --dataDir=Log_data命令,最后部分输出如下:
- TestX:
- [[[[-3.64077855e-16]
- [-4.69612372e-16]
- [ 3.68092310e-10]]
-
- [[ 1.02756571e+01]
- [-1.14305305e+01]
- [ 2.61872125e+01]]
-
- [[-2.84181689e+00]
- [-3.54747048e+00]
- [-5.51206446e+00]]
-
- [[-3.82102513e+00]
- [-1.41233186e+01]
- [-4.59900586e+00]]
-
- [[ 6.68010824e+00]
- [ 9.39457601e+00]
- [-2.96397789e+00]]
-
- [[-1.71771782e+01]
- [ 1.19374149e+01]
- [ 3.05770680e+00]]
-
- [[-6.65782005e+00]
- [ 2.39062819e+00]
- [ 3.22844912e+00]]
-
- [[ 4.59021292e+00]
- [-6.27548028e+00]
- [-4.92783556e+00]]
-
- [[ 8.03018658e+00]
- [-2.72208600e+00]
- [-6.35796053e+00]]
-
- [[ 7.73164454e+00]
- [-6.31879160e+00]
- [-5.90723810e+00]]
-
- [[ 8.53803514e-01]
- [-9.75763211e+00]
- [ 1.02466115e+01]]
-
- [[ 1.11299171e+01]
- [-1.70658346e+01]
- [ 2.18511283e+01]]
-
- [[ 3.92044994e-01]
- [ 5.94768181e+00]
- [ 4.30131750e+00]]
-
- [[-5.61807988e+00]
- [ 1.97310400e+01]
- [-2.22512540e+00]]
-
- [[ 3.86836548e+00]
- [ 1.71617325e+00]
- [-5.86292387e+00]]
-
- [[ 7.65913325e+00]
- [-7.19628424e+00]
- [ 2.01628025e+00]]
-
- [[-7.52357836e+00]
- [ 3.68102584e+00]
- [-1.22753233e+01]]
-
- [[-5.12351958e+00]
- [ 1.23941669e+01]
- [-1.77385540e+00]]
-
- [[-4.86155823e-01]
- [ 1.26333902e+01]
- [ 5.93595914e+00]]
-
- [[-1.96569165e+01]
- [ 1.00467317e+01]
- [ 9.47374003e+00]]
-
- [[-4.34050581e+00]
- [ 5.16311148e-01]
- [-5.63004156e-01]]
-
- [[-3.57974669e+00]
- [ 4.87240857e-01]
- [-9.38271247e-01]]
-
- [[ 6.11930536e+00]
- [ 5.99067573e+00]
- [-7.68834262e+00]]
-
- [[ 1.12153409e+01]
- [ 2.37168199e+00]
- [-7.40963357e+00]]]]
- TestY:
- [[1. 0. 0. 0.]]
- PS D:\tools\arm_tool\STM32CubeIDE\STM32CubeFunctionPack_SENSING1_V4.0.3\Utilities\AI_Ressources\Training Scripts\HAR>
显然输入24*3的一组数据,输出结果是[1. 0. 0. 0.],再将该数据用于测试 c语言模型神经网络模型API调用。
- ai_float in_buf[] =
- {
- -3.64077855e-16,-4.69612372e-16,3.68092310e-10,
- 1.02756571e+01,-1.14305305e+01,2.61872125e+01,
- -2.84181689e+00,-3.54747048e+00,-5.51206446e+00,
- -3.82102513e+00,-1.41233186e+01,-4.59900586e+00,
- 6.68010824e+00, 9.39457601e+00,-2.96397789e+00,
- -1.71771782e+01,1.19374149e+01,3.05770680e+00,
- -6.65782005e+00,2.39062819e+00,3.22844912e+00,
- 4.59021292e+00,-6.27548028e+00,-4.92783556e+00,
- 8.03018658e+00,-2.72208600e+00,-6.35796053e+00,
- 7.73164454e+00,-6.31879160e+00,-5.90723810e+00,
- 8.53803514e-01,-9.75763211e+00, 1.02466115e+01,
- 1.11299171e+01,-1.70658346e+01, 2.18511283e+01,
- 3.92044994e-01, 5.94768181e+00, 4.30131750e+00,
- -5.61807988e+00, 1.97310400e+01,-2.22512540e+00,
- 3.86836548e+00, 1.71617325e+00,-5.86292387e+00,
- 7.65913325e+00,-7.19628424e+00, 2.01628025e+00,
- -7.52357836e+00, 3.68102584e+00,-1.22753233e+01,
- -5.12351958e+00, 1.23941669e+01,-1.77385540e+00,
- -4.86155823e-01, 1.26333902e+01, 5.93595914e+00,
- -1.96569165e+01, 1.00467317e+01, 9.47374003e+00,
- -4.34050581e+00, 5.16311148e-01,-5.63004156e-01,
- -3.57974669e+00, 4.87240857e-01,-9.38271247e-01,
- 6.11930536e+00, 5.99067573e+00,-7.68834262e+00,
- 1.12153409e+01, 2.37168199e+00,-7.40963357e+00
- };
-
- int acquire_and_process_data(void *in_data,int factor)
- {
- printf("in_data:");
- for (int i=0; i<AI_HAR_IGN_IN_1_SIZE; i++)
- {
- ((ai_float*)in_data)[i] =in_buf[i];
- printf("%.4f ",((ai_float*)in_data)[i]);
- }
- printf("\n");
-
- return 0;
- }
再次编译下载程序,采用串口助手测试如下,输出数据为,【0.943687 0.000000 0.000294 0.056019】,而实际数据是[1. 0. 0. 0.],显然能对应上,只是精度问题:

五、精度问题
再次回到HAR训练项目上,如前文所述,训练结果按时间生成一个目录进行输出:

输出了训练的acc 、loss变化曲线图和混淆矩阵图,观察可以看到,用于训练数据其主要还是来自于WISDM的数据集占据大头,从混淆矩阵也可以看出,为何前面测试时输出结果0.943687 0.000000 0.000294 0.056019】,显然训练过程中,'Jogging'姿态会有一部分判断 'Stairs', 'Walking'姿态。

在训练过程日志显示:

再次改写RunMe.py,加入下面打印语句,查看用于训练、验证及测试的数据集量级:
- print("TrainX:"+str(len(TrainX)))
- print("TrainY:"+str(len(TrainY)))
- print("ValidationX:"+str(len(ValidationX)))
- print("ValidationY:"+str(len(ValidationY)))
- print("TestX:"+str(len(TestX)))
- print("TestY:"+str(len(TestY)))
再次运行python3 .\RunMe.py --dataDir=Log_data命令:

通常在实际项目中,不断优化算法模型是主要原因,但相信ST公司及其合作团队应该就算法模型做了足够好,而本文测试验证为何还出现精度相差这么大,应该是以下几点:
1)本文用于训练模型的数据集不是同一设备,同一批次,统一采集方法获得足够量数据集。
2)本文自行采集的数量偏小,可能预WISDM采集数据方法存在差异而出现精确性问题,并加入其中,还是会影响模型训练精度的(若仅采用WISDM采集数据集)。
3)本文仅采用了HAR训练项目建议的默认参数,实际项目中,可能需要我们根据数据集及部署环境,不断尝试不同参数设置来训练和使用神经网络模型。
4)cube.AI将keras训练的神经网络模型转换为c语言的神经网络模型虽然损耗极小,但还是存在一定精度损失的。

篇一、二,是基于FP-AI-SENSING1案例和配套的B-L475E-IOT01A开发板来使用cube.AI软件包的,那么在实际使用cube.AI时,需要与我们项目实际硬件平台,并基于该硬件平台采集的数据进行数据预处理和神经网络模型构建、训练、验证及测试,然后再通过cubeMX和cube.AI将训练好的神经网络模型转换为c语言支持的AI模型,通过嵌入式程序加载(AI模型+cube.AI)从而实现神经网络计算的前端或边缘端部署,请阅读偏三。
————————————————
版权声明:py_free-物联智能
如有侵权请联系删除
|
 微信公众号
微信公众号
 手机版
手机版