|
正好手里有个ws2812的灯环,全彩模式开始。
WS2812特点:
1.WS2812灯珠内置控制电路与RGB芯片,集成在一个5050封装的元器件中,构成一个完整的外控像素点。
2.每个像素点的三基色可实现256级亮度显示,完成16777216种颜色的全真色彩显示,扫描频率不低于400Hz/s。
3.串行级联接口,能通过一根信号线完成数据的接收与解码。
4.当刷新速率30帧/秒时,低速模式级联数不小于512点,高速模式不小于1024点。
5.数据发送速度可达800Kbps。
数据传输:
ws2812的每颗灯珠的控制需要24位数据,分为8位绿色+8位红色+8位蓝色,每个像素点的三基色颜色可实现256级亮度显示,完成16777216种颜色的全真色彩显示。灯珠之间采用串行级联,在上电复位以后,控制器可向灯带发送一串24bit的数据,比如需要点亮10颗灯,我们发送10个24bit的数据到第一个灯,第一个灯的DIN端接受控制器发过来的24bit数据,第一个灯珠会提取第一个24bit数据后会将该数据送进数据锁存器,剩余的数据经过内部整形电路向下传送,直到所有的灯都获取一个24bit数据。这10个24bit数据的发送间隔不能超过50us,否则会导致下一次的颜色数据被第一个重新锁存,就无法完成完整的点亮。
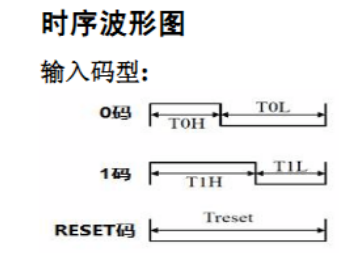
这里需要着重点一下时序相关的知识,先看时序波形图和数据传输时间表: 
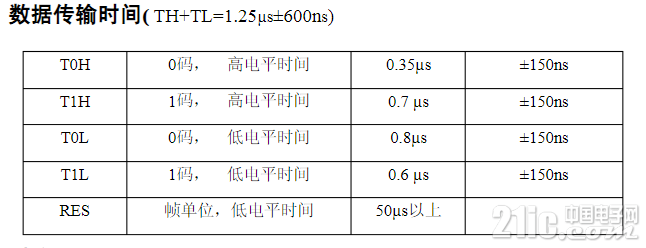
根据上面两个图可以看到ws2812的电**转是纳秒级别的,所以在使用单片机外设时我们需要对单片机的外设的传输速度进行控制,速度慢了根本无法点亮。
操作开始:
在驱动ws2812的时候一般采用PWM或者SPI的方式,这两个速度较快,比直接使用IO口进行电**转要方便,且控制效果更好。这里我们采用SPI的方式,因为在点灯是的数据发送间隔时间的约束,如果我们使用SPI发送的数据较多,中途遇到中断可能会打断我们的点灯,所以我这里使用SPI的DMA进行控制,不怕被其他影响。
通过硬件SPI我们模拟WS2812的通信时序。单片机选用STM32F103,主频72M,SPI1分频设置为8,这样SPI1的通信频率为9M。时间很充足,如果使用SPI2,则需要减小分频系数,否则无法点亮。我这里采用的便是SPI2,4分频,因为SPI1被我的屏幕占用了。
.h文件只要定义了灯珠的个数和0码1码。不同的灯珠数量只需修改PIXEL_NUM 的值。
- #ifndef __WS2812_H
-
- #define __WS2812_H
-
-
-
- #include "stm32f10x.h"
-
-
-
- #define PIXEL_NUM 24
-
-
-
- //硬件spi模拟ws2811时序(用spi的8位数据模拟ws281x的一位数据)
-
- //要将系统时钟设置为56M,分频数设置为8,则SPI的通信频率为7M,传输一位数据的时间约为143纳秒(ns)
-
- //3*143 = 429ns 5*143 = 715ns 符合WS281X芯片的通信时序。
-
- // _____
-
- // | |___| 11111000 high level
-
- // ___
-
- // | |_____| 11100000 low level
-
-
-
- #define WS_HIGH 0XF8
-
- #define WS_LOW 0XE0
-
-
-
- void ws281x_init(void);
-
- void ws281x_closeAll(void);
-
- void ws281x_rainbowCycle(uint8_t wait);
-
- uint32_t ws281x_color(uint8_t red, uint8_t green, uint8_t blue);
-
- void ws281x_setPixelColor(uint16_t n ,uint32_t GRBcolor);
-
- void ws281x_show(void);
-
-
-
- void ws281x_theaterChase(uint32_t c, uint8_t wait);
-
- void ws281x_colorWipe(uint32_t c, uint8_t wait);
-
- void ws281x_rainbow(uint8_t wait);
-
- void ws281x_theaterChaseRainbow(uint8_t wait);
-
-
-
- #endif /* __WS2812_H */
- #include "../BOARD/ws2812/ws2812.h"
-
- #include "usart.h"
-
- #include "delay.h"
-
-
-
- uint8_t pixelBuffer[PIXEL_NUM][24] ;
-
-
-
-
-
- void ws281x_init(void)
-
- {
-
- GPIO_InitTypeDef GPIO_InitStructure;
-
- SPI_InitTypeDef SPI_InitStructure;
-
- DMA_InitTypeDef DMA_InitStructure;
-
-
-
- RCC_APB2PeriphClockCmd(RCC_APB2Periph_GPIOB, ENABLE); //PORTA时钟使能
-
- RCC_APB1PeriphClockCmd(RCC_APB1Periph_SPI2, ENABLE); //SPI1时钟使能
-
- RCC_AHBPeriphClockCmd(RCC_AHBPeriph_DMA1, ENABLE); //使能DMA传输
-
-
-
-
-
- /* PA7 SPI1_MOSI */
-
- GPIO_InitStructure.GPIO_Pin = GPIO_Pin_15;
-
- GPIO_InitStructure.GPIO_Mode = GPIO_Mode_AF_PP; //PA7复用推挽输出 SPI
-
- GPIO_InitStructure.GPIO_Speed = GPIO_Speed_50MHz;
-
- GPIO_Init(GPIOB, &GPIO_InitStructure);//初始化GPIOA
-
-
-
- SPI_InitStructure.SPI_Direction = SPI_Direction_1Line_Tx; //设置SPI单向或者双向的数据模式:SPI设置为双线双向全双工
-
- SPI_InitStructure.SPI_Mode = SPI_Mode_Master; //设置SPI工作模式:设置为主SPI
-
- SPI_InitStructure.SPI_DataSize = SPI_DataSize_8b; //设置SPI的数据大小:SPI发送接收8位帧结构
-
- SPI_InitStructure.SPI_CPOL = SPI_CPOL_Low; //串行同步时钟的空闲状态为低电平
-
- SPI_InitStructure.SPI_CPHA = SPI_CPHA_2Edge; //串行同步时钟的第2个跳变沿(上升或下降)数据被采样
-
- SPI_InitStructure.SPI_NSS = SPI_NSS_Soft; //NSS信号由硬件(NSS管脚)还是软件(使用SSI位)管理:内部NSS信号有SSI位控制
-
- SPI_InitStructure.SPI_BaudRatePrescaler = SPI_BaudRatePrescaler_4; //定义波特率预分频的值:波特率预分频值为16
-
- SPI_InitStructure.SPI_FirstBit = SPI_FirstBit_MSB; //指定数据传输从MSB位还是LSB位开始:数据传输从MSB位开始
-
- SPI_InitStructure.SPI_CRCPolynomial = 7; //CRC值计算的多项式
-
- SPI_Init(SPI2, &SPI_InitStructure); //根据SPI_InitStruct中指定的参数初始化外设SPIx寄存器
-
-
-
- SPI_Cmd(SPI2, ENABLE); //使能SPI外设
-
- SPI_I2S_DMACmd(SPI2, SPI_I2S_DMAReq_Tx, ENABLE);
-
-
-
- DMA_DeInit(DMA1_Channel5); //将DMA的通道1寄存器重设为缺省值
-
- DMA_InitStructure.DMA_PeripheralBaseAddr = (uint32_t) &(SPI2 -> DR); //cpar; //DMA外设ADC基地址
-
- DMA_InitStructure.DMA_MemoryBaseAddr = (uint32_t)pixelBuffer; //cmar; //DMA内存基地址
-
- DMA_InitStructure.DMA_DIR = DMA_DIR_PeripheralDST; //数据传输方向,从内存读取发送到外设
-
- DMA_InitStructure.DMA_BufferSize = PIXEL_NUM * 24; //cndtr; //DMA通道的DMA缓存的大小
-
- DMA_InitStructure.DMA_PeripheralInc = DMA_PeripheralInc_Disable; //外设地址寄存器不变
-
- DMA_InitStructure.DMA_MemoryInc = DMA_MemoryInc_Enable; //内存地址寄存器递增
-
- DMA_InitStructure.DMA_PeripheralDataSize = DMA_PeripheralDataSize_Byte; //数据宽度为8位
-
- DMA_InitStructure.DMA_MemoryDataSize = DMA_MemoryDataSize_Byte; //数据宽度为8位
-
- DMA_InitStructure.DMA_Mode = DMA_Mode_Normal; //工作在正常缓存模式
-
- DMA_InitStructure.DMA_Priority = DMA_Priority_Medium; //DMA通道 x拥有中优先级
-
- DMA_InitStructure.DMA_M2M = DMA_M2M_Disable; //DMA通道x没有设置为内存到内存传输
-
- DMA_Init(DMA1_Channel5, &DMA_InitStructure); //根据DMA_InitStruct中指定的参数初始化DMA的通道USART1_Tx_DMA_Channel所标识的寄存器
-
-
-
- ws281x_closeAll(); //关闭全部的灯
-
- delay_ms(100); //关闭全部的灯需要一定的时间
-
- }
-
-
-
- void ws281x_closeAll(void)
-
- {
-
- uint16_t i;
-
- uint8_t j;
-
-
-
- for(i = 0; i < PIXEL_NUM; ++i)
-
- {
-
- for(j = 0; j < 24; ++j)
-
- {
-
- pixelBuffer[i][j] = WS_LOW;
-
- }
-
- }
-
- ws281x_show();
-
- }
-
-
-
- uint32_t ws281x_color(uint8_t red, uint8_t green, uint8_t blue)
-
- {
-
- return green << 16 | red << 8 | blue;
-
- }
-
-
-
- void ws281x_setPixelColor(uint16_t n ,uint32_t GRBcolor)
-
- {
-
- uint8_t i;
-
- if(n < PIXEL_NUM)
-
- {
-
- for(i = 0; i < 24; ++i)
-
- {
-
- pixelBuffer[n][i] = (((GRBcolor << i) & 0X800000) ? WS_HIGH : WS_LOW);
-
- }
-
- }
-
- }
-
-
-
- void ws281x_setPixelRGB(uint16_t n ,uint8_t red, uint8_t green, uint8_t blue)
-
- {
-
- uint8_t i;
-
-
-
- if(n < PIXEL_NUM)
-
- {
-
- for(i = 0; i < 24; ++i)
-
- {
-
- pixelBuffer[n][i] = (((ws281x_color(red,green,blue) << i) & 0X800000) ? WS_HIGH : WS_LOW);
-
- }
-
- }
-
- }
-
-
-
- void ws281x_show(void)
-
- {
-
- DMA_Cmd(DMA1_Channel5, DISABLE ); //关闭USART1 TX DMA1 所指示的通道
-
- DMA_ClearFlag(DMA1_FLAG_TC5);
-
- DMA_SetCurrDataCounter(DMA1_Channel5,24 * PIXEL_NUM );//DMA通道的DMA缓存的大小
-
- DMA_Cmd(DMA1_Channel5, ENABLE); //使能USART1 TX DMA1 所指示的通道
-
- }
-
-
-
-
-
-
-
- // Input a value 0 to 255 to get a color value.
-
- // The colours are a transition r - g - b - back to r.
-
- uint32_t ws281x_wheel(uint8_t wheelPos) {
-
- wheelPos = 255 - wheelPos;
-
- if(wheelPos < 85) {
-
- return ws281x_color(255 - wheelPos * 3, 0, wheelPos * 3);
-
- }
-
- if(wheelPos < 170) {
-
- wheelPos -= 85;
-
- return ws281x_color(0, wheelPos * 3, 255 - wheelPos * 3);
-
- }
-
- wheelPos -= 170;
-
- return ws281x_color(wheelPos * 3, 255 - wheelPos * 3, 0);
-
- }
-
-
-
- // Fill the dots one after the other with a color
-
- void ws281x_colorWipe(uint32_t c, uint8_t wait) {
-
- for(uint16_t i=0; i<PIXEL_NUM; i++) {
-
- ws281x_setPixelColor(i, c);
-
- ws281x_show();
-
- delay_ms(wait);
-
- }
-
- }
-
-
-
- void ws281x_rainbow(uint8_t wait) {
-
- uint16_t i, j;
-
-
-
- for(j=0; j<256; j++) {
-
- for(i=0; i<PIXEL_NUM; i++) {
-
- ws281x_setPixelColor(i, ws281x_wheel((i+j) & 255));
-
- }
-
- ws281x_show();
-
- delay_ms(wait);
-
- }
-
- }
-
-
-
- // Slightly different, this makes the rainbow equally distributed throughout
-
- void ws281x_rainbowCycle(uint8_t wait) {
-
- uint16_t i, j;
-
-
-
- for(j=0; j<256*5; j++) { // 5 cycles of all colors on wheel
-
- for(i=0; i< PIXEL_NUM; i++) {
-
- ws281x_setPixelColor(i,ws281x_wheel(((i * 256 / PIXEL_NUM) + j) & 255));
-
- }
-
- ws281x_show();
-
- delay_ms(wait);
-
- }
-
- }
-
-
-
- //Theatre-style crawling lights.
-
- void ws281x_theaterChase(uint32_t c, uint8_t wait) {
-
- for (int j=0; j<10; j++) { //do 10 cycles of chasing
-
- for (int q=0; q < 3; q++) {
-
- for (uint16_t i=0; i < PIXEL_NUM; i=i+3) {
-
- ws281x_setPixelColor(i+q, c); //turn every third pixel on
-
- }
-
- ws281x_show();
-
-
-
- delay_ms(wait);
-
-
-
- for (uint16_t i=0; i < PIXEL_NUM; i=i+3) {
-
- ws281x_setPixelColor(i+q, 0); //turn every third pixel off
-
- }
-
- }
-
- }
-
- }
-
-
-
- //Theatre-style crawling lights with rainbow effect
-
- void ws281x_theaterChaseRainbow(uint8_t wait) {
-
- for (int j=0; j < 256; j++) { // cycle all 256 colors in the wheel
-
- for (int q=0; q < 3; q++) {
-
- for (uint16_t i=0; i < PIXEL_NUM; i=i+3) {
-
- ws281x_setPixelColor(i+q, ws281x_wheel( (i+j) % 255)); //turn every third pixel on
-
- }
-
- ws281x_show();
-
-
-
- delay_ms(wait);
-
-
-
- for (uint16_t i=0; i < PIXEL_NUM; i=i+3) {
-
- ws281x_setPixelColor(i+q, 0); //turn every third pixel off
-
- }
-
- }
-
- }
-
- }
-

- const char s[5];
-
- int8_t i;
-
-
-
- int main(void)
-
- {
-
- // usart1_init(115200);
-
- delay_init();
-
-
-
- ws281x_init();
-
-
-
- while(1)
-
- {
-
- // Some example procedures showing how to display to the pixels:
-
- ws281x_colorWipe(ws281x_color(255, 0, 0), 50); // Red
-
- ws281x_colorWipe(ws281x_color(0, 255, 0), 50); // Green
-
- ws281x_colorWipe(ws281x_color(0, 0, 255), 50); // Blue
-
- //colorWipe(strip.Color(0, 0, 0, 255), 50); // White RGBW
-
- // Send a theater pixel chase in...
-
- ws281x_theaterChase(ws281x_color(127, 127, 127), 50); // White
-
- ws281x_theaterChase(ws281x_color(127, 0, 0), 50); // Red
-
- ws281x_theaterChase(ws281x_color(0, 0, 127), 50); // Blue
-
-
-
- //ws281x_rainbow(20);
-
- ws281x_rainbowCycle(20);
-
- ws281x_theaterChaseRainbow(200);
-
-
-
- for(i = 0; i < PIXEL_NUM; ++i)
-
- {
-
- ws281x_setPixelColor(i, ws281x_color(0,250,0));
-
- ws281x_show();
-
- delay_ms(500);
-
- }
-
- }
-
- }
在ws2812.c移植了Adafruit_NeoPixel库的部分函数,用以实现炫酷的显示效果。
都是基础的SPI,不说废话,移植就能用。展示一下效果吧!
---------------------
作者:呐咯密密
|
.png) STMCU小助手
发布时间:2022-12-10 21:00
STMCU小助手
发布时间:2022-12-10 21:00
 微信公众号
微信公众号
 手机版
手机版