关于stm32与esp8266之间的通信,在前面的文章中已经介绍得差不多了,本文章主要介绍的是app inventor的制作,然后生成app二维码,最后在手机端下载app,进而实现通过WIFI局域网控制stm32开发板,当然关于stm32与esp8266之间的一些东西也会粗略讲一下。
本章所用到的器件如下:
STM32F103ZET6最小系统板
ESP8266-01S模块
USB转microUSB数据线
四根杜邦线
连接如下:
32板3.3v----------->ESP8266的3.3v
32板GND---------->ESP8266的GND
32板的PA2-------->ESP8266的RX
32板的PA3-------->ESP8266的TX
stm32与esp8266通信
先附上32程序的主代码:
- <font face="Tahoma"><font size="3"><font color="#000000">#include "stdio.h"</font></font></font>
- <font face="Tahoma"><font size="3"><font color="#000000">#include "delay.h"</font></font></font>
- <font face="Tahoma"><font size="3"><font color="#000000">#include "led.h"</font></font></font>
- <font face="Tahoma"><font size="3"><font color="#000000">#include "usart.h"</font></font></font>
- <font face="Tahoma"><font size="3"><font color="#000000">#include "serial.h"</font></font></font>
- <font face="Tahoma"><font size="3"><font color="#000000">#include "esp8266.h"</font></font></font>
- <font face="Tahoma"><font size="3"><font color="#000000">
- </font></font></font>
- <font face="Tahoma"><font size="3"><font color="#000000">/* AT指令返回值的结尾没有\r\n这样的回车换行符,</font></font></font>
- <font face="Tahoma"><font size="3"><font color="#000000"> * 而在串口调试助手中,需要MCU输出\r\n给串口调试助手才能刷新缓冲区把字符显示出来,</font></font></font>
- <font face="Tahoma"><font size="3"><font color="#000000"> * 同时这个\r\n还起到回车换行的目的*/</font></font></font>
- <font face="Tahoma"><font size="3"><font color="#000000"> </font></font></font>
- <font face="Tahoma"><font size="3"><font color="#000000">/* AT指令的结尾处必须是\r\n*/</font></font></font>
- <font face="Tahoma"><font size="3"><font color="#000000">
- </font></font></font>
- <font face="Tahoma"><font size="3"><font color="#000000">/* serial.h中的usart1_send_usart2函数用于没有USB转TLL模块的人使用,</font></font></font>
- <font face="Tahoma"><font size="3"><font color="#000000"> * 此函数作用是利用串口1发送AT指令给串口2,串口2将AT指令发送给ESP8266,实现对ESP8266的AT指令配置,</font></font></font>
- <font face="Tahoma"><font size="3"><font color="#000000"> * 当然,如果你有USB转TTL模块的话,可以直接将ESP8266与USB转TTL模块直连,然后在串口调试助手里面直接配置AT指令*/</font></font></font>
- <font face="Tahoma"><font size="3"><font color="#000000">
- </font></font></font>
- <font face="Tahoma"><font size="3"><font color="#000000">extern u8 esp_sipsend1[];</font></font></font>
- <font face="Tahoma"><font size="3"><font color="#000000">extern u8 esp_sipsend2[];</font></font></font>
- <font face="Tahoma"><font size="3"><font color="#000000">
- </font></font></font>
- <font face="Tahoma"><font size="3"><font color="#000000">int main(void)</font></font></font>
- <font face="Tahoma"><font size="3"><font color="#000000">{ </font></font></font>
- <font face="Tahoma"><font size="3"><font color="#000000"> delay_init(); //延时函数初始化</font></font></font>
- <font face="Tahoma"><font size="3"><font color="#000000"> NVIC_PriorityGroupConfig(NVIC_PriorityGroup_2); //设置NVIC中断分组2:2位抢占优先级,2位响应优先级</font></font></font>
- <font face="Tahoma"><font size="3"><font color="#000000"> uart_init(115200); //串口1初始化为115200</font></font></font>
- <font face="Tahoma"><font size="3"><font color="#000000"> Uart2_Init(115200); //串口2初始化为115200</font></font></font>
- <font face="Tahoma"><font size="3"><font color="#000000"> LED_Init(); //初始化与LED连接的硬件接口</font></font></font>
- <font face="Tahoma"><font size="3"><font color="#000000"> Esp8266_Init();</font></font></font>
- <font face="Tahoma"><font size="3"><font color="#000000"> </font></font></font>
- <font face="Tahoma"><font size="3"><font color="#000000"> while(1)</font></font></font>
- <font face="Tahoma"><font size="3"><font color="#000000"> { </font></font></font>
- <font face="Tahoma"><font size="3"><font color="#000000"> usart1_send_usart2(); //利用串口1发送AT指令给串口2,从而达到配置ESP8266的目的,并且让模块的返回值在串口1打印出来</font></font></font>
- <font face="Tahoma"><font size="3"><font color="#000000"> if(Data_Compare((u8 *)"LEDK")) //点亮板上的led</font></font></font>
- <font face="Tahoma"><font size="3"><font color="#000000"> { </font></font></font>
- <font face="Tahoma"><font size="3"><font color="#000000"> led(1); </font></font></font>
- <font face="Tahoma"><font size="3"><font color="#000000"> Clear_Buf();</font></font></font>
- <font face="Tahoma"><font size="3"><font color="#000000"> Uart_SendStr(USART1, (u8 *)"led is open\r\n"); </font></font></font>
- <font face="Tahoma"><font size="3"><font color="#000000"> Uart_SendStr(USART2, esp_sipsend1); //利用串口2给esp8266发送AT+CIPSEND指令,告诉它下一次将发送具体数据</font></font></font>
- <font face="Tahoma"><font size="3"><font color="#000000"> Usart2_Receive_Data(USART1); //将串口2接收到的AT+CIPSEND指令返回的数据显示在串口1上</font></font></font>
- <font face="Tahoma"><font size="3"><font color="#000000"> Uart_SendStr(USART2, (u8 *)"led is open\r\n"); //发送具体数据给esp8266,让他转发到app上</font></font></font>
- <font face="Tahoma"><font size="3"><font color="#000000"> }</font></font></font>
- <font face="Tahoma"><font size="3"><font color="#000000"> else if(Data_Compare((u8 *)"LEDG")) //关闭板上的led</font></font></font>
- <font face="Tahoma"><font size="3"><font color="#000000"> {</font></font></font>
- <font face="Tahoma"><font size="3"><font color="#000000"> led(0);</font></font></font>
- <font face="Tahoma"><font size="3"><font color="#000000"> Clear_Buf();</font></font></font>
- <font face="Tahoma"><font size="3"><font color="#000000"> Uart_SendStr(USART1, (u8 *)"led is close\r\n"); </font></font></font>
- <font face="Tahoma"><font size="3"><font color="#000000"> Uart_SendStr(USART2, esp_sipsend2); //利用串口2给esp8266发送AT+CIPSEND指令,告诉它下一次将发送具体数据</font></font></font>
- <font face="Tahoma"><font size="3"><font color="#000000"> Usart2_Receive_Data(USART1); //将串口2接收到的AT+CIPSEND指令返回的数据显示在串口1上</font></font></font>
- <font face="Tahoma"><font size="3"><font color="#000000"> Uart_SendStr(USART2, (u8 *)"led is close\r\n"); //发送具体数据给esp8266,让他转发到app上 </font></font></font>
- <font face="Tahoma"><font size="3"><font color="#000000"> }</font></font></font>
- <font face="Tahoma"><font size="3"><font color="#000000"> }</font></font></font>
- <font face="Tahoma"><font size="3"><font color="#000000">}</font></font></font>
此代码中的serial.h包含几个自定义函数,其函数的作用见其右边的注释,代码如下所示:
- <font face="Tahoma"><font size="3"><font color="#000000">#ifndef __SERIAL_H</font></font></font>
- <font face="Tahoma"><font size="3"><font color="#000000">#define __SERIAL_H</font></font></font>
- <font face="Tahoma"><font size="3"><font color="#000000">#include "stdio.h" </font></font></font>
- <font face="Tahoma"><font size="3"><font color="#000000">#include "sys.h" </font></font></font>
- <font face="Tahoma"><font size="3"><font color="#000000">#include "delay.h"</font></font></font>
- <font face="Tahoma"><font size="3"><font color="#000000">#include "string.h"</font></font></font>
- <font face="Tahoma"><font size="3"><font color="#000000">#include "usart.h"</font></font></font>
- <font face="Tahoma"><font size="3"><font color="#000000">
- </font></font></font>
- <font face="Tahoma"><font size="3"><font color="#000000">#define tbuf 100</font></font></font>
- <font face="Tahoma"><font size="3"><font color="#000000">
- </font></font></font>
- <font face="Tahoma"><font size="3"><font color="#000000">void Uart2_Init(u32 bound); //初始化串口2</font></font></font>
- <font face="Tahoma"><font size="3"><font color="#000000">void Clear_Buf(void); //清除缓冲区数据</font></font></font>
- <font face="Tahoma"><font size="3"><font color="#000000">void Uart_SendStr(USART_TypeDef* USARTx, u8 *s); //往某一个串口发送指定字符串</font></font></font>
- <font face="Tahoma"><font size="3"><font color="#000000">void Usart2_Receive_Data(USART_TypeDef* USARTx); //将串口2返回的数据发送给串口1进行显示</font></font></font>
- <font face="Tahoma"><font size="3"><font color="#000000">u8 Data_Compare(u8 *p); //指定字符串与缓存数组数据进行数据比较</font></font></font>
- <font face="Tahoma"><font size="3"><font color="#000000">void usart1_send_usart2(void); //利用串口1发送AT指令给串口2,从而达到配置ESP8266的目的,并且让模块的返回值在串口1打印出来</font></font></font>
- <font face="Tahoma"><font size="3"><font color="#000000">
- </font></font></font>
- <font face="Tahoma"><font size="3"><font color="#000000">#endif</font></font></font>
其中Usart2_Receive_Data函数是用于接收esp8266返回的数据并在串口1进行显示,因为串口2是与esp8266进行连接的,只要串口2正确发送AT指令给esp8266,esp8266都会返回响应值,由于手头上没有USB转TTL模块,只能用这种方法来观察esp8266模块的返回值。
而usart1_send_usart2函数的作用是利用串口调试助手发送AT指令给串口1,串口1接收到数据之后,将数据通过串口2发送给esp8266模块,达到通过串口调试助手发送AT指令配置esp8266模块的目的,之所以用这种方式,其原因是手头上没有USB转TTL模块,才出此下策。
假如手头上有USB转TTL模块,上面的两个函数大可不必要,直接将USB转TTL直连上esp8266模块,然后USB端插在电脑上,利用串口调试助手即可直接发送AT指令去配置esp8266模块以及显示模块的返回值。
主函数中的Esp8266_Init函数是对esp8266进行一系列的配置,使得能够被app客户端所连接上,其详细代码如下所示:
- <font face="Tahoma"><font size="3"><font color="#000000">#include "esp8266.h"</font></font></font>
- <font face="Tahoma"><font size="3"><font color="#000000">
- </font></font></font>
- <font face="Tahoma"><font size="3"><font color="#000000">u8 esp_at[] = "AT\r\n"; //握手连接指令,返回"OK"</font></font></font>
- <font face="Tahoma"><font size="3"><font color="#000000">u8 esp_cifsr[] = "AT+CIFSR\r\n"; //本机IP地址查询指令</font></font></font>
- <font face="Tahoma"><font size="3"><font color="#000000">u8 esp_cipsend[] = "AT+CIPSEND=6\r\n"; //设置发送数据长度</font></font></font>
- <font face="Tahoma"><font size="3"><font color="#000000">u8 esp_test[] = "sunny\r\n"; //数据内容</font></font></font>
- <font face="Tahoma"><font size="3"><font color="#000000">u8 esp_rst[] = "AT+RST\r\n"; //软件复位</font></font></font>
- <font face="Tahoma"><font size="3"><font color="#000000">u8 esp_cwmode[] = "AT+CWMODE=2\r\n"; //设置ESP8266的工作模式2(AP模式,WIFI模块作为热点),返回"OK"或者"no change"</font></font></font>
- <font face="Tahoma"><font size="3"><font color="#000000">u8 esp_cwsap[] = "AT+CWSAP="ESP8266_TEST","1234567890",1,4\r\n";//设置WIFI的名称、密码、通道号、加密方式(4-WPA_WPA2_PSK)</font></font></font>
- <font face="Tahoma"><font size="3"><font color="#000000">u8 esp_cipmux[] = "AT+CIPMUX=1\r\n"; //打开多连接 </font></font></font>
- <font face="Tahoma"><font size="3"><font color="#000000">u8 esp_cipserver[] = "AT+CIPSERVER=1,8080\r\n"; //建立TCP服务器,开放端口8080,端口号可以改成其他的例如8086等等</font></font></font>
- <font face="Tahoma"><font size="3"><font color="#000000">u8 esp_cipsto[] = "AT+CIPSTO=2880\r\n"; //设置服务器超时时间为2880s,也就是连接服务器过程中可以等待的时间</font></font></font>
- <font face="Tahoma"><font size="3"><font color="#000000">
- </font></font></font>
- <font face="Tahoma"><font size="3"><font color="#000000">extern u8 RX_num; //接收计数变量</font></font></font>
- <font face="Tahoma"><font size="3"><font color="#000000">extern u8 RX_buffer[tbuf];</font></font></font>
- <font face="Tahoma"><font size="3"><font color="#000000">
- </font></font></font>
- <font face="Tahoma"><font size="3"><font color="#000000">void Esp8266_Init(void)</font></font></font>
- <font face="Tahoma"><font size="3"><font color="#000000">{</font></font></font>
- <font face="Tahoma"><font size="3"><font color="#000000"> Uart_SendStr(USART2, esp_cwmode); //设置ESP8266的工作模式2 AP,返回"OK"或者"no change"</font></font></font>
- <font face="Tahoma"><font size="3"><font color="#000000"> Usart2_Receive_Data(USART1); //将串口2收到的数据发送给串口1进行显示</font></font></font>
- <font face="Tahoma"><font size="3"><font color="#000000"> Uart_SendStr(USART1, (u8 *)"\r\nOK,set mode as AP with ESP8266!\r\n----------\r\n");</font></font></font>
- <font face="Tahoma"><font size="3"><font color="#000000"> </font></font></font>
- <font face="Tahoma"><font size="3"><font color="#000000"> Uart_SendStr(USART2, esp_rst); //设置ESP8266的工作模式后需要复位以生效该模式</font></font></font>
- <font face="Tahoma"><font size="3"><font color="#000000"> Usart2_Receive_Data(USART1); //复位后可能会返回一堆乱码</font></font></font>
- <font face="Tahoma"><font size="3"><font color="#000000"> Uart_SendStr(USART1, (u8 *)"\r\nOK,set RST success!\r\n----------\r\n");</font></font></font>
- <font face="Tahoma"><font size="3"><font color="#000000"> </font></font></font>
- <font face="Tahoma"><font size="3"><font color="#000000"> Uart_SendStr(USART2, esp_cwsap); //设置WIFI的名称及密码</font></font></font>
- <font face="Tahoma"><font size="3"><font color="#000000"> Usart2_Receive_Data(USART1); //将串口2收到的数据发送给串口1进行显示</font></font></font>
- <font face="Tahoma"><font size="3"><font color="#000000"> Uart_SendStr(USART1, (u8 *)"\r\nOK,set cwsap success!\r\n----------\r\n");</font></font></font>
- <font face="Tahoma"><font size="3"><font color="#000000"> </font></font></font>
- <font face="Tahoma"><font size="3"><font color="#000000"> Uart_SendStr(USART2, esp_cipmux); //设置多连接(多路连接模式)</font></font></font>
- <font face="Tahoma"><font size="3"><font color="#000000"> Usart2_Receive_Data(USART1); //将串口2收到的数据发送给串口1进行显示</font></font></font>
- <font face="Tahoma"><font size="3"><font color="#000000"> Uart_SendStr(USART1, (u8 *)"\r\nOK,set cipmux success!\r\n----------\r\n");</font></font></font>
- <font face="Tahoma"><font size="3"><font color="#000000"> </font></font></font>
- <font face="Tahoma"><font size="3"><font color="#000000"> Uart_SendStr(USART2, esp_cipserver); //设置wifi模块为TCP服务器模式,并配置端口为8080</font></font></font>
- <font face="Tahoma"><font size="3"><font color="#000000"> Usart2_Receive_Data(USART1); //将串口2收到的数据发送给串口1进行显示</font></font></font>
- <font face="Tahoma"><font size="3"><font color="#000000"> Uart_SendStr(USART1, (u8 *)"\r\nOK,set server success!\r\n----------\r\n");</font></font></font>
- <font face="Tahoma"><font size="3"><font color="#000000"> </font></font></font>
- <font face="Tahoma"><font size="3"><font color="#000000"> Uart_SendStr(USART2, esp_cipsto); //设置服务器超时时间为2880s</font></font></font>
- <font face="Tahoma"><font size="3"><font color="#000000"> Usart2_Receive_Data(USART1); //将串口2收到的数据发送给串口1进行显示</font></font></font>
- <font face="Tahoma"><font size="3"><font color="#000000"> Uart_SendStr(USART1, (u8 *)"\r\nOK,set cipsto success!\r\n----------\r\n");</font></font></font>
- <font face="Tahoma"><font size="3"><font color="#000000"> </font></font></font>
- <font face="Tahoma"><font size="3"><font color="#000000"> Uart_SendStr(USART2, esp_cifsr); //获取本机IP地址</font></font></font>
- <font face="Tahoma"><font size="3"><font color="#000000"> Usart2_Receive_Data(USART1); //将串口2收到的数据发送给串口1进行显示</font></font></font>
- <font face="Tahoma"><font size="3"><font color="#000000"> Uart_SendStr(USART1, (u8 *)"\r\nOK,get ip address success!\r\n----------\r\n");</font></font></font>
- <font face="Tahoma"><font size="3"><font color="#000000">}</font></font></font>
至于其中的AT指令,网上随便找一下都有一大堆关于AT指令的详细解释,这里就不再过多解释,而其他的函数,也没有什么好讲的,至此,stm32代码部分就到这里了。
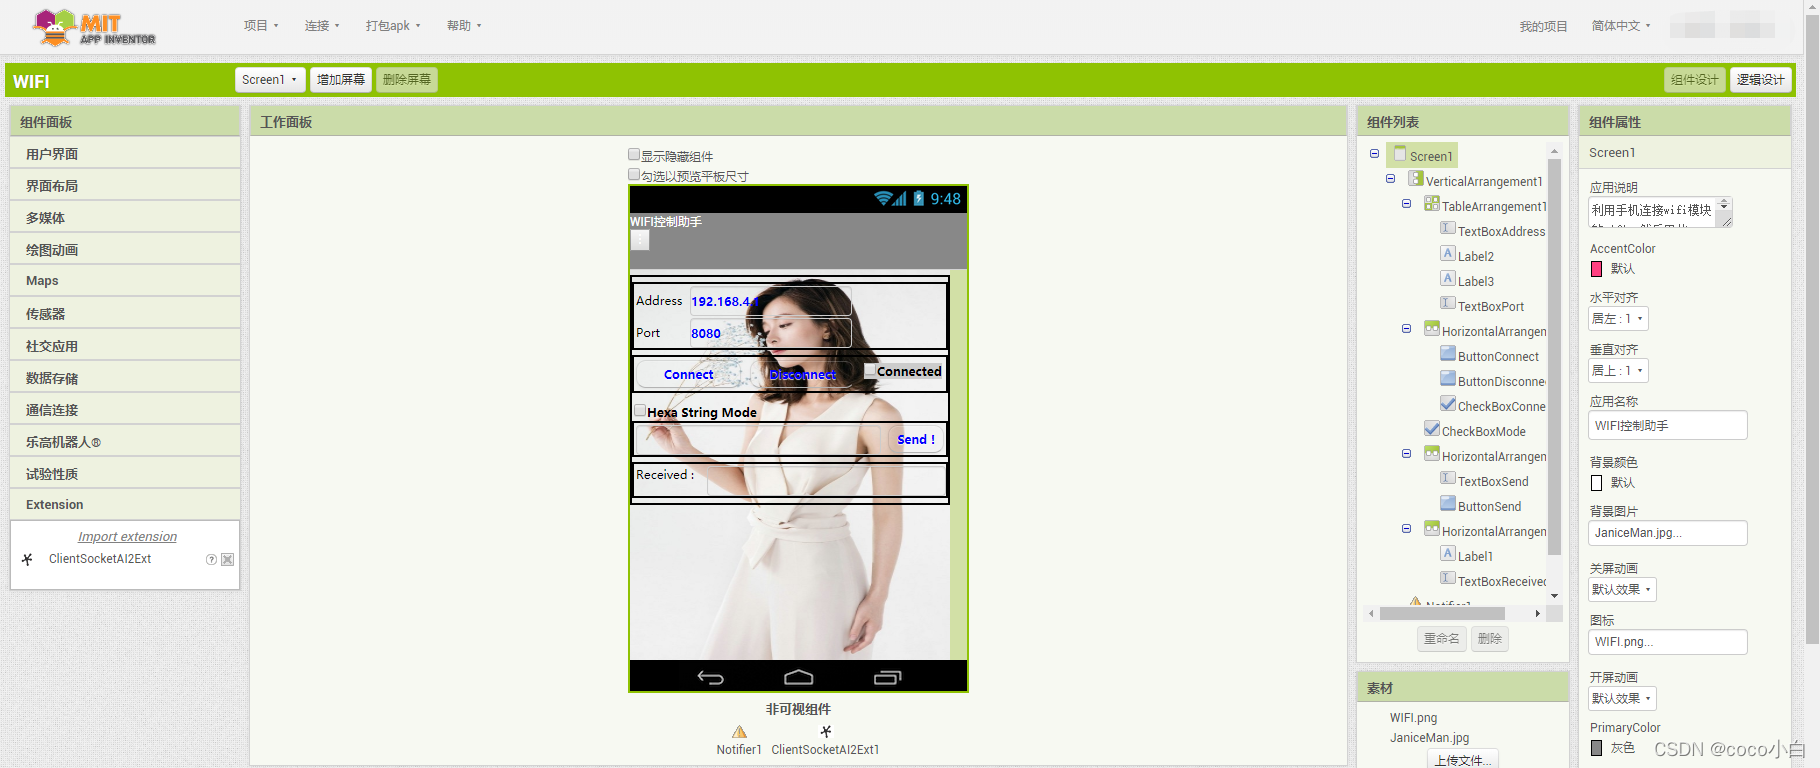
移动端app制作、生成、控制
接着进行app的设计,本章app的设计采用的是app inventor。
APP INVENTOR由谷歌实验室开发,后移交麻省理工学院,是一款可视化编程环境,采用搭积木的方式快速建立应用程序,并且可以结合AI伴侣,极其便利的在手机上进行测试和应用。
APP INVENTOR是完全基于网页的在线编程工具,国内外都有一些可用的服务器。
可以用QQ登录,登录后创建项目就可以进入编程界面。
中间显示的就是手机屏幕,通过拖拽工具到手机屏幕,就可以开始编程了,目前只支持Android手机。
为了便于编程调试可以在手机上安装AI伴侣,下载地址可以通过点击菜单栏 帮助->AI伴侣信息 打开下载帮助页。
————————————————
版权声明:i土豆
|
.png) STMCU小助手
发布时间:2022-10-16 20:19
STMCU小助手
发布时间:2022-10-16 20:19


 微信公众号
微信公众号
 手机版
手机版