|
这次目标是使用STM32C0的SPI硬件方式点亮ST7735彩屏,并移植GUILite。 一、GPIO选择 1、SPI需要使用4线,驱动屏幕可以不需回采数据,因此只用3线(没有使用PA6,MISO主入从出)
2、屏幕需要DC(屏命令和数据选择),RST(复位控制),BLK(背光控制,我这里没有额外进行控制,直接接3.3V)。 注:屏和芯片的SPI接口标识方式不同,SCL对应SPI_SCK(时钟),SDA对应SPI_MOSI(主出从入),CS对应SPI_NSS(片选)
3、为方便接线,根据SPI分布位置,尽量选择靠近GPIO,下图是我的选择
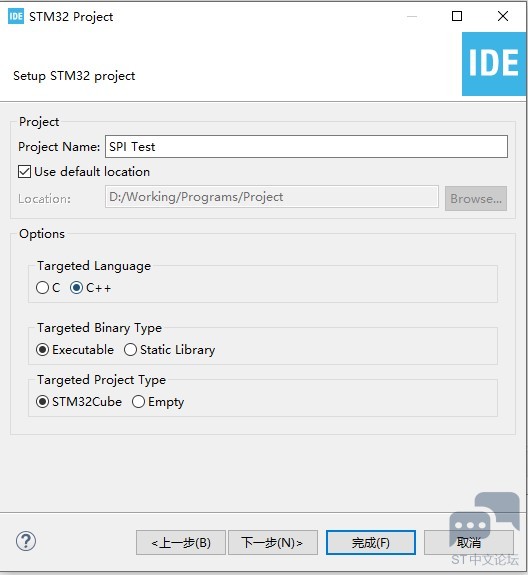
二、STM32CUBEIDE配置 1、因为要使用c++,需要建立c++工程
2、SPI设置 因只用3线驱动SPI,模式选择了主半双工(只发不收);使用硬件NSS,不需要额外代码去控制片选;采用8分频(6Mbps),速度太快有些屏会出现莫名其妙的问题,先保证亮屏,大家有空可以继续挑战屏的极限速度。
3、GPIO配置了PA0和PB1,并重命名Scr_DC和Scr_RST,方便写代码时不容易搞错。PA0速度设为high 三、代码 1、GuiLite介绍 GuiLite是一个开源的图形用户界面框架,只依赖于一个单一的头文件库(GuiLite.h),不需要很复杂的文件管理,代码量平易近人。 GuiLite由4千行C++代码编写,单片机上也能流畅运行,其最低的硬件运行要求如下:
开源地址:https://gitee.com/idea4good/GuiLite 例子:https://gitee.com/idea4good/GuiLiteSamples 可视化开发插件:https://gitee.com/idea4good/GuiLitePreviewer Guilite不像U8g2,没有自带各种屏的驱动,因此要自己编写屏的简单驱动。Guilite整个库只有一个单一的头文件库(GuiLite.h),只有把头文件拷入并做少量修改就行了。 这次我直接移植了例子中的Hello 3D效果,效果图如下,炫吧!只是针对小屏改了尺寸,没显示下面三角。
Let's go! 2、屏驱动 (1)spi接口: 按照习惯spi.c建立简化接口的函数: HAL_StatusTypeDef SPI_Send(uint8_t *pData, uint16_t Size) { return HAL_SPI_Transmit(&hspi1,pData,Size,1000); } (2)新建LCD7735.h 宏定义DC与RST接口高低电平设置 /#define Scr_Send_CMD HAL_GPIO_WritePin(Scr_DC_GPIO_Port, Scr_DC_Pin, GPIO_PIN_RESET); /#define Scr_Send_Data HAL_GPIO_WritePin(Scr_DC_GPIO_Port, Scr_DC_Pin, GPIO_PIN_SET ); /#define Scr_Reset HAL_GPIO_WritePin(Scr_RST_GPIO_Port, Scr_RST_Pin, GPIO_PIN_RESET); /#define Scr_Set HAL_GPIO_WritePin(Scr_RST_GPIO_Port, Scr_RST_Pin, GPIO_PIN_SET );**** (3)新建LCD7735.c //向LCD写指令,这里可以看出使用硬件片选,代码比较简单 void LCD_WR_REG(uint8_t CMD) { Scr_Send_CMD; SPI_Send(&CMD,1); } //向LCD写1个Byte数据 void LCD_WR_Byteuint8_t Data) { Scr_Send_Data; SPI_Send(&Data,1); } //批量发送数据 void LCD_WR_DATAS(uint8_t* pData,uint16_t Size) { Scr_Send_Data; SPI_Send(pData,Size); } //ST7735初始化代码,(代码比较长,直接可以上网拷贝修改一下就可用) void LCD7735_Init(void) {......} //设置显示窗 void LCD7735_SetWindows(uint8_t xStart, uint8_t yStart,uint8_t xEnd,uint8_t yEnd) { uint8_t temp[4] = {0,0,0,0}; LCD_WR_REG(0x2A); temp[1] = xStart + DELTA_X; temp[3] = xEnd + DELTA_X; LCD_WR_DATAS(temp,4); LCD_WR_REG(0x2B); temp[1] = yStart + DELTA_Y; temp[3] = yEnd + DELTA_Y; LCD_WR_DATAS(temp,4); LCD_WR_REG(0x2C); //开始写入GRAM } //这个最关键,GUILite需要知道屏幕如何在某个点上显示 void LCD7735_DrawPoint(uint8_t Xpos,uint8_t Ypos,uint16_t Color) { LCD7735_SetWindows(Xpos,Ypos,Xpos,Ypos); LCD_WR_DATAS((uint8_t *)&Color,2); } //画实心矩形 void LCD7735_FillRectangle(uint8_t x1, uint8_t y1, uint8_t x2, uint8_t y2,uint16_t Color) { uint16_t i,j; uint8_t Width,Height; Width = x2-x1+1; Height = y2-y1+1; LCD7735_SetWindows(x1,y1,x2,y2); for(i=0;i<Width;i++) for(j=0;j<Width;j++) LCD_WR_DATAS((uint8_t *)&Color,2); } 3、移植GUILite (1)拷贝GuiLite.h 加入#include "stm32c0xx_hal.h" 查找“delay_ms” 把delay_ms函数中内容修改为: void delay_ms(unsigned short nms) { HAL_Delay(nms); } (2)移植Hello3D 从GuiLiteSamples\Hello3D\UIcode目录中拷贝UIcode.cpp文件 修改 /#define UI_WIDTH 128 /#define UI_HEIGHT 128 /#define SHAPE_SIZE 30 ...... // Demo void create_ui(void phy_fb, int screen_width, int screen_height, int color_bytes, struct DISPLAY_DRIVER driver) { static c_surface surface(UI_WIDTH, UI_HEIGHT, color_bytes, Z_ORDER_LEVEL_0); static c_display display(phy_fb, screen_width, screen_height, &surface, driver); s_surface = &surface; s_display = &display; s_surface->fill_rect(0, 0, UI_WIDTH - 1, UI_HEIGHT - 1, 0, Z_ORDER_LEVEL_0); Cube theCube; Pyramid thePyramid; while(1) { theCube.draw(60, 50, true);//erase footprint theCube.rotate(); theCube.draw(60, 50, false);//refresh cube // thePyramid.draw(120, 250, true);//erase footprint // thePyramid.rotate(); // thePyramid.draw(120, 250, false);//refresh pyramid thread_sleep(50); } } 3、建立接口 (1)ui.h,注意中间使用#ifdef __cplusplus是为了c与c++混合编程 /#ifndef __UI_H /#define __UI_H /#include <GuiLite.h> /#ifdef __cplusplus extern "C"{ /#endif / 包含系统头文件 / /#include "stm32c0xx_hal.h" /#include "LCD7735.h" / 自定义常量宏和表达式宏 / //Transfer GuiLite 32 bits color to your LCD color /#define GL_RGB_32_to_16(rgb) (((((unsigned int)(rgb)) & 0xFF) >> 3) | ((((unsigned int)(rgb)) & 0xFC00) >> 5) | ((((unsigned int)(rgb)) & 0xF80000) >> 8)) /#define GUILITE_ON // Do not define this macro upon GuiLite.h once more / 声明给外部使用的函数 / void gfx_draw_pixel(int x, int y, unsigned int rgb); void gfx_draw_fill(int x,int y,int w,int q,unsigned int rgb); //void delay_us(uint32_t us); //C文件中的函数声明 void demo(void); /#ifdef __cplusplus } /#endif extern void startHello3D(void phy_fb, int width, int height, int color_bytes, struct DISPLAY_DRIVER driver); /#endif (2)ui.cpp / 包含系统头文件 / /#include "ui.h" DISPLAY_DRIVER my_driver; //Encapsulate your LCD driver: void gfx_draw_pixel(int x, int y, unsigned int rgb) { LCD7735_DrawPoint(x,y,GL_RGB_32_to_16(rgb)); } void gfx_draw_fill(int x,int y,int w,int q,unsigned int rgb) { LCD7735_FillRectangle(x, y, x + w - 1, y + q -1 ,GL_RGB_32_to_16(rgb)); } //Implement it, if you have more fast solution than drawing pixels one by one. //void gfx_fill_rect(int x0, int y0, int x1, int y1, unsigned int rgb){} //UI entry / struct DISPLAY_DRIVER { void (draw_pixel)(int x, int y, unsigned int rgb); void (fill_rect)(int x0, int y0, int x1, int y1, unsigned int rgb); } my_driver;/ //Link your LCD driver & start UI: void demo(void) { my_driver.draw_pixel = gfx_draw_pixel; my_driver.fill_rect = NULL;//gfx_fill_rect; startHello3D(NULL, 128, 128, 2, &my_driver); } 4、演示 main.c中增加 /#include "LCD7735.h" /#include "ui.h" main程序中增加 LCD7735_Init(); demo(); 四、编译 晕、空间不足
使用最高的代码压缩率
哈哈,完美 看看效果:
顺带说一句:颜色有点与样例不一样,这要修改初始化程序(寄存器0x36,数值由0xC8改为0xC0),累了,这里不改了,抱歉。 |

AI工具训练营-用ChatGPT解决HID Keyboard实现的问题
F429I-DISC1体验报告(5) 滚动菜单、语言切换的实现丨国庆开发板测评活动
意法半导体18nm STM32V8震撼登场,获SpaceX星链选用,重新定义高性能MCU未来
F429I-DISC1体验报告(4) 温度可视化动态图表的实现丨国庆开发板测评活动
在主机模式下使用STM32Cube HAL I2C驱动
F429I-DISC1体验报告(3) 画板线条绘制和调色功能的实现丨国庆开发板测评活动
【评论有奖】STM32CubeIDE 2.0版本要来了
F429I-DISC1体验报告(2) 按钮和弹窗GUI的简单交互设计丨国庆开发板测评活动
F429I-DISC1体验报告(1)久经沙场,锋芒依旧丨TouchGFX开发F429丨国庆开发板测评活动
架构更新!STM32CubeIDE 2.0.0重磅发布,STM32CubeMX成独立工具(文末有奖)
 微信公众号
微信公众号
 手机版
手机版

粘贴代码很麻烦
"#"加了不显示,而且字体变大
我不会处理,简单粗暴地在前面加了"/",各位拷贝时要去掉。