“ 从ubuntu20.04入门到完成stm32程序的调试。”

1、更换软件源
源文件(sources.list)
更改源(Ubuntu20.04对应的源)
更新源
2、安装拼音输入法
Region&Language->Language Support->Installed Languages
Input Sources->"+"->chinese->Hanyu Pinyin
3、安装VSCode
下载.deb程序包
使用dpkg安装
调整设置
启用Title Bar
安装插件
4、安装Build Essential及gdb
build essential介绍
命令行安装build essential和gdb
Linux C程序开发简介
无makefile
有makefile
生成.vscode文件下的debug配置文件
生成task.json文件
生成launch.json文件
生成c_cpp_properties.json文件
5、安装Vim
6、安装gcc-arm-none-eabi
下载嵌入式gcc编译器
解压
添加gcc-arm-none-eabi下的可执行文件命令到Terminal
7、安装stm32cubemx
下载stm32cubemx
安装
增加图标到菜单
8、使用stm32cubemx生成初始代码
选择芯片->配置->Generate
勾选PinOut-Debug-SerialWire
9、配置VSCode
使用vscode打开上述生成的初始代码
生成VSCode配置文件
c_cpp_properties.json
task.json
settings.json
宏定义包含
make编译/使用ctrl+shift+B
10、调试
安装openocd
在tasks.json中使用openocd进行编译后的下载
使用openocd进行调试
安装Cortex Debug和Venus's Cortex-Debug插件
添加调试配置
选择cortex debug,生成launch.json
调试
11、使用VSCode串口工具
安装serial monitor
查看连接的usb
加权限
12、使用git
01更换源
1、源文件(sources.list)
chen@ubuntu:/etc/apt$ ls -a
. apt.conf.d preferences.d sources.list trusted.gpg.d
.. auth.conf.d sources.bak sources.list.d
2、更改源(Ubuntu20.04对应的源)
- chen@ubuntu:/etc/apt$ sudo gedit sources.list
- #阿里源(Ubuntu20.04)
- deb https://mirrors.aliyun.com/ubuntu/ focal main restricted universe multiverse
- deb-src https://mirrors.aliyun.com/ubuntu/ focal main restricted universe multiverse
- deb https://mirrors.aliyun.com/ubuntu/ focal-security main restricted universe multiverse
- deb-src https://mirrors.aliyun.com/ubuntu/ focal-security main restricted universe multiverse
- deb https://mirrors.aliyun.com/ubuntu/ focal-updates main restricted universe multiverse
- deb-src https://mirrors.aliyun.com/ubuntu/ focal-updates main restricted universe multiverse
- # deb https://mirrors.aliyun.com/ubuntu/ focal-proposed main restricted universe multiverse
- # deb-src https://mirrors.aliyun.com/ubuntu/ focal-proposed main restricted universe multiverse
- deb https://mirrors.aliyun.com/ubuntu/ focal-backports main restricted universe multiverse
- deb-src https://mirrors.aliyun.com/ubuntu/ focal-backports main restricted universe multiverse
- #清华源(Ubuntu20.04)
- # 默认注释了源码镜像以提高 apt update 速度,如有需要可自行取消注释
- deb https://mirrors.tuna.tsinghua.edu.cn/ubuntu/ focal main restricted universe multiverse
- # deb-src https://mirrors.tuna.tsinghua.edu.cn/ubuntu/ focal main restricted universe multiverse
- deb https://mirrors.tuna.tsinghua.edu.cn/ubuntu/ focal-updates main restricted universe multiverse
- # deb-src https://mirrors.tuna.tsinghua.edu.cn/ubuntu/ focal-updates main restricted universe multiverse
- deb https://mirrors.tuna.tsinghua.edu.cn/ubuntu/ focal-backports main restricted universe multiverse
- # deb-src https://mirrors.tuna.tsinghua.edu.cn/ubuntu/ focal-backports main restricted universe multiverse
- deb https://mirrors.tuna.tsinghua.edu.cn/ubuntu/ focal-security main restricted universe multiverse
- # deb-src https://mirrors.tuna.tsinghua.edu.cn/ubuntu/ focal-security main restricted universe multiverse
- # 预发布软件源,不建议启用
- # deb https://mirrors.tuna.tsinghua.edu.cn/ubuntu/ focal-proposed main restricted universe multiverse
- # deb-src https://mirrors.tuna.tsinghua.edu.cn/ubuntu/ focal-proposed main restricted universe multiverse
- #中科大源(Ubuntu20.04)
- deb https://mirrors.ustc.edu.cn/ubuntu/ focal main restricted universe multiverse
- deb-src https://mirrors.ustc.edu.cn/ubuntu/ focal main restricted universe multiverse
- deb https://mirrors.ustc.edu.cn/ubuntu/ focal-updates main restricted universe multiverse
- deb-src https://mirrors.ustc.edu.cn/ubuntu/ focal-updates main restricted universe multiverse
- deb https://mirrors.ustc.edu.cn/ubuntu/ focal-backports main restricted universe multiverse
- deb-src https://mirrors.ustc.edu.cn/ubuntu/ focal-backports main restricted universe multiverse
- deb https://mirrors.ustc.edu.cn/ubuntu/ focal-security main restricted universe multiverse
- deb-src https://mirrors.ustc.edu.cn/ubuntu/ focal-security main restricted universe multiverse
- deb https://mirrors.ustc.edu.cn/ubuntu/ focal-proposed main restricted universe multiverse
- deb-src https://mirrors.ustc.edu.cn/ubuntu/ focal-proposed main restricted universe multiverse
3、更新源
02安装拼音输入法
1、Region&Language->Language Support->Installed Languages

2、Input Sources->"+"->chinese->Hanyu Pinyin
- chen@ubuntu:~$ sudo apt-get install ibus-pinyin
- chen@ubuntu:~$ ibus restart
- chen@ubuntu:~$ ibus-setup


03安装VSCODE
1、下载.deb程序包https://code.visualstudio.com/
2、使用dpkg安装(在Terminal中Ctrl+Shift+C为复制,Ctrl+Shift+V为粘贴)
- chen@ubuntu:~/Downloads$ sudo dpkg -i code_1.89.1-1715060508_amd64.deb
- chen@ubuntu:~/Downloads$ code .
3、调整设置
启用Title Bar:View->Appearance->Editor Actions Position->Tab Bar

4、安装插件
git安装
Download Git for Linux(https://git-scm.com/download/linux)


命令行直接安装(Ctrl+Alt+T呼出Terminal)
- chen@ubuntu:~$ sudo apt-get install git
- chen@ubuntu:~$ git --version
git设置

- git clone https://gitee.com/kevinkerry/linux-stm32.git
- git config --global user.name 'kevin.kerry'
- git config --global user.email 'ct15762287606@outlook.com'
- #示例
- chen@ubuntu:~/prj_vscode$ git clone https://gitee.com/kevinkerry/linux-stm32.git
- Cloning into 'linux-stm32'...
- Username for 'https://gitee.com': ct15762287606@outlook.com
- Password for 'https://ct15762287606@outlook.com@gitee.com':
- remote: Enumerating objects: 4, done.
- remote: Counting objects: 100% (4/4), done.
- remote: Compressing objects: 100% (4/4), done.
- remote: Total 4 (delta 0), reused 0 (delta 0), pack-reused 0
- Unpacking objects: 100% (4/4), 1.79 KiB | 1.79 MiB/s, done.
- chen@ubuntu:~/prj_vscode$ ls
- linux-stm32
GitLens — Git supercharged插件安装

Git History

Bracket Pair Color DLW

Arm Assembly

Venu's Cortex-Debug

C/C++

04安装Build Essential及gdb
1、build essential介绍
build-essential 指的是编译程序必须的软件包。它本身不是一个软件,而是一个工具集,包含了在Linux开发程序的一些必要的软件包,包括但不限于gcc、g++、make等。
查看该软件包的依赖关系,可以看到以下内容:
- chen@ubuntu:~$ apt-cache depends build-essential
- build-essential
- |Depends: libc6-dev
- Depends: <libc-dev>
- libc6-dev
- Depends: gcc
- Depends: g++
- Depends: make
- make-guile
- Depends: dpkg-dev
也就是说,安装了该软件包,编译c/c++所需要的软件包也都会被安装。因此如果想在Ubuntu中编译c/c++程序,只需要安装该软件包就可以了。
2、命令行安装build essential和gdb
有时候可能会需要安装gdbserver
- chen@ubuntu:~$ sudo apt-get install build-essential gdb
3、Linux C程序开发简介
3.1 无makefile
- chen@ubuntu:~$ mkdir linux_c
- chen@ubuntu:~$ cd linux_c
- chen@ubuntu:~$ touch hello.c
- chen@ubuntu:~$ sudo vi hello.c
- chen@ubuntu:~$ cat hello.c
- #include <stdio.h>
- int main(int argc,char *argv[])
- {
- printf("hello world\n");
- }
- chen@ubuntu:~$ gcc hello.c
- chen@ubuntu:~$ gcc hello.c -o hello
- chen@ubuntu:~$ ls -al
- total 52
- drwxrwxr-x 2 chen chen 4096 May 16 18:32 .
- drwxrwxr-x 4 chen chen 4096 May 16 17:37 ..
- -rwxrwxr-x 1 chen chen 16696 May 16 18:29 a.out
- -rwxrwxr-x 1 chen chen 16696 May 16 18:32 hello
- -rw-rw-r-- 1 chen chen 82 May 16 18:29 hello.c
- chen@ubuntu:~$ ./a.out
- chen@ubuntu:~$ ./hello
3.2 有makefile
3.2.1 创建程序文件- chen@ubuntu:~/prj_vscode/linux-c$ touch main.c input.c calcu.c input.h calcu.h
main.c
- #include <stdio.h>
- #include "input.h"
- #include "calcu.h"
- int main(int argc, char *argv[])
- {
- int a, b, num;
- input_int(&a, &b);
- num = calcu(a, b);
- printf("%d + %d = %d\r\n", a, b, num);
-
- }
input.h- #ifndef _INPUT_H
- #define _INPUT_H
- void input_int(int *a, int *b);
- #endif
input.c
- #include <stdio.h>
- #include "input.h"
- void input_int(int *a, int *b)
- {
- printf("input two num:");
- scanf("%d %d", a, b);
- printf("\r\n");
- }
calcu.h- #ifndef _CALCU_H
- #define _CALCU_H
- int calcu(int a, int b);
- #endif
calcu.c
- #include "calcu.h"
- int calcu(int a,int b)
- {
- return (a+b);
- }
3.2.2 编译测试一下
- chen@ubuntu:~/prj_vscode/linux-c$ gcc main.c input.c calcu.c -o main
- chen@ubuntu:~/prj_vscode/linux-c$ ./main
- input two num:23 56
- 23 + 56 = 79
- chen@ubuntu:~/prj_vscode/linux-c$
- chen@ubuntu:~/prj_vscode/linux-c$ touch Makefile
- chen@ubuntu:~/prj_vscode/linux-c$ cat Makefile
- main: main.o input.o calcu.o
- gcc -o main main.o input.o calcu.o
- main.o: main.c
- gcc -c main.c
- input.o: input.c
- gcc -c input.c
- calcu.o: calcu.c
- gcc -c calcu.c
- clean:
- rm *.o
- rm main
- chen@ubuntu:~/prj_vscode/linux-c$ make clean
- chen@ubuntu:~/prj_vscode/linux-c$ make
4、生成.vscode文件下的debug配置文件
tasks.json:该文件主要用于配置编译的选项,如果使用makefile或者cmake进行编译,则用该文件调研make或者cmake命令进行配置。
launch.json:该文件主要对debugger进行设置
c_cpp_properties.json:编译器路径和intellisense设置
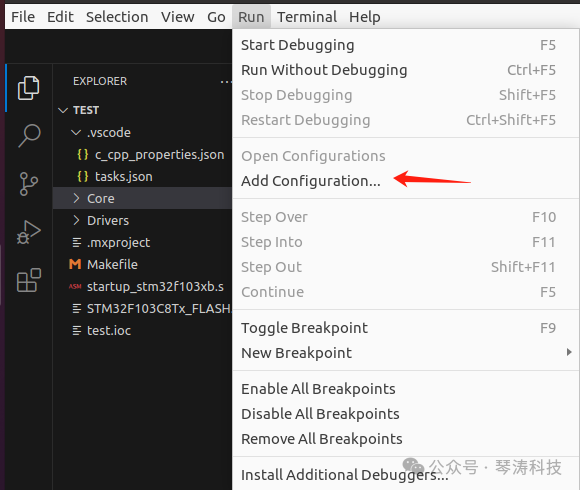
4.1、生成task.json文件

图4.1.1 Run C/C++File

修改生成的task.json文件如下
- {
- "tasks": [
- {
- "type": "cppbuild",
- "label": "C/C++: gcc build active file",
- "command": "/usr/bin/gcc",
- "args": [
- "-fdiagnostics-color=always",
- "-g",
- "${file}",
- "-o",
- "${fileDirname}/${fileBasenameNoExtension}"
- ],
- "options": {
- "cwd": "${fileDirname}"
- },
- "problemMatcher": [
- "$gcc"
- ],
- "group": {
- "kind": "build",
- "isDefault": true
- },
- "detail": "Task generated by Debugger."
- }
- ],
- "version": "2.0.0"
- }
修改如下- {
- "version": "2.0.0",
- "tasks": [
- {
- "type": "shell",
- "label": "C/C++: g++ build active file",
- "command": "/usr/bin/g++",
- "args": ["-g", "${file}", "-o", "${fileDirname}/${fileBasenameNoExtension}"],
- "options": {
- "cwd": "/usr/bin"
- },
- "problemMatcher": ["$gcc"],
- "group": {
- "kind": "build",
- "isDefault": true
- },
- "detail": "Task generated by Debugger."
- }
- ]
- }
command 代表使用什么程序去执行文件,这里使用的是g++. args表示的是传递给g++的参数,表明使用了什么文件(-g 后面的file文件所指内容),生成了什么文件(-o 后面文件所指的内容)。所以这command 和 args两行参数表达的意思是:使用g++编译器将${file}文件进行编译,生成${fileDirname}/${fileBasenameNoExtension}文件。
上面部分是对单个c++文件或者多个c++文件进行编译。但是如果一个项目使用makefile进行编译,则如何使用vscode 进行配置呢?我们这里进行讲解。由于我们使用make进行编译,所以我们将command命令后面加上make,args后面添加相应的参数。比如我们需要进行debug 所以要控制makefile 中所有的gcc编译命令后添加-g。不然的话,就会出现,编译成功了。但是debug的时候,断点无效,所有的执行都是一下子执行完的情况。由于在我们的makefile 中通过TAG = dbg来控制加不加编译选项-g,如图3所示。所以这里我们的参数添加了"TAG=dbg",这里根据不同的makefile进行不同的配置。
- {
- "version": "2.0.0",
- "tasks": [
- {
- "type": "shell",
- "label": "Build",
- "command": "make",
- "args": ["NTHREADS=1", "TAG=dbg"],
- "group": {
- "kind": "build",
- "isDefault": true
- },
- // "detail": "compiler: /usr/bin/g++"
- }
- }
一种可行的Makefile文件内容(gcc后添加-g命令)
- main: main.o input.o calcu.o
- gcc -o main1 main.o input.o calcu.o
- main.o: main.c
- gcc -c -g main.c
- input.o: input.c
- gcc -c -g input.c
- calcu.o: calcu.c
- gcc -c -g calcu.c
- clean:
- rm *.o
- rm main
4.2、生成launch.json文件
(注意只有在.c文件中才会有下图中右上角的图标显示)


图4.2.1 添加调试配置文件
- {
- "configurations": [
- {
- "name": "C/C++: gcc build and debug active file",
- "type": "cppdbg",
- "request": "launch",
- "program": "${fileDirname}/${fileBasenameNoExtension}",
- "args": [],
- "stopAtEntry": false,
- "cwd": "${fileDirname}",
- "environment": [],
- "externalConsole": false,
- "MIMode": "gdb",
- "setupCommands": [
- {
- "description": "Enable pretty-printing for gdb",
- "text": "-enable-pretty-printing",
- "ignoreFailures": true
- },
- {
- "description": "Set Disassembly Flavor to Intel",
- "text": "-gdb-set disassembly-flavor intel",
- "ignoreFailures": true
- }
- ],
- "preLaunchTask": "C/C++: gcc build active file",
- "miDebuggerPath": "/usr/bin/gdb"
- }
- ],
- "version": "2.0.0"
- }
修改生成的launch.json文件如下
- {
- "configurations": [
- {
- "name": "C/C++: g++ build and debug active file",
- "type": "cppdbg",
- "request": "launch",
- "program": "${workspaceRoot}/a.out",
- "args": [ "1232"],
- "stopAtEntry": false,
- "cwd": "${workspaceRoot}",
- "environment": [],
- "externalConsole": false,
- "MIMode": "gdb",
- "setupCommands": [
- {
- "description": "Enable pretty-printing for gdb",
- "text": "-enable-pretty-printing",
- "ignoreFailures": true
- },
- {
- "description": "Set Disassembly Flavor to Intel",
- "text": "-gdb-set disassembly-flavor intel",
- "ignoreFailures": true
- }
- ],
- "preLaunchTask": "Build",
- "miDebuggerPath": "/usr/bin/gdb"
- }
- ],
- "version": "2.0.0"
- }
"program"选项代表,需要进行调试的程序,所以这里需要修改为对应的文件。"PreLaunchTask" 代表debug流程的前序任务,这里的内容需要和tasks.json中的label相同。"args"可以添加执行程序的过程中,需要添加的参数。在下面的代码中,我们就添加了cacti程序,以及参数。
4.3、生成c_cpp_properties.json文件
ctrl+shift+p 搜索C/C++:Edit configurations(UI) 即可生成该文件
- {
- "configurations": [
- {
- "name": "Linux",
- "includePath": ["${workspaceFolder}/**"],
- "defines": [],
- "compilerPath": "/usr/bin/gcc",
- "cStandard": "c11",
- "cppStandard": "c++17",
- "intelliSenseMode": "clang-x64"
- }
- ],
- "version": 4
- }
05安装Vim
1、命令行安装
- chen@ubuntu:~$ sudo apt-get install vim
- chen@ubuntu:~$ touch a.txt
- chen@ubuntu:~$ sudo vi a.txt
06安装gcc-arm-none-eabi
1、下载嵌入式gcc编译器
https://developer.arm.com/downloads/-/gnu-rm

2、解压gcc-arm-none-eabi-10.3-2021.10
- chen@ubuntu:~$ tar -vxjf gcc-arm-none-eabi-10.3-2021.10-x86_64-linux.tar.bz2
- #对于bz2、gz文件解压
- tar -vxjf test1.tar.bz2
- tar -vxzf test2.tar.gz
- #对于bz2、gz文件压缩
- tar -vxjf test1.tar.bz2
- tar -vxzf test2.tar.gz
3、添加gcc-arm-none-eabi下的可执行文件命令到Terminal(终端)
- chen@ubuntu:~$ sudo gedit .bashrc
- #在文末添加下面一行
- export PATH=$PATH:~/gcc-arm-none-eabi-10.3-2021.10/bin
- #添加上述行
- chen@ubuntu:~$ source ~/.bashrc
- chen@ubuntu:~$ arm-none-eabi-gcc --help
- chen@ubuntu:~$ arm-none-eabi-gcc -v
07安装stm32cubemx
1、下载stm32cubemx
https://www.st.com/zh/development-tools/stm32cubemx.html

2、安装- chen@ubuntu:~/Downloads$ unzip en.stm32cubemx-lin-v6-11-1.zip
- chen@ubuntu:~/Downloads$ sudo chmod 777 SetupSTM32CubeMX-6.11.1
- chen@ubuntu:~/Downloads$ ls -l
- -rwxrwxrwx 1 chen chen 539136342 Apr 11 09:41 SetupSTM32CubeMX-6.11.1
- chen@ubuntu:~/Downloads$
- chen@ubuntu:~/Downloads$ sudo ./SetupSTM32CubeMX-6.11.1
- chen@ubuntu:~/Downloads$ find /usr -name STM32CubeMX
- chen@ubuntu:/usr/local/STMicroelectronics/STM32Cube/STM32CubeMX$ ./STM32CubeMX
3、增加图标到菜单
- chen@ubuntu:~$ /usr/share/applications/
- chen@ubuntu:/usr/share/applications$ sudo touch stm32cubemx.desktop
- chen@ubuntu:/usr/share/applications$ sudo gedit stm32cubemx.desktop
- chen@ubuntu:/usr/share/applications$ cat stm32cubemx.desktop
- [Desktop Entry]
- Type=Application
- Name=STM32CubeMX
- Comment=STM32 Development Environment
- Encoding=UTF-8
- StartupNotify=true
- Terminal=false
- Categories=Development;java;c;c++;
- #icon= ##########图标的路径,自己找一个就行
- Exec= /usr/local/STMicroelectronics/STM32Cube/STM32CubeMX/STM32CubeMX
- chen@ubuntu:/usr/share/applications$
08使用stm32cubemx生成初始代码
1、选择芯片->配置->Generate

2、一定要记得勾选PinOut-Debug-SerialWire否则后面下载程序时会报错Error: init mode failed (unable to connect to the target) 。这个是巨坑,一定要小心!!!!!!!!!!

09配置VSCode
1、使用vscode打开上述生成的初始代码
2、生成VSCode配置文件
2.1 c_cpp_properties.jason
ctrl+shift+p->Edit Configurations(JSON)生成.vscode/c_cpp_properties.json文件

- {
- "configurations": [
- {
- "name": "Linux",
- "includePath": [
- "${workspaceFolder}/**"
- ],
- "defines": [
- "USE_HAL_DRIVER",
- "STM32F103xB"
- ],
- "compilerPath": "/home/chen/gcc-arm-none-eabi-10.3-2021.10/bin/arm-none-eabi-gcc",
- "cStandard": "c99",
- "cppStandard": "gnu++14",
- "intelliSenseMode": "gcc-arm"
- }
- ],
- "version": 4
- }
2.2 task.json
修改好task.json即可使用ctrl+shift+B对stm32工程进行编译


修改如下:
- {
- // See https://go.microsoft.com/fwlink/?LinkId=733558
- // for the documentation about the tasks.json format
- "version": "2.0.0",
- "tasks": [
- {
- "label": "Build", // 标签名
- "type": "shell", // 终端(shell)型的任务
- "command": "make", // *执行的命令
- "args": [ // 命令的参数
- "-j6" // 表示六线程同时编译
- ],
- "problemMatcher": ["$gcc"], // 表示如果出现了编译报错,问题面板会显示 gcc类型的错误
- "group": {
- "kind": "build",
- "isDefault": true
- }
- }
- }
2.3 settings.json
3、上述”defines“字段中的定义应包括stm32cubemx生成的Makefile文件中相关的宏定义

4、make编译/使用ctrl+shift+B
- chen@ubuntu:~/prj_vscode/linux-stm32/test$ make clean
- chen@ubuntu:~/prj_vscode/linux-stm32/test$ make
10调试
1、安装openocd- chen@ubuntu:~$ sudo apt-get install openocd
- chen@ubuntu:~$ whereis openocd
- openocd:
- /usr/bin/openocd
- /usr/share/openocd
- /usr/share/man/man1/openocd.1.gz
- /usr/share/info/openocd.info-2.gz
- /usr/share/info/openocd.info.gz
- /usr/share/info/openocd.info-1.gz
- chen@ubuntu:~$
- //连接好stlinkv2-1到电脑和pcb板,输入以下命令。完成连接
- chen@ubuntu:/usr/share/openocd/scripts$ openocd -f interface/stlink-v2.cfg -f target/stm32f1x_stlink.cfg
2、在tasks.json中使用openocd进行编译后的下载
在原本的tasks.json中追加popenocd的相关内容
- {
- // See https://go.microsoft.com/fwlink/?LinkId=733558
- // for the documentation about the tasks.json format
- "version": "2.0.0",
- "tasks": [
- {
- "label": "Build", // 标签名
- "type": "shell", // 终端(shell)型的任务
- "command": "make", // *执行的命令
- "args": [ // 命令的参数
- // "-j6"表示六线程同时编译
- ],
- //"problemMatcher": ["$gcc"], // 表示如果出现了编译报错,问题面板会显示 gcc类型的错误
- "group": {
- "kind": "build",
- "isDefault": true
- }
- },
- {
- "dependsOn":"Build", // 任务依赖
- "label": "Build and Download",
- "type": "shell",
- "command": "openocd",
- "args": [
- "-f",
- "/usr/share/openocd/scripts/interface/stlink-v2.cfg",
- "-f",
- "/usr/share/openocd/scripts/target/stm32f1x_stlink.cfg",
- "-c",
- "program ./build/${workspaceFolderBasename}.elf verify reset exit"
- ],
- "problemMatcher": []
- }
-
- }
这个任务要求先进行 Build任务,然后通过命令打开 openocd,加载两个配置文件(-f interface/stlink.cfg 和 -f target/stm32l1.cfg),同时,这个 -c 的选项后面跟着的就是openocd成功加载后执行的内置命令,这里我们让它下载、验证、reset,然后直接退出,这样就实现了一条龙式的下载。


3、使用openocd进行调试
3.1 安装Cortex Debug和Venus's Cortex-Debug插件(第二个插件一定要安装,否则会报错Failed to launch OpenOCD GDB Server: Timeout.)


3.2、 添加调试配置

3.3 选择cortex debug,生成launch.json,并修改内容如下

- {
- // 使用 IntelliSense 了解相关属性。
- // 悬停以查看现有属性的描述。
- // 欲了解更多信息,请访问: https://go.microsoft.com/fwlink/?linkid=830387
- "version": "0.2.0",
- "configurations": [
- {
- "name": "Cortex Debug",
- "cwd": "${workspaceRoot}", // 输出路径
- "executable": "./build/${workspaceRootFolderName}.elf", // 要调试的程序
- "request": "launch",
- "type": "cortex-debug",
- "servertype": "openocd", // 调试器选择
- "device": "STM32F103C8", // 使用J-link GDB Server时必须;其他GBD Server时可选(有可能帮助自动选择 SVD文件)。支持的设备见 https://www.segger.com/downloads/supported-devices.php
- //"svdFile": "./STM32L15xC.svd", // svd文件,有这个文件才能查看寄存器的值,每个单片机都不同。可以在以下地址找到 https://github.com/posborne/cmsis-svd下载
- "interface": "swd",
- "configFiles": [
- //"${workspaceRoot}/openocd.cfg", // *可以通过加载该文件来配置
- "/usr/share/openocd/scripts/interface/stlink-v2.cfg",
- "/usr/share/openocd/scripts/target/stm32f1x.cfg"
- ],
- "runToEntryPoint": "false",
- //"runToMain": false,
- "preLaunchTask": "Build", // 在调试前预先执行的任务,此处是tasks.json中的
- //"armToolchainPath": "C:\\Program Files (x86)\\GNU Tools ARM Embedded\\5.4 2016q3\\bin" // 如果没有把 arm工具链路径添加到系统环境变量,则需要这条指令添加你的路径
- }
- }
3.4 调试

11使用VSCode串口工具
1、安装serial monitor

2、查看连接的usb
- chen@ubuntu:~$ lsusb
- Bus 001 Device 001: ID 1d6b:0002 Linux Foundation 2.0 root hub
- Bus 002 Device 007: ID 1a86:7523 QinHeng Electronics HL-340 USB-Serial adapter
- Bus 002 Device 006: ID 0483:3748 STMicroelectronics ST-LINK/V2
- Bus 002 Device 004: ID 0e0f:0008 VMware, Inc. VMware Virtual USB Mouse
- Bus 002 Device 003: ID 0e0f:0002 VMware, Inc. Virtual USB Hub
- Bus 002 Device 002: ID 0e0f:0003 VMware, Inc. Virtual Mouse
- Bus 002 Device 001: ID 1d6b:0001 Linux Foundation 1.1 root hub
- chen@ubuntu:~$
2、加权限- chen@ubuntu:~$ sudo chmod 777 /dev/ttyUSB0
12使用git
1、检查状态
- //在执行 git add 和 git commit 之前,先执行以下命令查看当前仓库的状态:
- git status
- //这将显示工作目录和暂存区的状态。确保没有未追踪的文件,也确保已将需要提交的文件添加到暂存区。
2、确认 Git 配置:
- git config user.name
- git config user.email
- 如果没有设置,请使用以下命令设置:
- git config --global user.name "Your Name"
- git config --global user.email "your.email@example.com"
3、检查文件权限
确保你有权限在新文件夹中进行写操作。使用 ls -l 命令检查文件和目录的权限:
ls -l
4、查看错误信息:
如果 git commit 操作没有反应,尝试使用 -v 参数查看详细的错误信息:
git commit -v
5、清理缓存:
有时 Git 的内部缓存可能导致问题。尝试清理 Git 缓存并重新尝试:
git rm -r --cached .
git add .
git commit -m "Your commit message"
这将清理缓存并重新添加和提交所有更改。
转载自:kevin
如有侵权请联系删除
|

 微信公众号
微信公众号
 手机版
手机版