“ win+vscode+eide+gcc下的STM32编程环境搭建。”

1.VSCode安装与配置
a.卸载
b.安装
c.git安装与配置
d.安装插件
2.Embedded IDE配置
a.安装EIDE插件
b.安装实用工具到EIDE
- 安装arm-none-embed-gcc
- 添加其bin文件夹到环境变量
- 安装OpenOCD
- 在vscode中安装Makefile Tools
3.Embedded IDE项目建立-stm32标准库
a.工程项目建立
b.在EIDE中使用标准库时的设置(无Makefile)
c.编译工程
4.一些问题的处理:
5.调试工程
01VSCode安装与配置
1.完全卸载之前安装过的VSCode
a.卸载软件
b.删除插件:找到C:\Users\用户名\.vscode`文件夹并删除它,以彻底清除已安装的插件。
c.删除用户信息和缓存信息:访问C:\Users\用户名\AppData\Roaming路径下,删除Code和Visual Studio Code文件夹,以彻底删除用户信息和缓存信息。
2.下载安装vscode
3.git安装与配置
安装git

安装完成后,在开始菜单中找到并打开Git Bash

在代码托管平台网站新建仓库,按照gitee等克隆下载的要求设置git

在git bash中输入配置- git config --global user.name 'kevin.kerry'
- git config --global user.email 'ct15762287606@outlook.com'
- //检查当前仓库状态
- git status
- //确认git配置
- git config user.name
- git config user.email
- //查看错误信息
- git commit -v
- //清理缓存
- git rm -r --cached .
- git add .
- git commit -m "Your commit message"

4.安装插件,如下图:


02Embedded IDE配置
1.安装EIDE插件到VS Code
2.安装实用工具到EIDE环境
a.安装arm-none-embed-gcc工具链

b.添加其bin文件夹到环境变量
- 在EIDE中安装的gcc插件安装目录通常为:C:\Users\${用户名}\.eide\tools\gcc_arm\bin
- "windows"键唤出搜索,输入编辑系统环境变量。找到Path进行编辑。添加上述gcc命令地址


在cmd/VSCode的集成终端输入 arm-none-eabi-gcc -v测试
- PS C:\Users\ct\Desktop\win-stm32-gcc> arm-none-eabi-gcc -v
c.安装OpenOCD
d.在vscode中安装Makefile Tools


- 将该Make工具的bin路径添加到环境变量,如前
- 重启vscode,测试make -v命令是否正常
- PS C:\Users\ct\Desktop\win-stm32-gcc> make -v
- GNU Make 3.81
- Copyright (C) 2006 Free Software Foundation, Inc.
- This is free software; see the source for copying conditions.
- There is NO warranty; not even for MERCHANTABILITY or FITNESS FOR A
- PARTICULAR PURPOSE.
- This program built for i686-pc-msys
03Embedded IDE项目建立-stm32标准库
1.工程项目建立
a.切换到EIDE环境,点击操作-新建项目-空项目图片

b.选择一个合适的MCU项目类型,如Cortex-M项目

c.点击右下角继续,跳转到工作区

d.添加工程文件到工作区路径下。——标准库

- 将Libraries文件夹复制到根目录,删除Libraries文件夹中的无用文件,保留core_cm3.c,core_cm3.h,stm32f10x.h文件,startup文件选择固件库里的Libraries\CMSIS\CM3\DeviceSupport\ST\STM32F10x\startup\TrueSTUDIO 里对应芯片的s文件,一定要TrueSTUDIO 目录里的启动文件。
- 新建User目录,将STM32F10x_StdPeriph_Lib_V3.5.0\Project\STM32F10x_StdPeriph_Template目录下的stm32f10x_conf.h,stm32f10x_it.c,stm32f10x_it.h,system_stm32f10x.c复制到User目录,并新建main.c文件。
- 将固件库对应芯片下的(例如)Project\STM32F10x_StdPeriph_Template\TrueSTUDIO\STM3210C-EVAL\stm32_flash.ld拷贝到根目录并在EIDE中指定gcc所需的链接文件

stm32_flash.ld
- /*
- *****************************************************************************
- **
- ** File : stm32_flash.ld
- **
- ** Abstract : Linker script for STM32F107VC Device with
- ** 256KByte FLASH, 64KByte RAM
- **
- ** Set heap size, stack size and stack location according
- ** to application requirements.
- **
- ** Set memory bank area and size if external memory is used.
- **
- ** Target : STMicroelectronics STM32
- **
- ** Environment : Atollic TrueSTUDIO(R)
- **
- ** Distribution: The file is distributed �as is,� without any warranty
- ** of any kind.
- **
- ** (c)Copyright Atollic AB.
- ** You may use this file as-is or modify it according to the needs of your
- ** project. Distribution of this file (unmodified or modified) is not
- ** permitted. Atollic AB permit registered Atollic TrueSTUDIO(R) users the
- ** rights to distribute the assembled, compiled & linked contents of this
- ** file as part of an application binary file, provided that it is built
- ** using the Atollic TrueSTUDIO(R) toolchain.
- **
- *****************************************************************************
- */
- /* Entry Point */
- ENTRY(Reset_Handler)
- /* Highest address of the user mode stack */
- _estack = ORIGIN(RAM) + LENGTH(RAM); /* end of 64K RAM */
- /* Generate a link error if heap and stack don't fit into RAM */
- _Min_Heap_Size = 0; /* required amount of heap */
- _Min_Stack_Size = 0x200; /* required amount of stack */
- /* Specify the memory areas */
- MEMORY
- {
- RAM (xrw) : ORIGIN = 0x20000000, LENGTH = 20K
- FLASH (rx) : ORIGIN = 0x8000000, LENGTH = 64K
- }
- /* Define output sections */
- SECTIONS
- {
- /* The startup code goes first into FLASH */
- .isr_vector :
- {
- . = ALIGN(4);
- KEEP(*(.isr_vector)) /* Startup code */
- . = ALIGN(4);
- } >FLASH
- /* The program code and other data goes into FLASH */
- .text :
- {
- . = ALIGN(4);
- *(.text) /* .text sections (code) */
- *(.text*) /* .text* sections (code) */
- *(.rodata) /* .rodata sections (constants, strings, etc.) */
- *(.rodata*) /* .rodata* sections (constants, strings, etc.) */
- *(.glue_7) /* glue arm to thumb code */
- *(.glue_7t) /* glue thumb to arm code */
- KEEP (*(.init))
- KEEP (*(.fini))
- . = ALIGN(4);
- _etext = .; /* define a global symbols at end of code */
- } >FLASH
- .ARM.extab : { *(.ARM.extab* .gnu.linkonce.armextab.*) } >FLASH
- .ARM : {
- __exidx_start = .;
- *(.ARM.exidx*)
- __exidx_end = .;
- } >FLASH
- .ARM.attributes : { *(.ARM.attributes) } > FLASH
- .preinit_array :
- {
- PROVIDE_HIDDEN (__preinit_array_start = .);
- KEEP (*(.preinit_array*))
- PROVIDE_HIDDEN (__preinit_array_end = .);
- } >FLASH
- .init_array :
- {
- PROVIDE_HIDDEN (__init_array_start = .);
- KEEP (*(SORT(.init_array.*)))
- KEEP (*(.init_array*))
- PROVIDE_HIDDEN (__init_array_end = .);
- } >FLASH
- .fini_array :
- {
- PROVIDE_HIDDEN (__fini_array_start = .);
- KEEP (*(.fini_array*))
- KEEP (*(SORT(.fini_array.*)))
- PROVIDE_HIDDEN (__fini_array_end = .);
- } >FLASH
- /* used by the startup to initialize data */
- _sidata = .;
- /* Initialized data sections goes into RAM, load LMA copy after code */
- .data : AT ( _sidata )
- {
- . = ALIGN(4);
- _sdata = .; /* create a global symbol at data start */
- *(.data) /* .data sections */
- *(.data*) /* .data* sections */
- . = ALIGN(4);
- _edata = .; /* define a global symbol at data end */
- } >RAM
- /* Uninitialized data section */
- . = ALIGN(4);
- .bss :
- {
- /* This is used by the startup in order to initialize the .bss secion */
- _sbss = .; /* define a global symbol at bss start */
- __bss_start__ = _sbss;
- *(.bss)
- *(.bss*)
- *(COMMON)
- . = ALIGN(4);
- _ebss = .; /* define a global symbol at bss end */
- __bss_end__ = _ebss;
- } >RAM
- PROVIDE ( end = _ebss );
- PROVIDE ( _end = _ebss );
- /* User_heap_stack section, used to check that there is enough RAM left */
- ._user_heap_stack :
- {
- . = ALIGN(4);
- . = . + _Min_Heap_Size;
- . = . + _Min_Stack_Size;
- . = ALIGN(4);
- } >RAM
- /* MEMORY_bank1 section, code must be located here explicitly */
- /* Example: extern int foo(void) __attribute__ ((section (".mb1text"))); */
- .memory_b1_text :
- {
- *(.mb1text) /* .mb1text sections (code) */
- *(.mb1text*) /* .mb1text* sections (code) */
- *(.mb1rodata) /* read-only data (constants) */
- *(.mb1rodata*)
- } >MEMORY_B1
- /* Remove information from the standard libraries */
- /DISCARD/ :
- {
- libc.a ( * )
- libm.a ( * )
- libgcc.a ( * )
- }
- }

2.在EIDE中使用标准库时的设置(无Makefile)
a.切换到EIDE环境下


b.右键项目资源-点击添加源文件夹-选择普通文件夹,导入Keil工程文件及文件夹


文件目录如下:

c.点击+号安装CMSIS芯片支持包


d.修改构建配置为gcc

e.烧录配置为STLink/OpenOCD

f.添加arm-none-embed-gcc安装目录下的/ARM/ARMCC/include和/ARM/ARMCC/include到包含目录。

g.添加__C_ARM、STM32F10x_MD、USE_STDPERIPH_DRIVER到预处理宏定义

h.此时编译可能会有下述报错
- C:\416: Error: registers may not be the same -- `strexb r0,r0,[r1]'
- C:\436: Error: registers may not be the same -- `strexh r0,r0,[r1]'
打开src\Libraries\CMSIS\CoreSupport\core_cm3.c文件,将 736行,753行 中的 “=r"修改为”=&r",如下- uint32_t __STREXB(uint8_t value, uint8_t *addr)
- {
- uint32_t result=0;
- __ASM volatile ("strexb %0, %2, [%1]" : "=&r" (result) : "r" (addr), "r" (value) );
- return(result);
- }
- uint32_t __STREXH(uint16_t value, uint16_t *addr)
- {
- uint32_t result=0;
- __ASM volatile ("strexh %0, %2, [%1]" : "=&r" (result) : "r" (addr), "r" (value) );
- return(result);
- }
- ctrl+shift+p,配置c_cpp_properties.json文件图片

- {
- "configurations": [
- {
- "name": "Win32",
- "includePath": [
- "${workspaceFolder}/**",
- "C:/Keil_v5/ARM/ARMCC/include/**",
- "C:/Keil_v5/ARM/ARMCC/include/rw/**",
- "${workspaceFolder}/CORE"
- ],
- "defines": [
- "_DEBUG",
- "UNICODE",
- "_UNICODE",
- "STM32F10X_MD",
- "USE_STDPERIPH_DRIVER",
- "__CC_ARM"
- ],
- "cStandard": "c99"
- }
- ],
- "version": 4
3.编译工程
4.一些问题的处理:
a.编译成功,但下载后没有任何反应。
注意检查stm32_flash.ld文件内容
- /* Highest address of the user mode stack */
- _estack = ORIGIN(RAM) + LENGTH(RAM); /* end of 64K RAM */
注意对应芯片型号
- /* Specify the memory areas */
- MEMORY
- {
- RAM (xrw) : ORIGIN = 0x20000000, LENGTH = 20K
- FLASH (rx) : ORIGIN = 0x8000000, LENGTH = 64K
- }
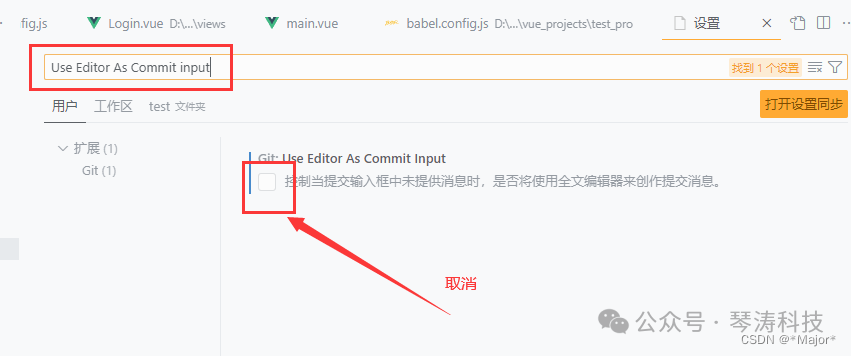
b.vscode提交(commit)代码时卡住


设置的这里选择的默认选项影响了commit,当commit却不添加任何消息时,会默认生成一个文件来替代消息并提交,而服务器无法接受这样的消息。
c.结束
5.调试工程
a.添加launch.json
进入一个C文件,点击右上角按钮生成launch.json

b.修改launch.json为下述内容
- {
- // 使用 IntelliSense 了解相关属性。
- // 悬停以查看现有属性的描述。
- // 欲了解更多信息,请访问: https://go.microsoft.com/fwlink/?linkid=830387
- "version": "0.2.0",
- "configurations": [
- {
- "name": "Cortex Debug",
- "cwd": "${workspaceRoot}", // 输出路径
- "executable": "./build/Debug/${workspaceRootFolderName}.elf", // 要调试的程序
- "request": "launch",
- "type": "cortex-debug",
- "servertype": "openocd", // 调试器选择
- "device": "STM32F103C8", // 使用J-link GDB Server时必须;其他GBD Server时可选(有可能帮助自动选择 SVD文件)。支持的设备见 https://www.segger.com/downloads/supported-devices.php
- //"svdFile": "./STM32L15xC.svd", // svd文件,有这个文件才能查看寄存器的值,每个单片机都不同。可以在以下地址找到 https://github.com/posborne/cmsis-svd下载
- "interface": "swd",
- "configFiles": [
- //"${workspaceRoot}/openocd.cfg", // *可以通过加载该文件来配置
- "C:/Users/ct/.eide/tools/openocd_7a1adfbec_mingw32/share/openocd/scripts/interface/stlink-v2.cfg",
- "C:/Users/ct/.eide/tools/openocd_7a1adfbec_mingw32/share/openocd/scripts/target/stm32f1x.cfg"
- ],
- "runToEntryPoint": "false",
- //"runToMain": false,
- //"preLaunchTask": "Build", // 在调试前预先执行的任务,此处是tasks.json中的
- //"armToolchainPath": "C:\\Program Files (x86)\\GNU Tools ARM Embedded\\5.4 2016q3\\bin" // 如果没有把 arm工具链路径添加到系统环境变量,则需要这条指令添加你的路径
- }
- }
上述最重要的是引入openocd的路径。
c.点击播放按钮进行调试

6.结束
转载自: kevin
如有侵权请联系删除
|

 微信公众号
微信公众号
 手机版
手机版