printf重定向介绍& |6 r7 |, h8 l, |
在学C语言的时候,会经常用标准库<stdio.h>中printf(), scanf()这两个函数, 来实现数据的输入与输出. 格式化输入输出的功能还是挺强大的, 那已经有了现成的轮子, 就要寻思一下如何进一步在单片机上使用它.' p3 Q6 | C' }0 ~# M3 N
下面是ARM Compiler6文档中对printf的介绍:
& Y! v: O& \- W2 `' k8 j7 q+ R5 y& v* M/ c* f7 J
The printf family consists of _printf(), printf(), _fprintf(), fprintf(), vprintf(), and vfprintf().
0 `- ^: ?/ a I. mAll these functions use __FILE opaquely and depend only on the functions fputc() and ferror(). The functions _printf() and _fprintf() are identical to printf() and fprintf() except that they cannot format floating-point values.$ _5 ]: @* h! S( y
The standard output functions of the form _printf(…) are equivalent to:
7 {' E2 l8 O! w4 {2 I- i7 N. K9 rfprintf(& __stdout, …)where __stdout has type __FILE.
' E* V j" o1 k Q. ?& o+ L! {
8 P" h8 k2 A' s0 ^% i! j% r, B大致是说printf家族有这么些函数<_printf(), printf(), _fprintf(), fprintf(), vprintf(), and vfprintf()>, 这些函数都隐式的使用__FILE<文件流>, 并且只依靠fputc(), ferror()这两个函数.& j& E2 G/ x8 L& J6 u) R3 \
0 y* g2 A6 `, z
If you define your own version of __FILE, your own fputc() and ferror() functions, and the __stdout object, you can use all of the printf() family, fwrite(), fputs(), puts() and the C++ object std::cout unchanged from the library.; C# Y+ k+ b6 V, |' g
! k: w1 x* W) M/ ]8 I" ?
重新定义__FILE, fputc(), ferror(), __stdout, 就可以使用printf()家族的各种函数了.
+ M, I; B1 R. J/ G4 h. ?" x5 s6 K9 F5 {
STM32中printf重定向
* H: A2 o: ?1 _下面是官方给出的重映射模板:* o1 k# B' ^5 Z( K7 C% i6 j
<遇到不会的先看看文档往往能得到最直接的答案>' M* u [7 A& m- C% K/ m
! q. Q) a: X: M# Y1 W. O! @
- #include <stdio.h>
; d; m G, V5 ?+ J9 \7 g' w9 }$ c \2 u - struct __FILE u) o9 ^% u7 N8 n3 I8 l' [- g2 @
- {' `5 H0 [. N- O* F6 A
- int handle;/ |6 b$ }2 [& |8 i: R+ ^0 b
- /* Whatever you require here. If the only file you are using is */; I/ f' e- m, o8 a) G
- /* standard output using printf() for debugging, no file handling */
0 J+ s ~1 {* t5 f: M% u0 Y - /* is required. */
t4 _2 t' D4 R' ?- c1 r% V! ] - };! T+ {4 C o9 y! }1 `& Y
- /* FILE is typedef’d in stdio.h. */
% D# B& C2 `0 n - FILE __stdout;( v$ V, {4 |* J3 ]2 }; b2 b
- int fputc(int ch, FILE *f) & E8 N; ^0 f& f0 m7 Z0 n5 g6 K4 p
- {
% I! I1 H7 ?6 J; f. { - /* Your implementation of fputc(). */
* c( a9 S. r- _5 G8 _+ x( X1 G$ W8 v - return ch;: y+ D/ D4 X* ^! I, M, }4 W5 b
- }- F! X* W7 U F7 |9 H
- int ferror(FILE *f)
( v( C1 n* G- w5 ~4 u) m7 n - {; A8 |5 ?; `/ p- o
- /* Your implementation of ferror(). */
* R9 X! U) u6 b9 Q$ i/ c - return 0;" z B2 H; b8 w. Q% `. m
- }
复制代码
4 C' j$ A; ^( K3 }要将printf()重定向到STM32中的串口, 只需要重新实现 fputc() 函数即可, 在fputc()中通过串口发送一个char. 在上一次的工程上进行修改, 将printf()重定向到串口3.0 B8 t+ B/ v. ^4 M
9 R' z$ H8 q3 R- d) W" A" I- #include <stdio.h>' {( s9 `2 n- l
- struct __FILE7 |% f- E% x% E0 X; t. w# P3 N }
- {
0 i1 G# i- F* Z9 F9 R6 A3 J - int handle;
- j+ e5 X2 r# f* G+ N a - /* Whatever you require here. If the only file you are using is */% M% ~5 t& C4 @, b B5 C# D
- /* standard output using printf() for debugging, no file handling */( O7 Y. y" v& R; V5 V
- /* is required. */
1 l7 L) _2 _/ A, o' X6 e - };
3 |6 H' s2 I6 M - /* FILE is typedef’d in stdio.h. *// \- y! u( T: @% C
- FILE __stdout;$ S( u: _/ P4 X$ o5 k
- int fputc(int ch, FILE *f)
# Y+ C2 I; {) ^% f, B! m( P- }/ Q6 d - {# z: ~; c5 I0 L: F, }( X4 w. W
- /* Your implementation of fputc(). */
4 \: ~. C& |/ k& d. o/ ` - HAL_UART_Transmit( &huart3, ( uint8_t* )&ch, 1, 0xFFFF );
: Q8 H ] N [' _ - return ch;
' G7 a$ m6 s( A( r1 v9 ` - }
% W1 J( B7 O% C- ]2 q# o0 Y - int ferror(FILE *f)
" Z9 O$ A6 [8 Y4 t9 ?9 I% T$ } - {# t0 C+ a7 A6 s4 _, U# m o
- /* Your implementation of ferror(). */
1 [1 S1 [4 M* V) z) U: | - HAL_UART_Transmit( &huart3, ( uint8_t* )"Printf Error\n", 13, 0xFFFF );// 可选
8 v( B" b. o2 ?! c - return 0;
D& a4 T3 V/ `! Q/ _ - }
复制代码
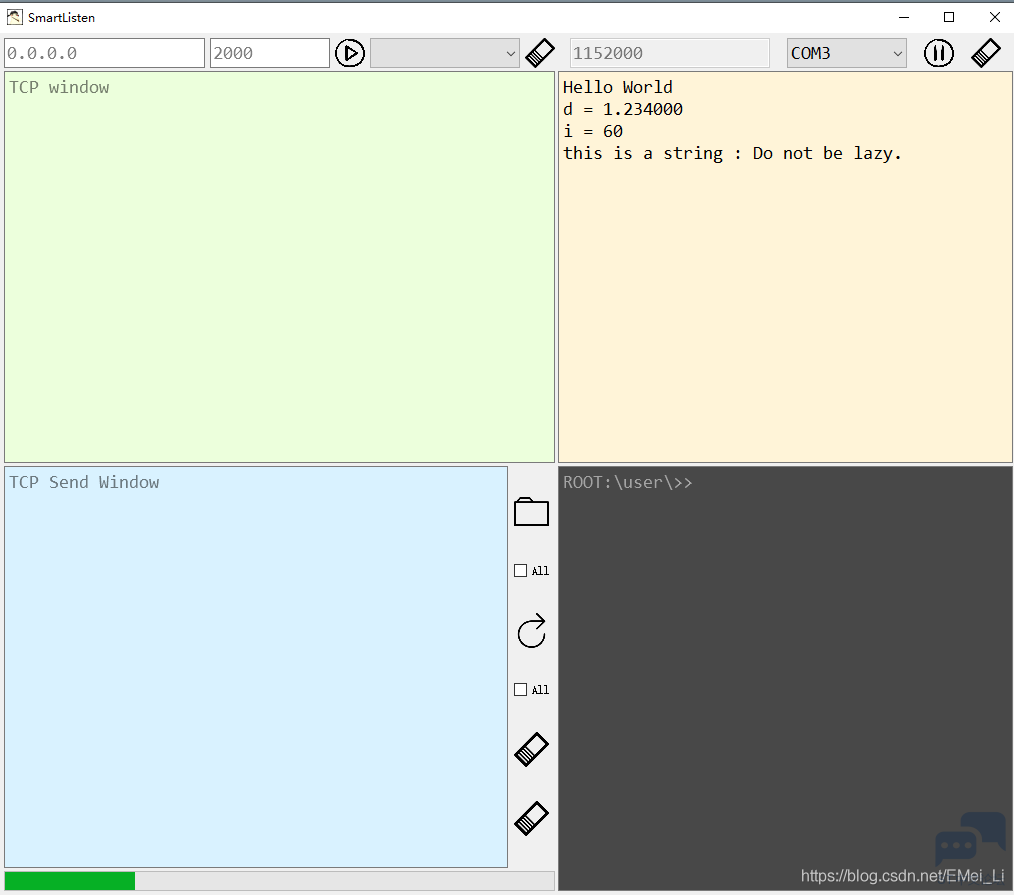
7 @: v0 f) w+ o) u5 I5 P: W& D' C写个简单的程序试一试:: m8 h6 e% R8 N, x% s
! L: p/ r8 w! _) Y4 V0 s* _
- int main(void)+ K$ s) Y9 W* L, @, {
- {9 R j/ L) M! b$ {' K* h. l) T; \
- MPU_Config();$ a- S' w7 c; T
- SCB_EnableICache();
% c4 e- x: T6 G2 v [4 T - SCB_EnableDCache();9 l3 T! a3 @- x o/ M
- HAL_Init();; j: s4 ^5 @; u: v [' Q! |
- SystemClock_Config();, l# i/ A1 t5 I" p$ j
- MX_GPIO_Init();4 J; t* x* E% I2 N
- MX_ETH_Init();4 f8 K5 U' S. T4 c' s# x# b
- MX_USART3_UART_Init();
6 z" B( |4 V6 M) x$ q0 A - /* USER CODE BEGIN 2 */
9 J( {& i" y9 s5 r, j- m+ n - double d = 1.234;3 Z# R1 _' E6 N
- int i = 60;
6 T2 P; U; r9 @, G l+ h5 n# \. x - char str[] = "Do not be lazy.\n";* @: w' B. Y) U* K- c0 q6 R
- printf("Hello World\n");/ s) ?$ N$ l' c W
- printf("d = %lf\ni = %d\n", d, i);
# @, E$ \# H" E; T7 k - printf("this is a string : %s", str);; R8 ^" y1 `4 M. a+ I
& U" D2 F8 g9 p5 L7 t' a% V J; P) Q- while (1){}" \( T; l+ T/ u. T. F
- }
复制代码 6 v4 [% r* [2 N) C: @' g
输出结果:' t5 p7 I. U- L9 T9 i! G2 D
5 s: l& d' U; f I
5 P9 C& N/ I6 B- n( a; F4 j
可以开始愉快的使用printf()了.
, e' R) h# V5 T% Z" \# D. G {* S: K! s | j3 [: ^; g5 U1 C4 Z
8 T, T6 _' @# s- v! t: p
! q2 {7 c* z, C( p, C. \9 M4 h |