要做的事
通过STM32自带的12位ADC模块读取8通道电压信号,并将其通过USART1发送出来
STM32Cube的USART1配置
USART1总体配置
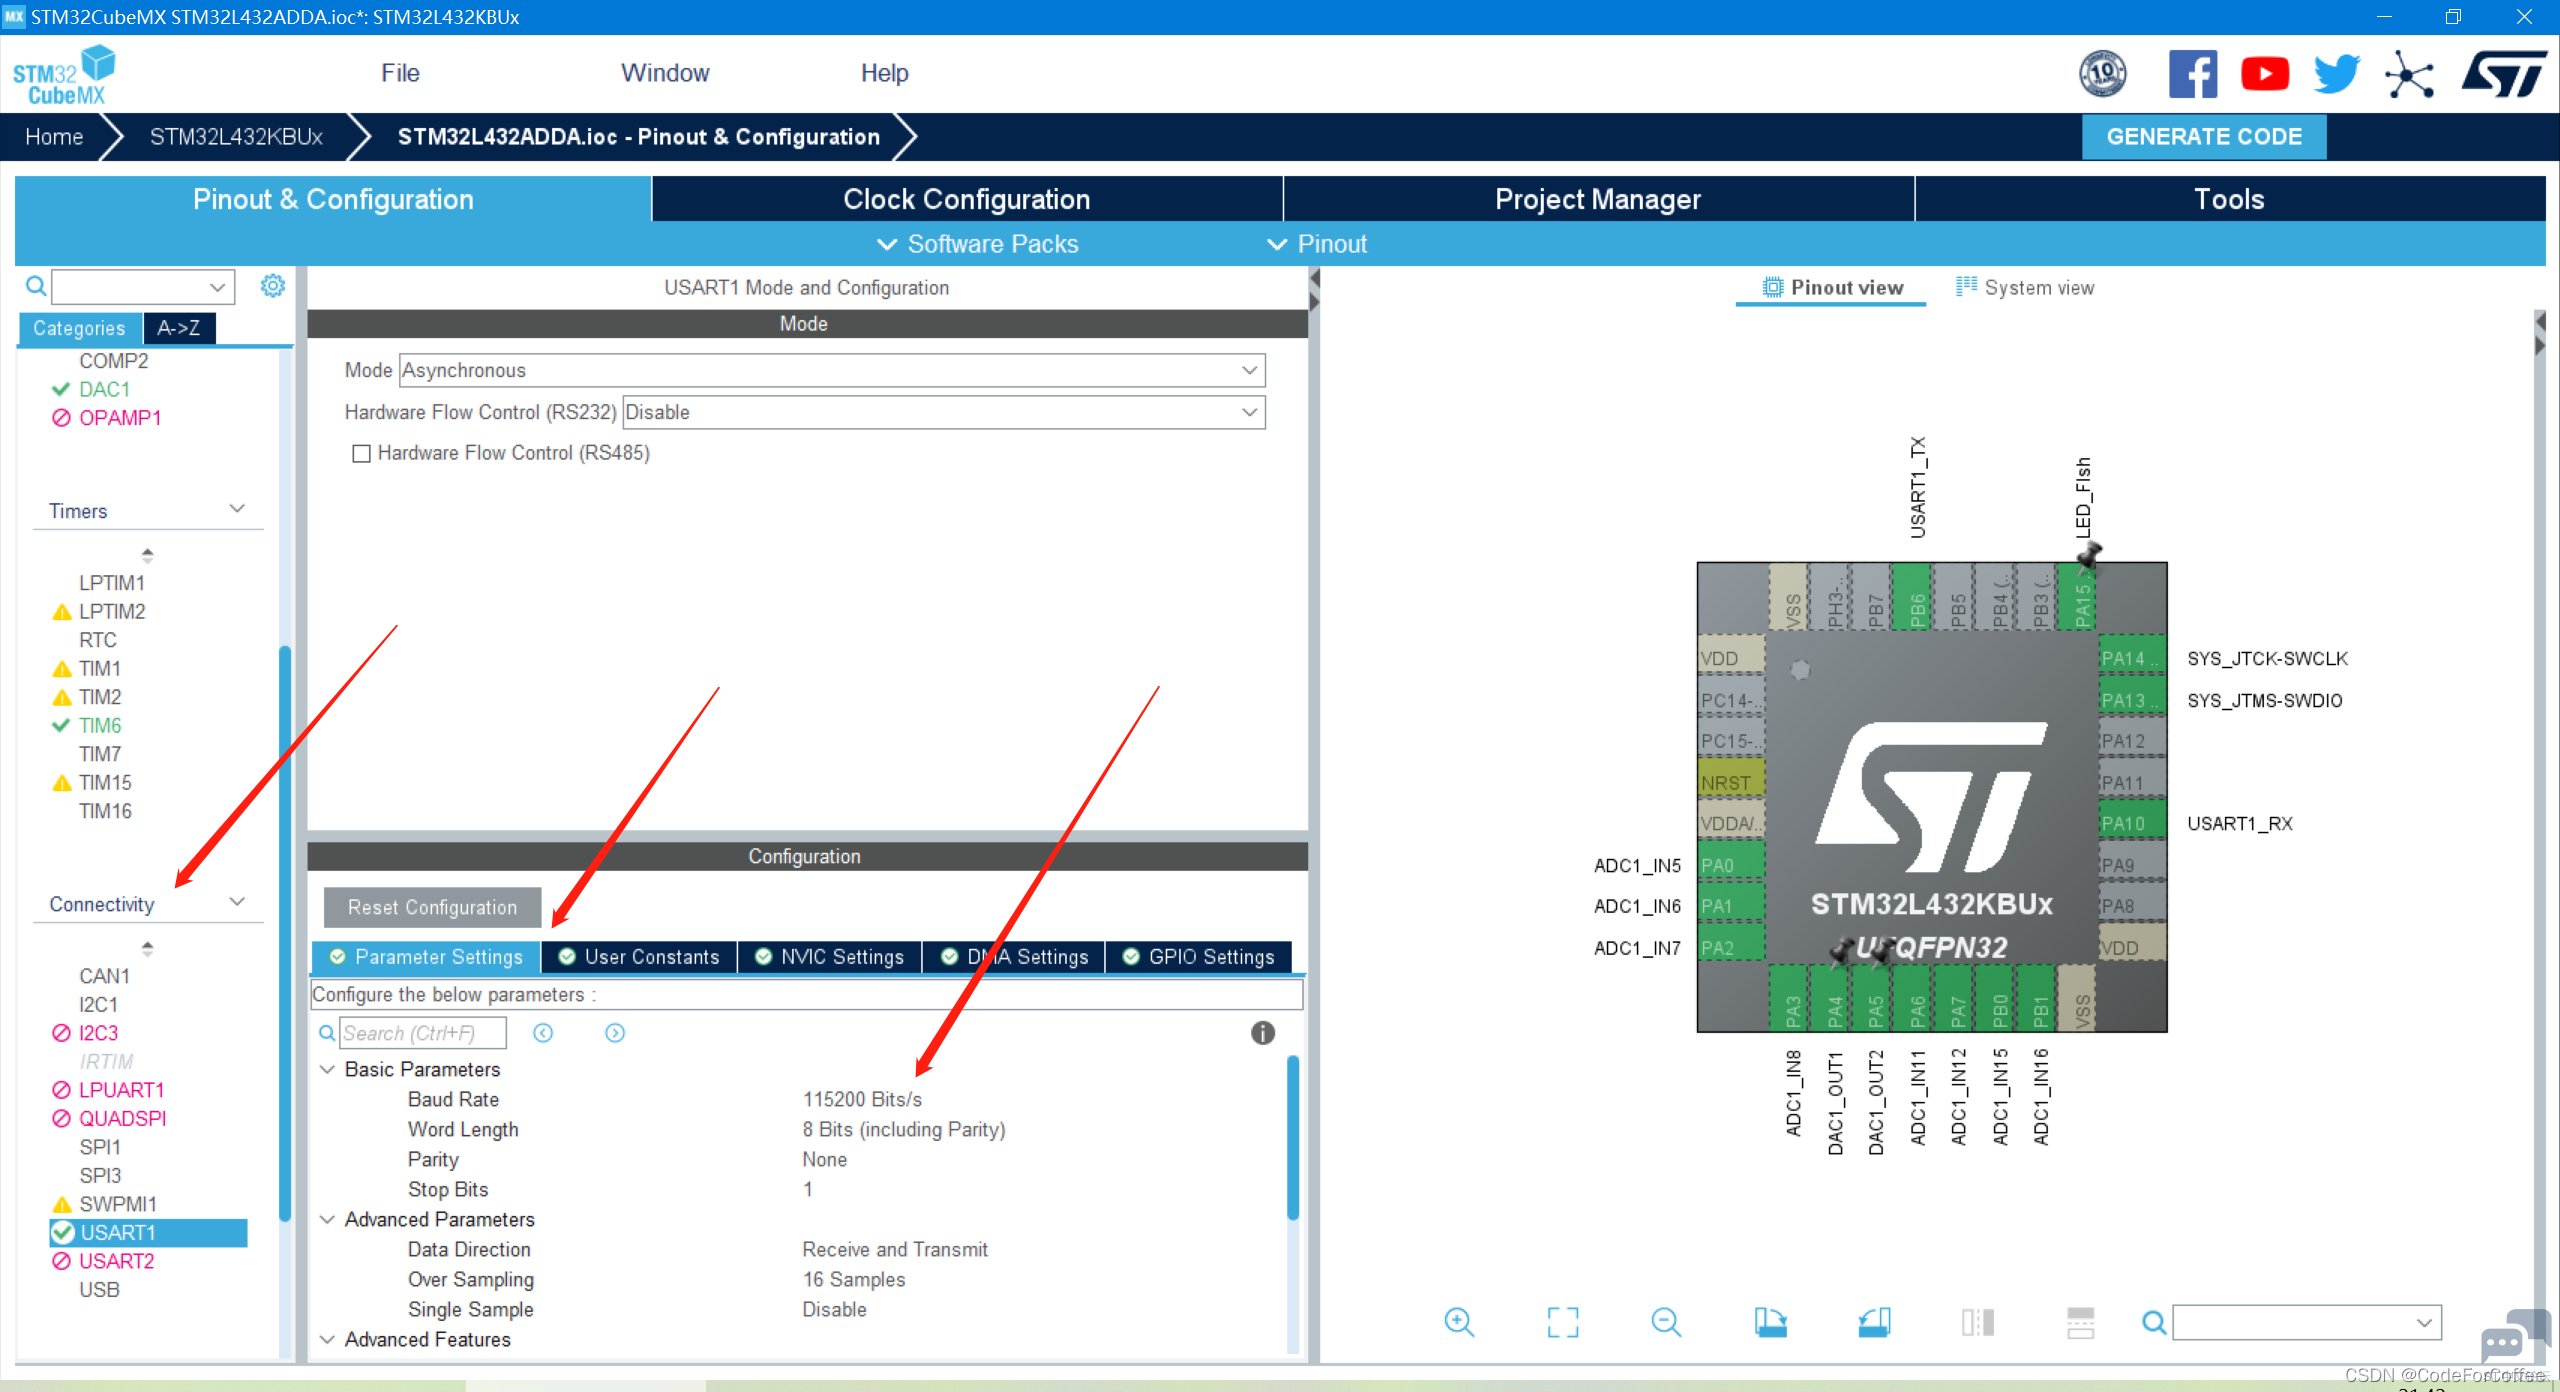
USART1的配置如下图所示
波特率初始化为115200,后续可以再进行修改
USART1引脚配置
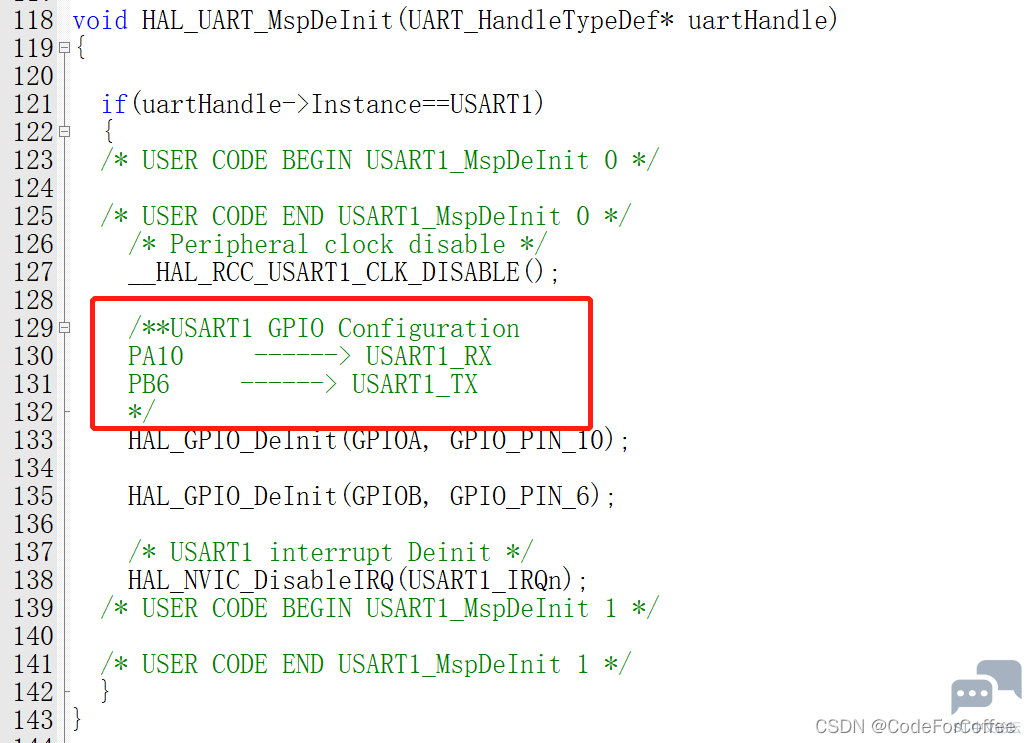
USART1的引脚配置如下
PA10为USART1的RX
PB6为USART1的TX
fputc重定向
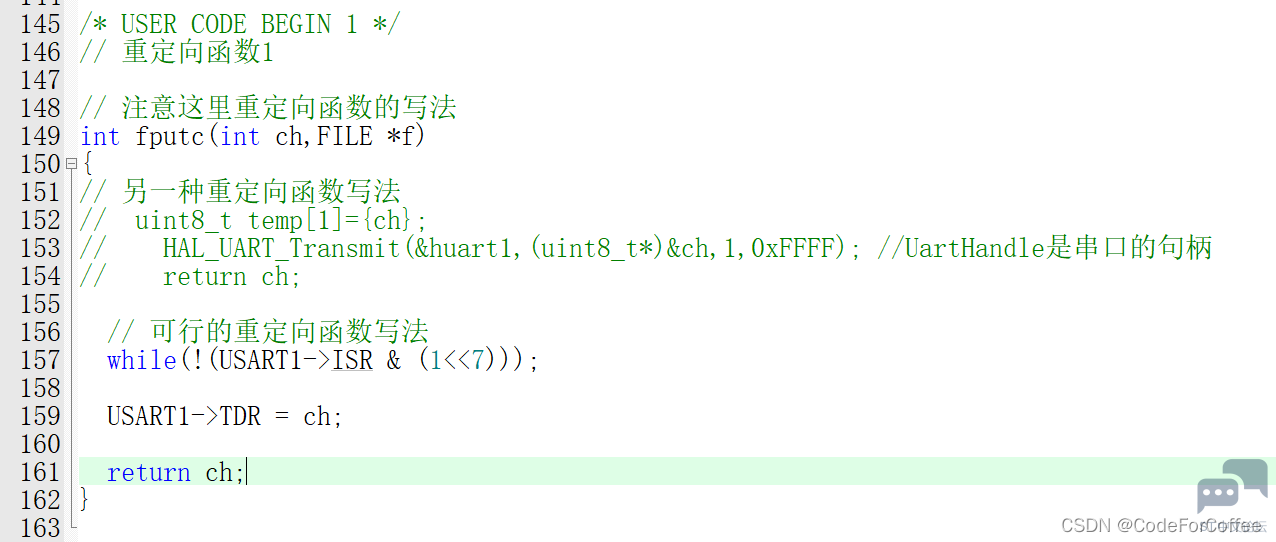
重定向完成后,在.c文件的开头或对应的.h文件中include <stdio.h>即可使用printf函数
USART1接收
重写中断服务函数HAL_UART_RxCpltCallback
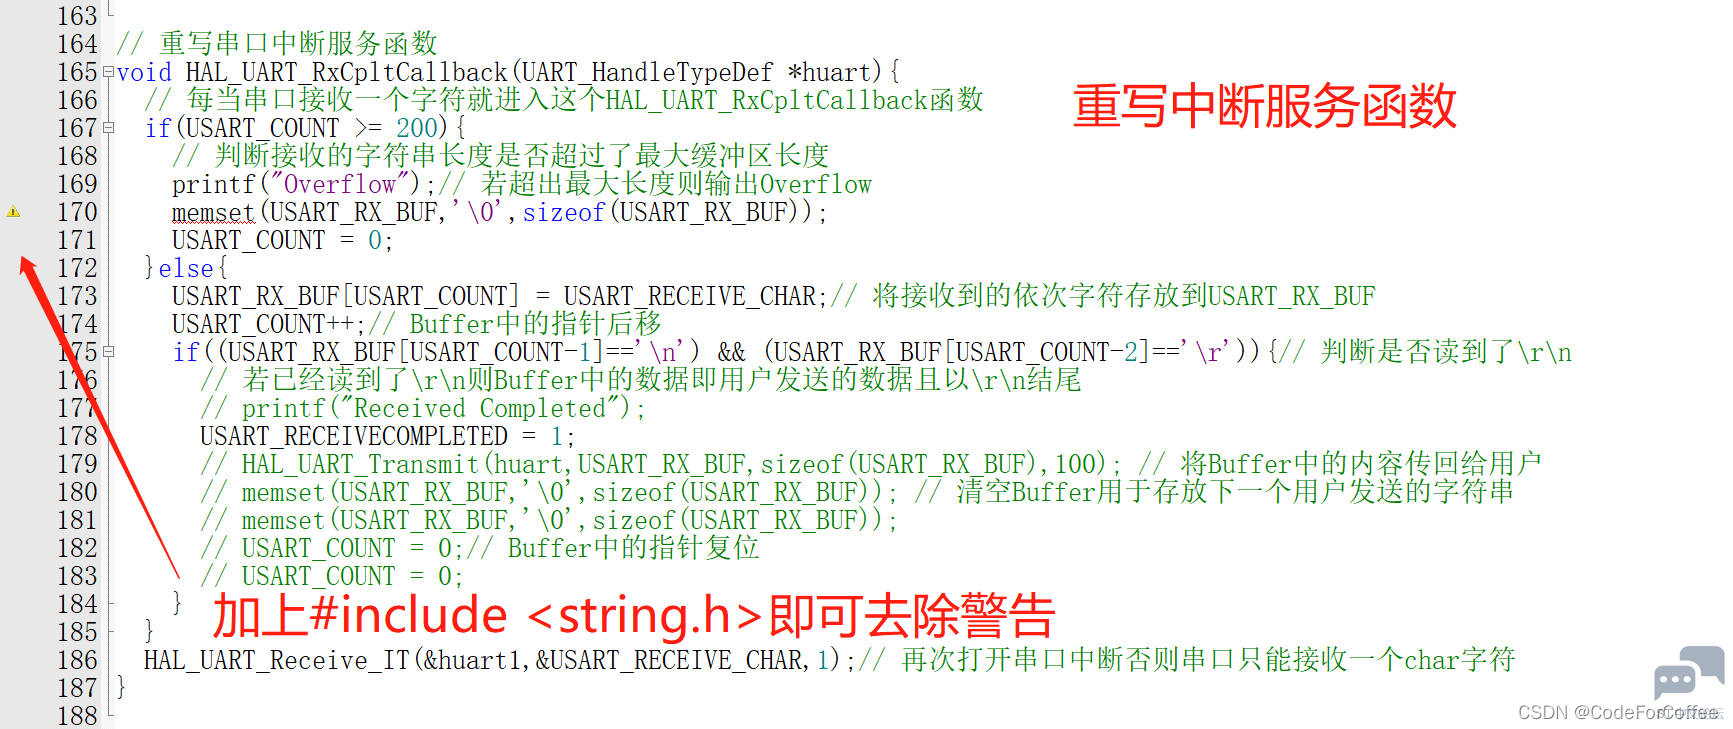
自定义一个Clear函数

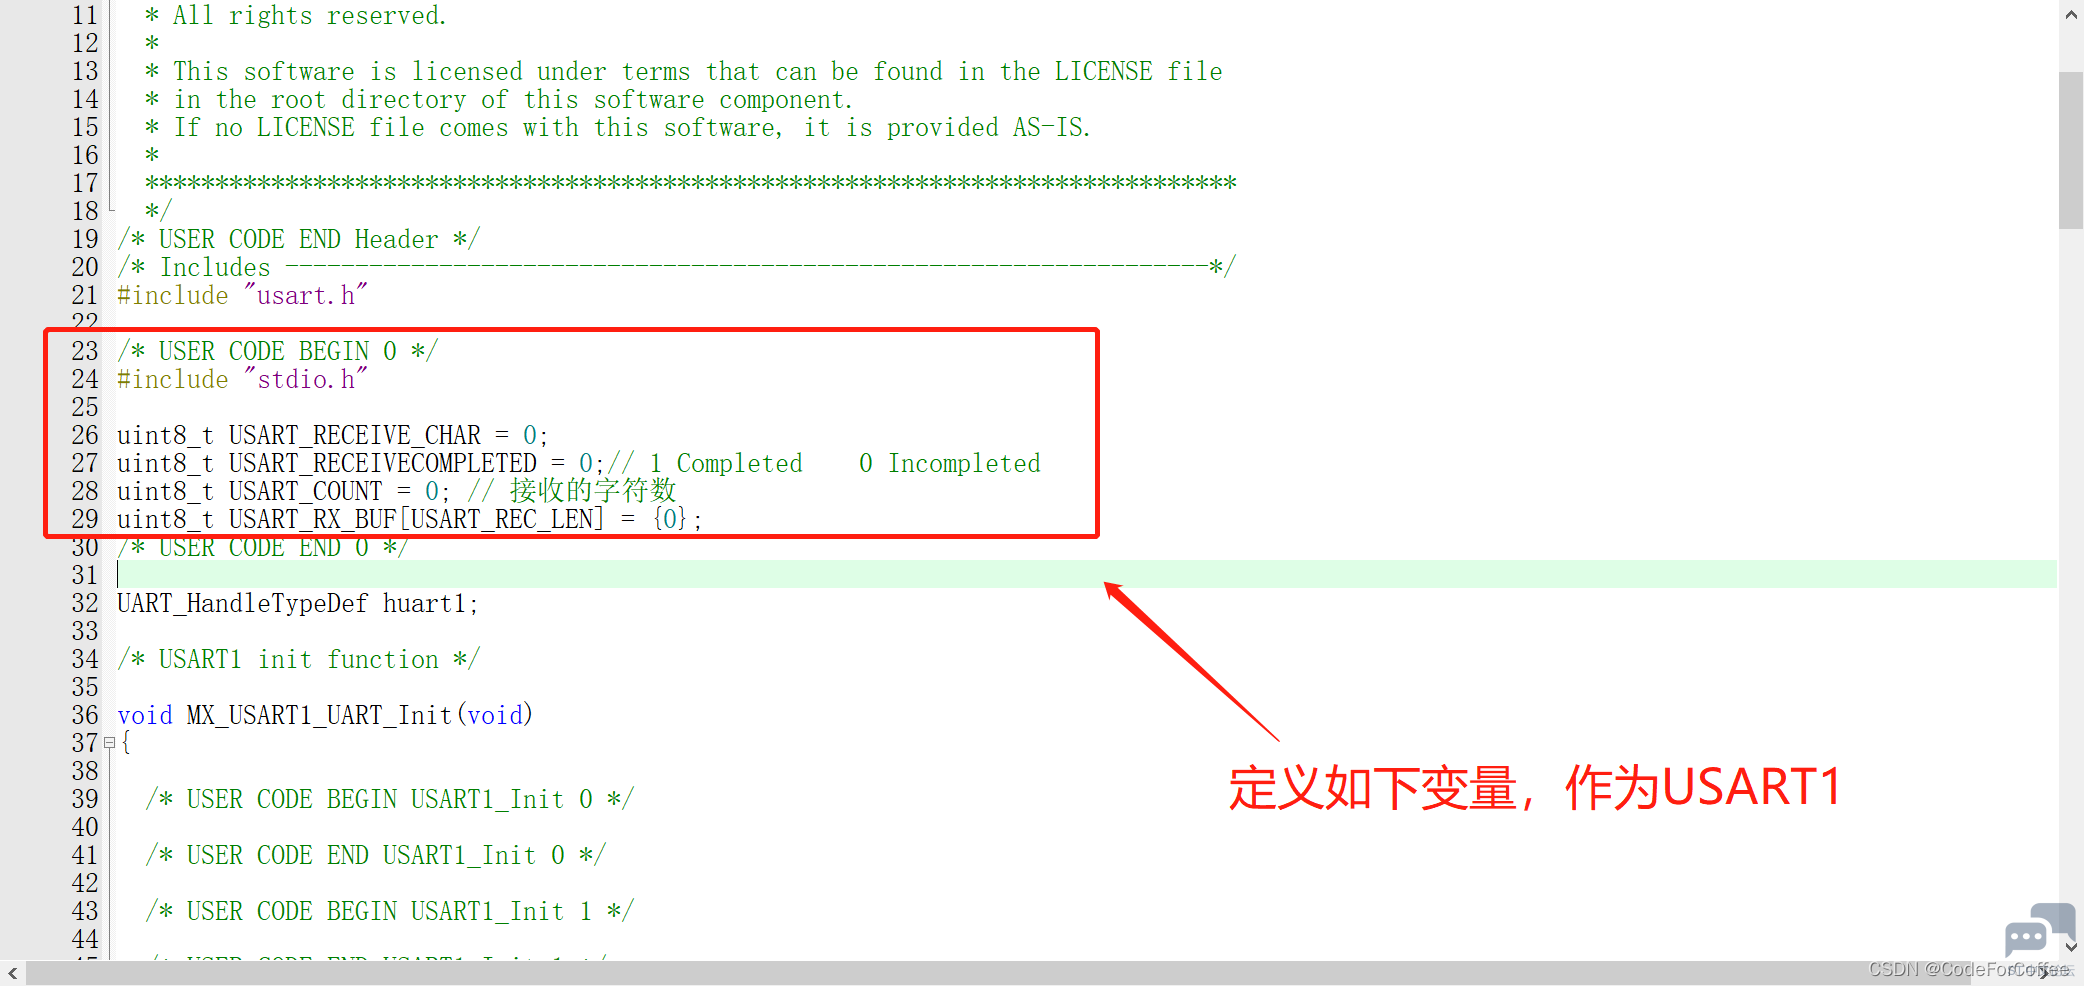
我们需要在几个地方extern一下,一个是usart.h一个是main.c
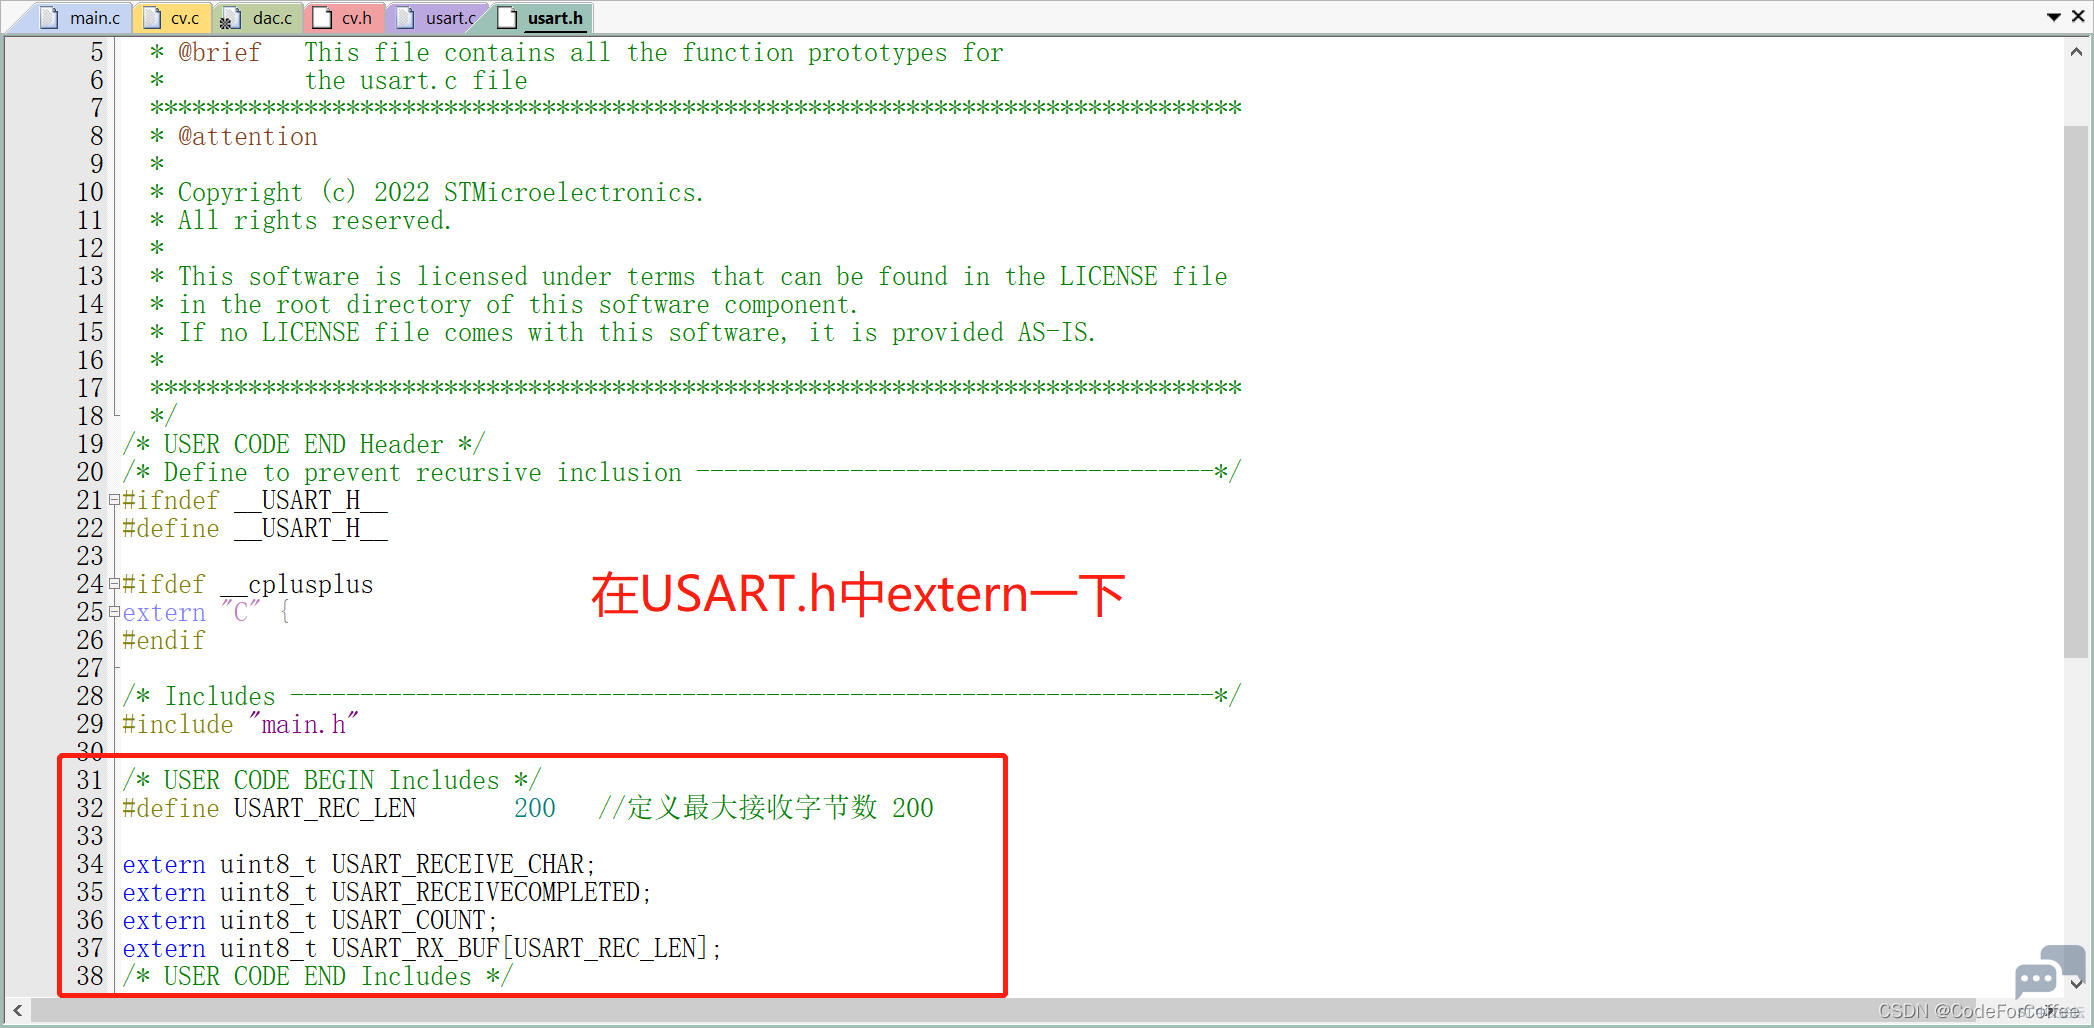

这里附上相关代码
首先是usart.h
- /* USER CODE BEGIN Header */
- /**
- ******************************************************************************
- * @file usart.h
- * @brief This file contains all the function prototypes for
- * the usart.c file
- ******************************************************************************
- * @attention
- *
- * Copyright (c) 2022 STMicroelectronics.
- * All rights reserved.
- *
- * This software is licensed under terms that can be found in the LICENSE file
- * in the root directory of this software component.
- * If no LICENSE file comes with this software, it is provided AS-IS.
- *
- ******************************************************************************
- */
- /* USER CODE END Header */
- /* Define to prevent recursive inclusion -------------------------------------*/
- #ifndef __USART_H__
- #define __USART_H__
-
- #ifdef __cplusplus
- extern "C" {
- #endif
-
- /* Includes ------------------------------------------------------------------*/
- #include "main.h"
-
- /* USER CODE BEGIN Includes */
- #define USART_REC_LEN 200 //定义最大接收字节数 200
-
- extern uint8_t USART_RECEIVE_CHAR;
- extern uint8_t USART_RECEIVECOMPLETED;
- extern uint8_t USART_COUNT;
- extern uint8_t USART_RX_BUF[USART_REC_LEN];
- /* USER CODE END Includes */
-
- extern UART_HandleTypeDef huart1;
-
- /* USER CODE BEGIN Private defines */
-
- /* USER CODE END Private defines */
-
- void MX_USART1_UART_Init(void);
-
- /* USER CODE BEGIN Prototypes */
- void ClearUSARTReceiveBuffer(void);
- /* USER CODE END Prototypes */
-
- #ifdef __cplusplus
- }
- #endif
-
- #endif /* __USART_H__ */
-
usart.c
- /* USER CODE BEGIN Header */
- /**
- ******************************************************************************
- * @file usart.c
- * @brief This file provides code for the configuration
- * of the USART instances.
- ******************************************************************************
- * @attention
- *
- * Copyright (c) 2022 STMicroelectronics.
- * All rights reserved.
- *
- * This software is licensed under terms that can be found in the LICENSE file
- * in the root directory of this software component.
- * If no LICENSE file comes with this software, it is provided AS-IS.
- *
- ******************************************************************************
- */
- /* USER CODE END Header */
- /* Includes ------------------------------------------------------------------*/
- #include "usart.h"
-
- /* USER CODE BEGIN 0 */
- #include "stdio.h"
- #include <string.h>
-
- uint8_t USART_RECEIVE_CHAR = 0;
- uint8_t USART_RECEIVECOMPLETED = 0;// 1 Completed 0 Incompleted
- uint8_t USART_COUNT = 0; // 接收的字符数
- uint8_t USART_RX_BUF[USART_REC_LEN] = {0};
- /* USER CODE END 0 */
-
- UART_HandleTypeDef huart1;
-
- /* USART1 init function */
-
- void MX_USART1_UART_Init(void)
- {
-
- /* USER CODE BEGIN USART1_Init 0 */
-
- /* USER CODE END USART1_Init 0 */
-
- /* USER CODE BEGIN USART1_Init 1 */
-
- /* USER CODE END USART1_Init 1 */
- huart1.Instance = USART1;
- huart1.Init.BaudRate = 115200;
- huart1.Init.WordLength = UART_WORDLENGTH_8B;
- huart1.Init.StopBits = UART_STOPBITS_1;
- huart1.Init.Parity = UART_PARITY_NONE;
- huart1.Init.Mode = UART_MODE_TX_RX;
- huart1.Init.HwFlowCtl = UART_HWCONTROL_NONE;
- huart1.Init.OverSampling = UART_OVERSAMPLING_16;
- huart1.Init.OneBitSampling = UART_ONE_BIT_SAMPLE_DISABLE;
- huart1.AdvancedInit.AdvFeatureInit = UART_ADVFEATURE_NO_INIT;
- if (HAL_UART_Init(&huart1) != HAL_OK)
- {
- Error_Handler();
- }
- /* USER CODE BEGIN USART1_Init 2 */
-
- /* USER CODE END USART1_Init 2 */
-
- }
-
- void HAL_UART_MspInit(UART_HandleTypeDef* uartHandle)
- {
-
- GPIO_InitTypeDef GPIO_InitStruct = {0};
- RCC_PeriphCLKInitTypeDef PeriphClkInit = {0};
- if(uartHandle->Instance==USART1)
- {
- /* USER CODE BEGIN USART1_MspInit 0 */
-
- /* USER CODE END USART1_MspInit 0 */
-
- /** Initializes the peripherals clock
- */
- PeriphClkInit.PeriphClockSelection = RCC_PERIPHCLK_USART1;
- PeriphClkInit.Usart1ClockSelection = RCC_USART1CLKSOURCE_PCLK2;
- if (HAL_RCCEx_PeriphCLKConfig(&PeriphClkInit) != HAL_OK)
- {
- Error_Handler();
- }
-
- /* USART1 clock enable */
- __HAL_RCC_USART1_CLK_ENABLE();
-
- __HAL_RCC_GPIOA_CLK_ENABLE();
- __HAL_RCC_GPIOB_CLK_ENABLE();
- /**USART1 GPIO Configuration
- PA10 ------> USART1_RX
- PB6 ------> USART1_TX
- */
- GPIO_InitStruct.Pin = GPIO_PIN_10;
- GPIO_InitStruct.Mode = GPIO_MODE_AF_PP;
- GPIO_InitStruct.Pull = GPIO_NOPULL;
- GPIO_InitStruct.Speed = GPIO_SPEED_FREQ_VERY_HIGH;
- GPIO_InitStruct.Alternate = GPIO_AF7_USART1;
- HAL_GPIO_Init(GPIOA, &GPIO_InitStruct);
-
- GPIO_InitStruct.Pin = GPIO_PIN_6;
- GPIO_InitStruct.Mode = GPIO_MODE_AF_PP;
- GPIO_InitStruct.Pull = GPIO_NOPULL;
- GPIO_InitStruct.Speed = GPIO_SPEED_FREQ_VERY_HIGH;
- GPIO_InitStruct.Alternate = GPIO_AF7_USART1;
- HAL_GPIO_Init(GPIOB, &GPIO_InitStruct);
-
- /* USART1 interrupt Init */
- HAL_NVIC_SetPriority(USART1_IRQn, 0, 0);
- HAL_NVIC_EnableIRQ(USART1_IRQn);
- /* USER CODE BEGIN USART1_MspInit 1 */
-
- /* USER CODE END USART1_MspInit 1 */
- }
- }
-
- void HAL_UART_MspDeInit(UART_HandleTypeDef* uartHandle)
- {
-
- if(uartHandle->Instance==USART1)
- {
- /* USER CODE BEGIN USART1_MspDeInit 0 */
-
- /* USER CODE END USART1_MspDeInit 0 */
- /* Peripheral clock disable */
- __HAL_RCC_USART1_CLK_DISABLE();
-
- /**USART1 GPIO Configuration
- PA10 ------> USART1_RX
- PB6 ------> USART1_TX
- */
- HAL_GPIO_DeInit(GPIOA, GPIO_PIN_10);
-
- HAL_GPIO_DeInit(GPIOB, GPIO_PIN_6);
-
- /* USART1 interrupt Deinit */
- HAL_NVIC_DisableIRQ(USART1_IRQn);
- /* USER CODE BEGIN USART1_MspDeInit 1 */
-
- /* USER CODE END USART1_MspDeInit 1 */
- }
- }
-
- /* USER CODE BEGIN 1 */
- // 重定向函数1
-
- // 注意这里重定向函数的写法
- int fputc(int ch,FILE *f)
- {
- // 另一种重定向函数写法
- // uint8_t temp[1]={ch};
- // HAL_UART_Transmit(&huart1,(uint8_t*)&ch,1,0xFFFF); //UartHandle是串口的句柄
- // return ch;
-
- // 可行的重定向函数写法
- while(!(USART1->ISR & (1<<7)));
-
- USART1->TDR = ch;
-
- return ch;
- }
-
- // 重写串口中断服务函数
- void HAL_UART_RxCpltCallback(UART_HandleTypeDef *huart){
- // 每当串口接收一个字符就进入这个HAL_UART_RxCpltCallback函数
- if(USART_COUNT >= 200){
- // 判断接收的字符串长度是否超过了最大缓冲区长度
- printf("Overflow");// 若超出最大长度则输出Overflow
- memset(USART_RX_BUF,'\0',sizeof(USART_RX_BUF));
- USART_COUNT = 0;
- }else{
- USART_RX_BUF[USART_COUNT] = USART_RECEIVE_CHAR;// 将接收到的依次字符存放到USART_RX_BUF
- USART_COUNT++;// Buffer中的指针后移
- if((USART_RX_BUF[USART_COUNT-1]=='\n') && (USART_RX_BUF[USART_COUNT-2]=='\r')){// 判断是否读到了\r\n
- // 若已经读到了\r\n则Buffer中的数据即用户发送的数据且以\r\n结尾
- // printf("Received Completed");
- USART_RECEIVECOMPLETED = 1;
- // HAL_UART_Transmit(huart,USART_RX_BUF,sizeof(USART_RX_BUF),100); // 将Buffer中的内容传回给用户
- // memset(USART_RX_BUF,'\0',sizeof(USART_RX_BUF)); // 清空Buffer用于存放下一个用户发送的字符串
- // memset(USART_RX_BUF,'\0',sizeof(USART_RX_BUF));
- // USART_COUNT = 0;// Buffer中的指针复位
- // USART_COUNT = 0;
- }
- }
- HAL_UART_Receive_IT(&huart1,&USART_RECEIVE_CHAR,1);// 再次打开串口中断否则串口只能接收一个char字符
- }
-
- void ClearUSARTReceiveBuffer(void){
-
- USART_COUNT = 0;// Buffer中的指针复位
- USART_RECEIVECOMPLETED = 0; // 清除接收完成标志
- memset(USART_RX_BUF,'\0',sizeof(USART_RX_BUF)); // 清空Buffer用于存放下一个用户发送的字符串
- }
-
- /* USER CODE END 1 */
main.c
- /* USER CODE BEGIN Header */
- /**
- ******************************************************************************
- * @file : main.c
- * @brief : Main program body
- * @author : Lihang Zhu
- ******************************************************************************
- * @attention
- *
- * Copyright (c) 2022 STMicroelectronics.
- * All rights reserved.
- *
- * This software is licensed under terms that can be found in the LICENSE file
- * in the root directory of this software component.
- * If no LICENSE file comes with this software, it is provided AS-IS.
- *
- ******************************************************************************
- */
- /* USER CODE END Header */
- /* Includes ------------------------------------------------------------------*/
- #include "main.h"
- #include "adc.h"
- #include "dac.h"
- #include "dma.h"
- #include "tim.h"
- #include "usart.h"
- #include "gpio.h"
- #include <stdio.h>
- #include "cv.h"
- /* Private includes ----------------------------------------------------------*/
- /* USER CODE BEGIN Includes */
- /*PB6---UART1_TX
- PA10---UART1_RX
-
- PA0---ADC1_IN5
- PA1---ADC1_IN6
- PA2---ADC1_IN7
- PA3---ADC1_IN8
- PA6---ADC1_IN11
- PA7---ADC1_IN12
- PB0---ADC1_IN15
- PB0---ADC1_IN16
-
- PA4---DAC1_OUT1 程序输出 2048/4096*3.3= 1.65
- PA5---DAC1_OUT2
-
- PA15 LED灯进行翻转 亮灭
- */
- /* USER CODE END Includes */
-
- /* Private typedef -----------------------------------------------------------*/
- /* USER CODE BEGIN PTD */
-
- // ADC Buffer 16bit
- volatile uint16_t ADC_Value[8];//存储数组
- float ADC_RESULT = 0;
- // USART Related Content
- // @author : Lihang Zhu
- extern uint8_t USART_RECEIVE_CHAR;
- extern uint8_t USART_RECEIVECOMPLETED;
- extern uint8_t USART_COUNT;
- extern uint8_t USART_RX_BUF[USART_REC_LEN];
- /* USER CODE END PTD */
-
- /* Private define ------------------------------------------------------------*/
- /* USER CODE BEGIN PD */
- /* USER CODE END PD */
-
- /* Private macro -------------------------------------------------------------*/
- /* USER CODE BEGIN PM */
-
- /* USER CODE END PM */
-
- /* Private variables ---------------------------------------------------------*/
-
- /* USER CODE BEGIN PV */
-
- /* USER CODE END PV */
-
- /* Private function prototypes -----------------------------------------------*/
- void SystemClock_Config(void);
- /* USER CODE BEGIN PFP */
-
- /* USER CODE END PFP */
-
- /* Private user code ---------------------------------------------------------*/
- /* USER CODE BEGIN 0 */
-
- /* USER CODE END 0 */
-
- /**
- * @brief The application entry point.
- * @retval int
- */
- int main(void)
- {
- /* USER CODE BEGIN 1 */
-
- /* USER CODE END 1 */
-
- /* MCU Configuration--------------------------------------------------------*/
-
- /* Reset of all peripherals, Initializes the Flash interface and the Systick. */
- HAL_Init();
-
- /* USER CODE BEGIN Init */
-
- /* USER CODE END Init */
-
- /* Configure the system clock */
- SystemClock_Config();
-
- /* USER CODE BEGIN SysInit */
-
- /* USER CODE END SysInit */
-
- /* Initialize all configured peripherals */
- MX_GPIO_Init();
- MX_DMA_Init();
- MX_ADC1_Init();
- MX_TIM6_Init();
- MX_USART1_UART_Init();
- MX_DAC1_Init();
- /* USER CODE BEGIN 2 */
- HAL_TIM_Base_Start_IT(&htim6);
-
- HAL_GPIO_WritePin(LED_Flsh_GPIO_Port, LED_Flsh_Pin, GPIO_PIN_RESET);
-
- HAL_ADCEx_Calibration_Start(&hadc1,ADC_SINGLE_ENDED); //AD校准
- HAL_ADC_Start_DMA(&hadc1,(uint32_t*)&ADC_Value,8);// 强制转换为uint32_t
-
-
- Dac1_Set_Vol(1200); // PA4
-
- /* USER CODE END 2 */
-
- /* Infinite loop */
- /* USER CODE BEGIN WHILE */
- HAL_UART_Receive_IT(&huart1,&USART_RECEIVE_CHAR,1); //开启第一次中断
-
- while (1)
- {
- /* USER CODE END WHILE */
- // ADC_RESULT = 3300000.0/4096.0*ADC_Value[0]/1000.0; printf("%f \r\n",ADC_RESULT);
- // HAL_Delay(300);
- /* USER CODE BEGIN 3 */
- // printf("Hello");
-
-
- // int i = 200;
- // if(i>=0){
- // CV_setting1();
- // i--;
- // }
-
- }
- /* USER CODE END 3 */
- }
-
- /**
- * @brief System Clock Configuration
- * @retval None
- */
- void SystemClock_Config(void)
- {
- RCC_OscInitTypeDef RCC_OscInitStruct = {0};
- RCC_ClkInitTypeDef RCC_ClkInitStruct = {0};
-
- /** Configure the main internal regulator output voltage
- */
- if (HAL_PWREx_ControlVoltageScaling(PWR_REGULATOR_VOLTAGE_SCALE1) != HAL_OK)
- {
- Error_Handler();
- }
-
- /** Initializes the RCC Oscillators according to the specified parameters
- * in the RCC_OscInitTypeDef structure.
- */
- RCC_OscInitStruct.OscillatorType = RCC_OSCILLATORTYPE_MSI;
- RCC_OscInitStruct.MSIState = RCC_MSI_ON;
- RCC_OscInitStruct.MSICalibrationValue = 0;
- RCC_OscInitStruct.MSIClockRange = RCC_MSIRANGE_6;
- RCC_OscInitStruct.PLL.PLLState = RCC_PLL_ON;
- RCC_OscInitStruct.PLL.PLLSource = RCC_PLLSOURCE_MSI;
- RCC_OscInitStruct.PLL.PLLM = 1;
- RCC_OscInitStruct.PLL.PLLN = 40;
- RCC_OscInitStruct.PLL.PLLP = RCC_PLLP_DIV7;
- RCC_OscInitStruct.PLL.PLLQ = RCC_PLLQ_DIV2;
- RCC_OscInitStruct.PLL.PLLR = RCC_PLLR_DIV2;
- if (HAL_RCC_OscConfig(&RCC_OscInitStruct) != HAL_OK)
- {
- Error_Handler();
- }
-
- /** Initializes the CPU, AHB and APB buses clocks
- */
- RCC_ClkInitStruct.ClockType = RCC_CLOCKTYPE_HCLK|RCC_CLOCKTYPE_SYSCLK
- |RCC_CLOCKTYPE_PCLK1|RCC_CLOCKTYPE_PCLK2;
- RCC_ClkInitStruct.SYSCLKSource = RCC_SYSCLKSOURCE_PLLCLK;
- RCC_ClkInitStruct.AHBCLKDivider = RCC_SYSCLK_DIV1;
- RCC_ClkInitStruct.APB1CLKDivider = RCC_HCLK_DIV1;
- RCC_ClkInitStruct.APB2CLKDivider = RCC_HCLK_DIV1;
-
- if (HAL_RCC_ClockConfig(&RCC_ClkInitStruct, FLASH_LATENCY_4) != HAL_OK)
- {
- Error_Handler();
- }
- }
-
- /* USER CODE BEGIN 4 */
-
- /* USER CODE END 4 */
-
- /**
- * @brief This function is executed in case of error occurrence.
- * @retval None
- */
- void Error_Handler(void)
- {
- /* USER CODE BEGIN Error_Handler_Debug */
- /* User can add his own implementation to report the HAL error return state */
- __disable_irq();
- while (1)
- {
- }
- /* USER CODE END Error_Handler_Debug */
- }
-
- #ifdef USE_FULL_ASSERT
- /**
- * @brief Reports the name of the source file and the source line number
- * where the assert_param error has occurred.
- * @param file: pointer to the source file name
- * @param line: assert_param error line source number
- * @retval None
- */
- void assert_failed(uint8_t *file, uint32_t line)
- {
- /* USER CODE BEGIN 6 */
- /* User can add his own implementation to report the file name and line number,
- ex: printf("Wrong parameters value: file %s on line %d\r\n", file, line) */
- /* USER CODE END 6 */
- }
- #endif /* USE_FULL_ASSERT */
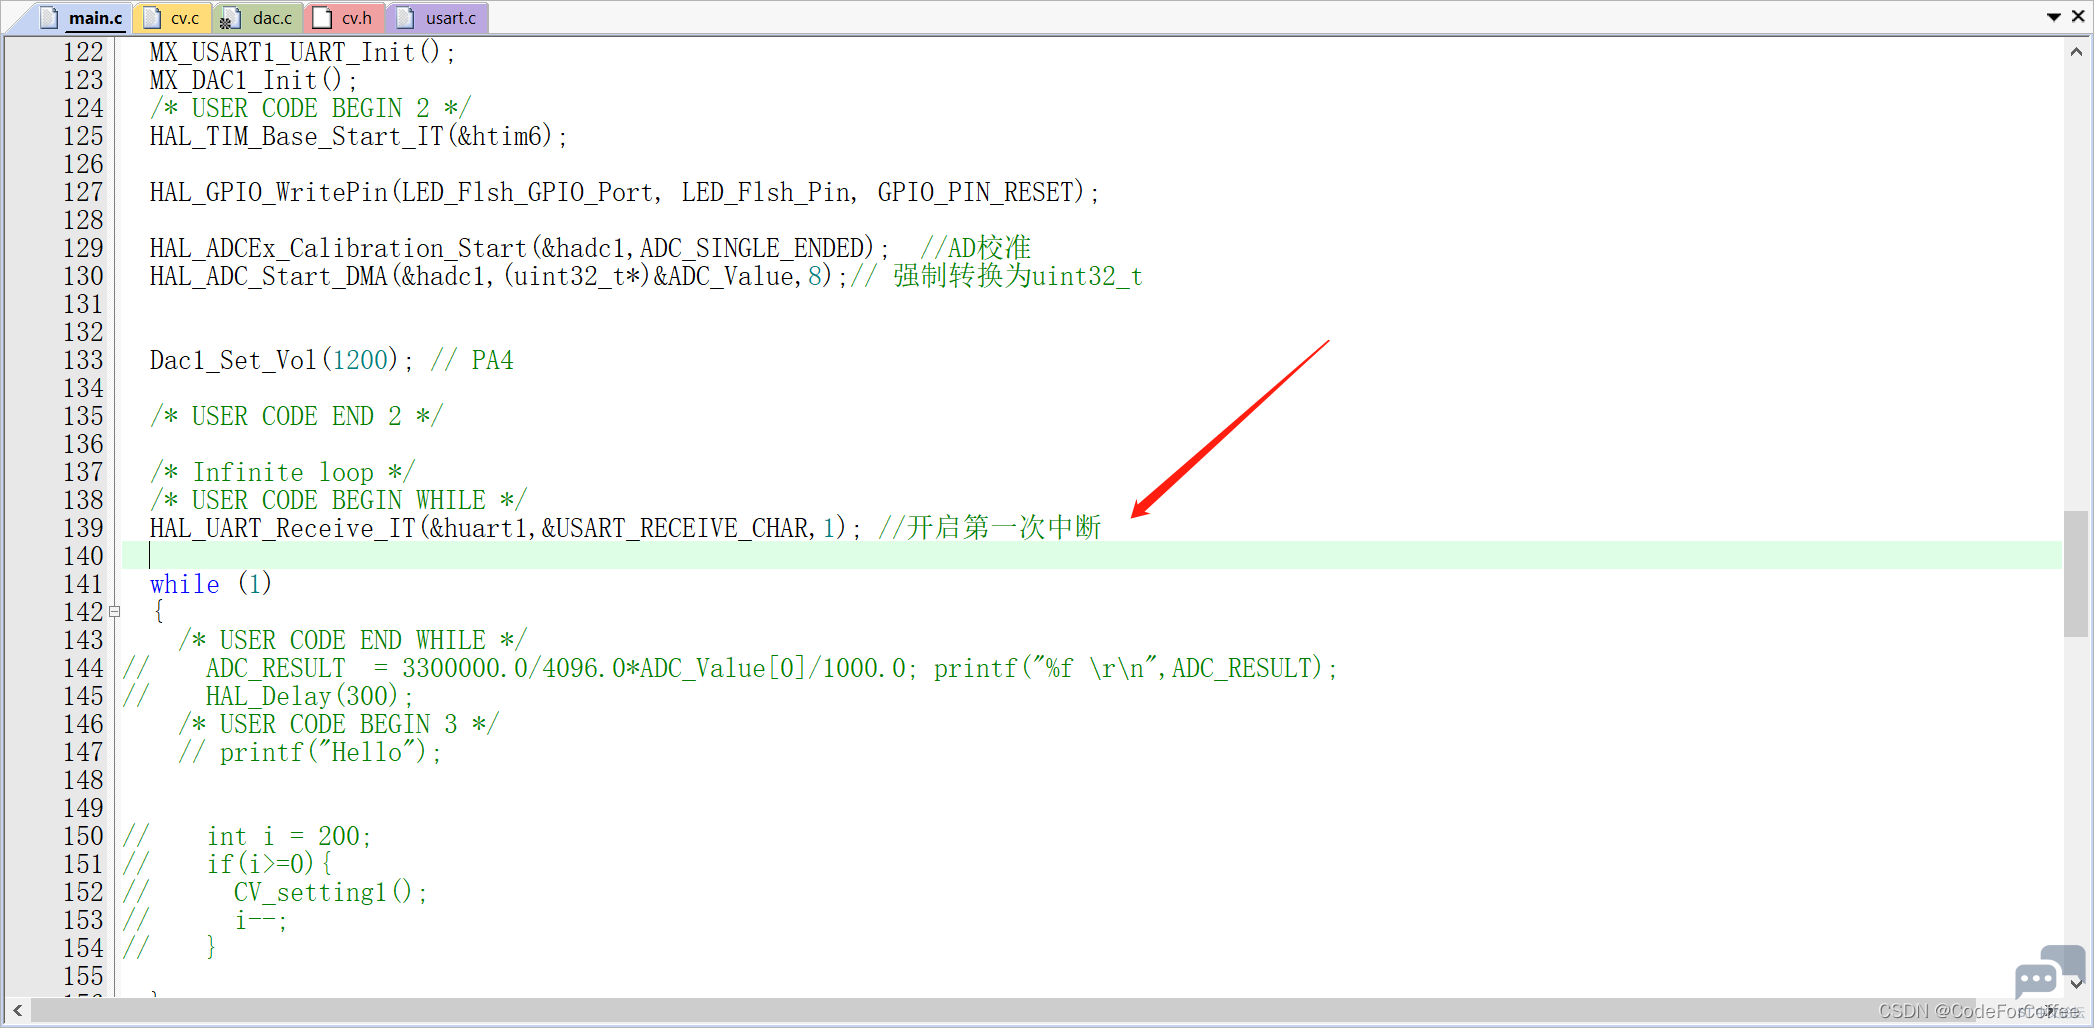
使用USART中断接收数据,记得要在while前开启USART中断
此外,这里也要再次开启中断
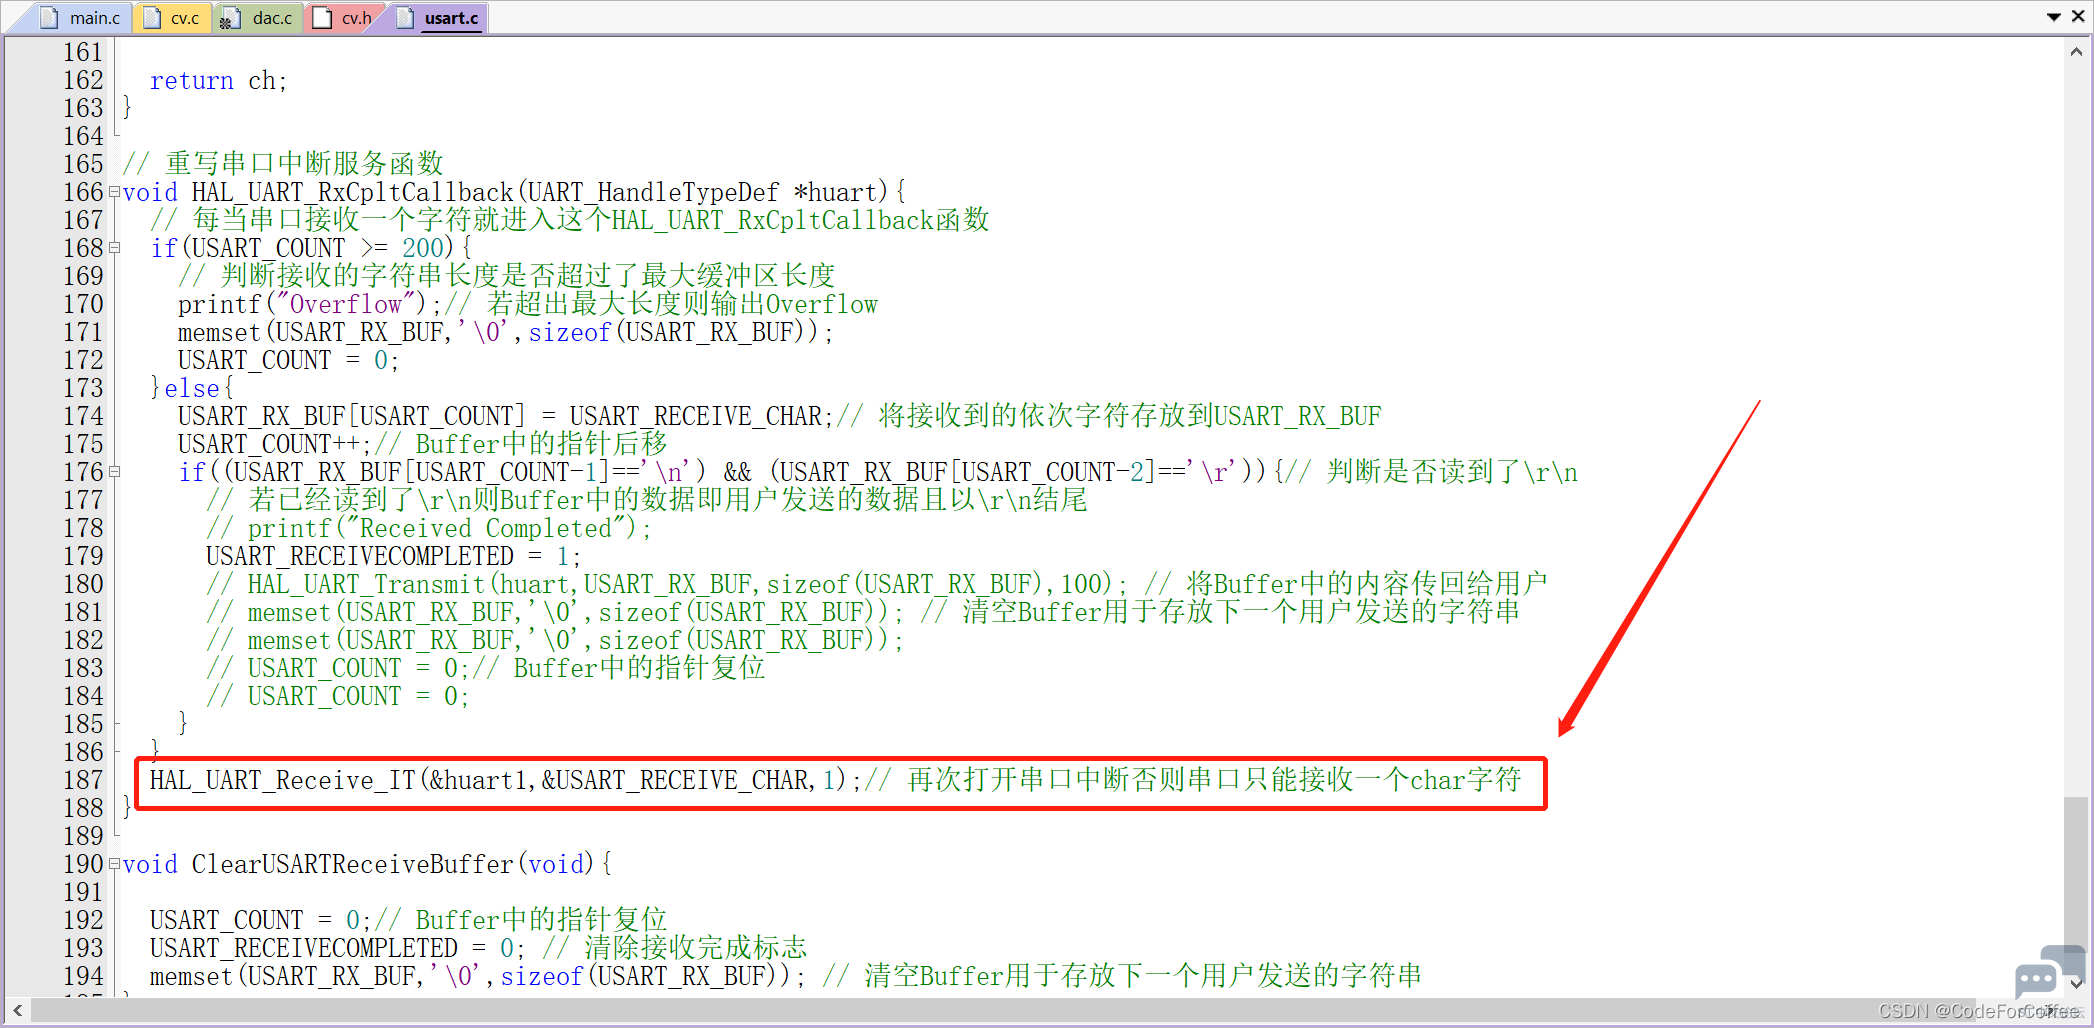
注意:每当串口接收一个字符就进入这个HAL_UART_RxCpltCallback函数,我们将将接收到的依次字符按照收到的顺序从低到高存放到USART_RX_BUF中
我们可以通过USART_RECEIVECOMPLETED判断USART1是否读取到了完整的数据
读取到的数据存放在USART_RX_BUF中
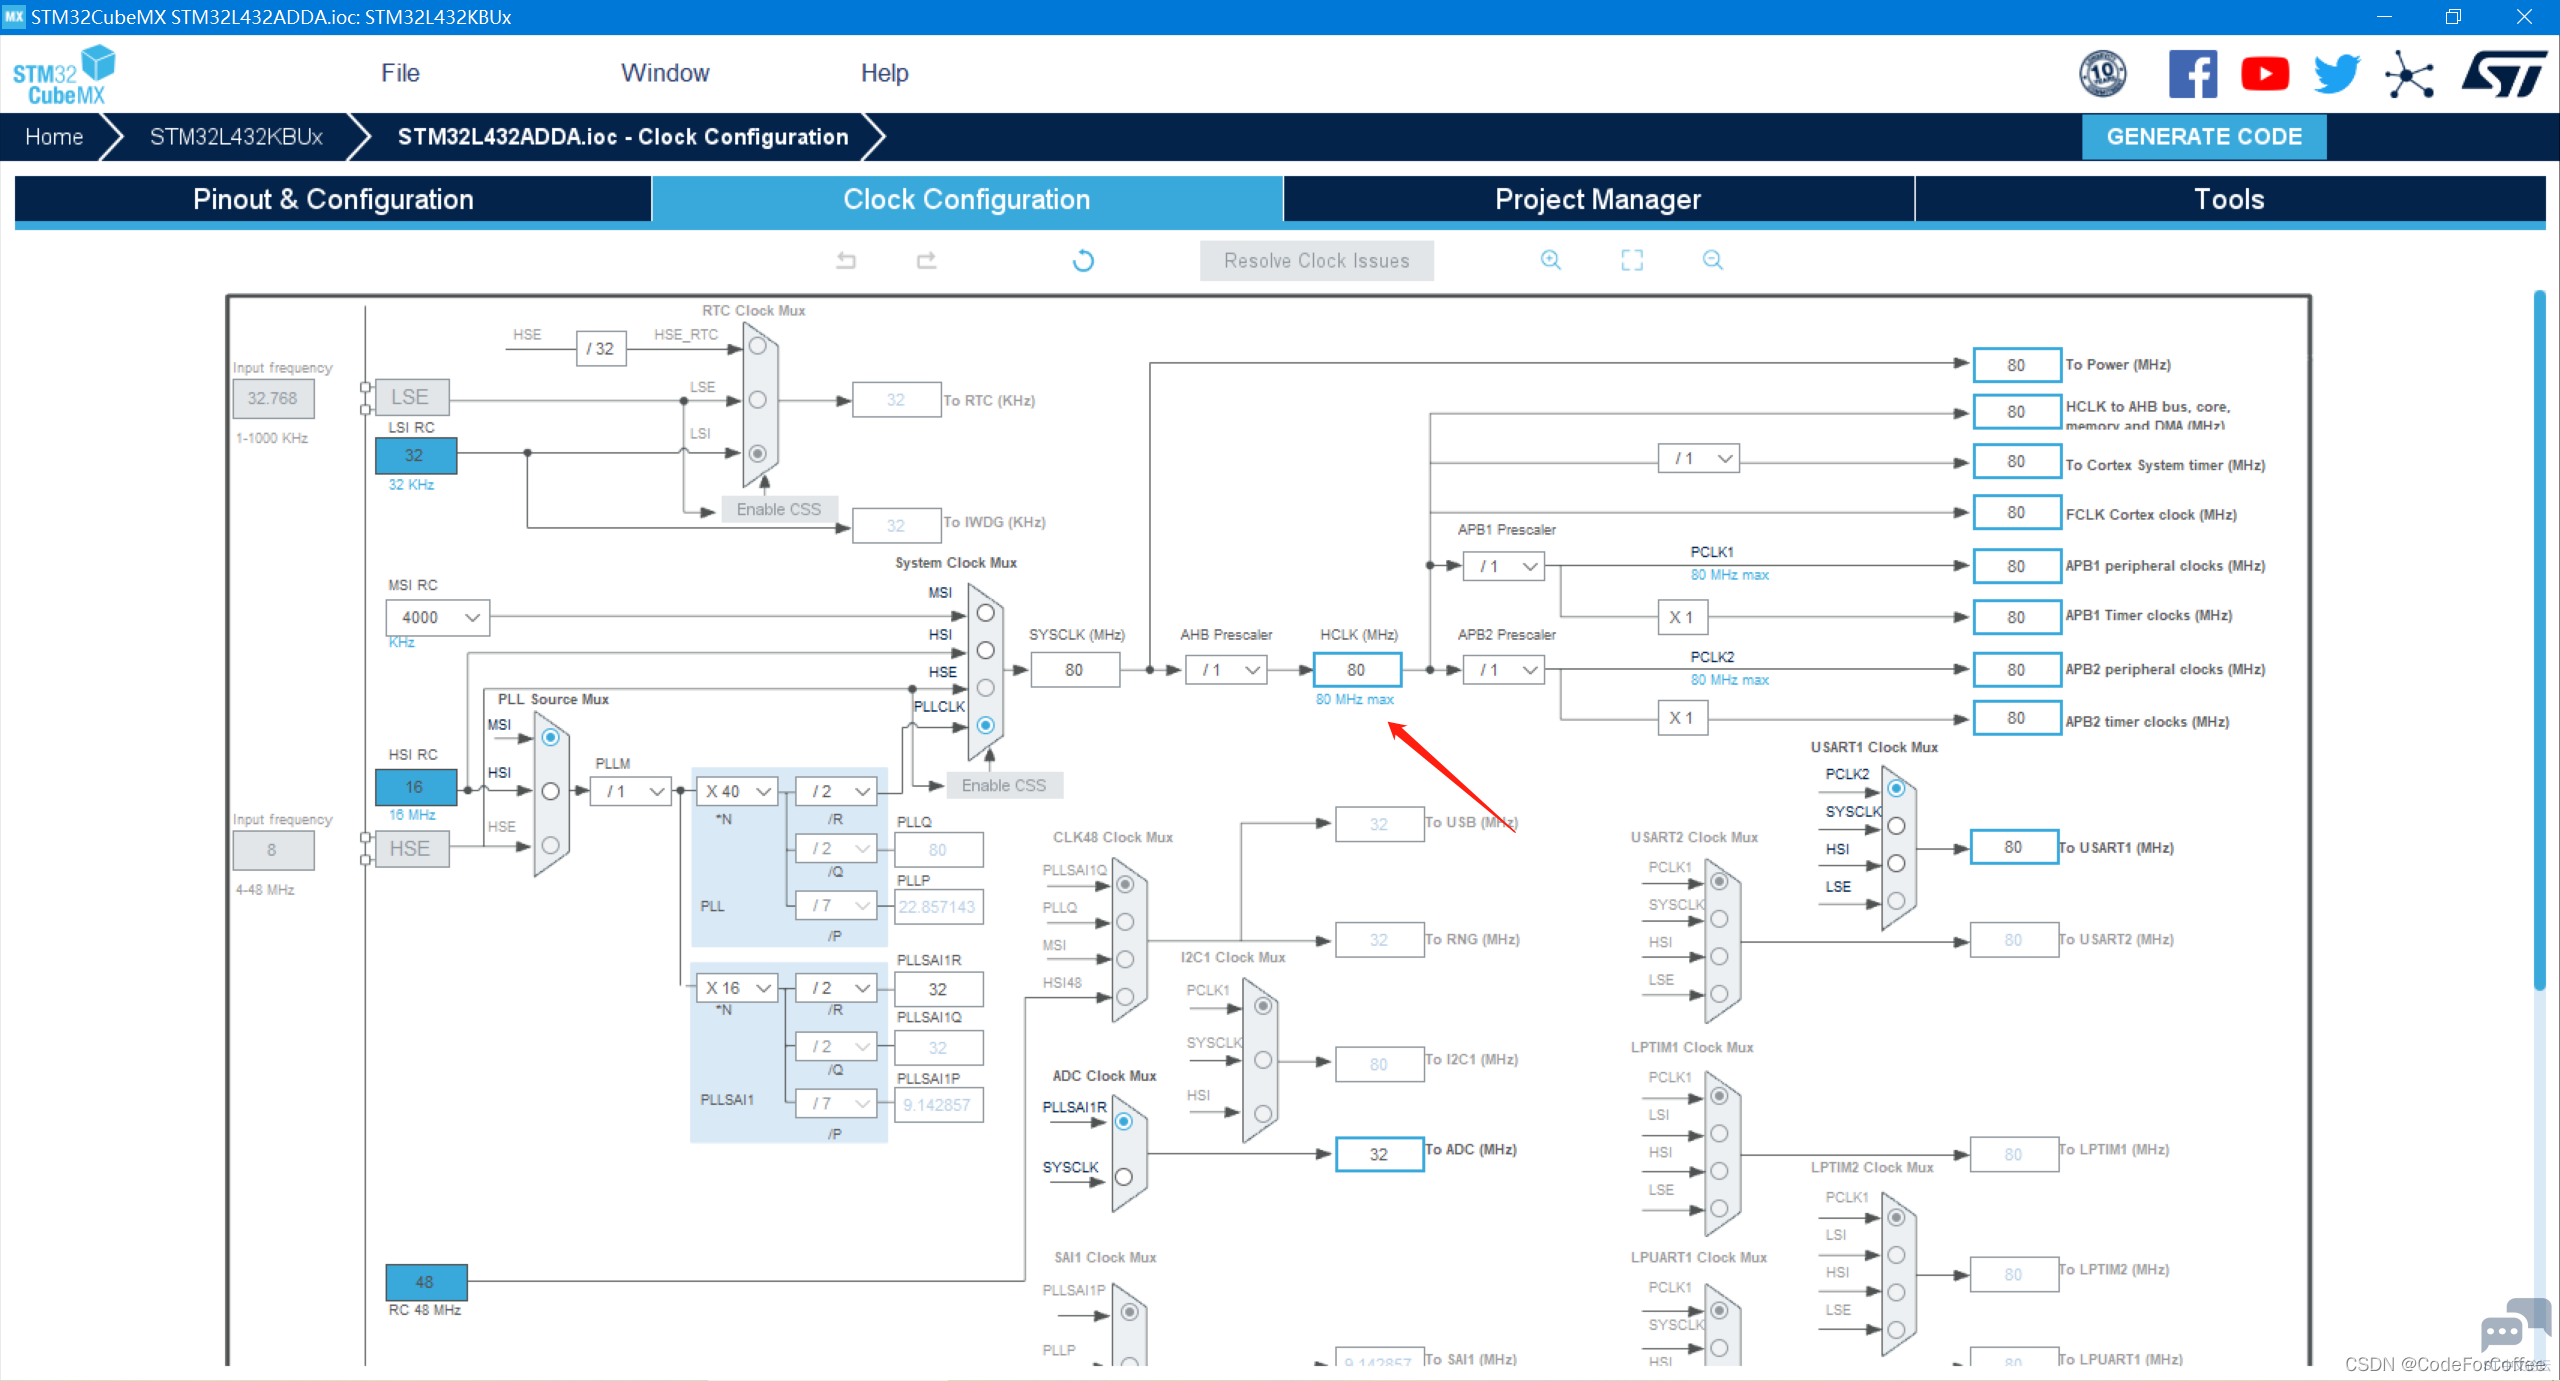
STM32Cube的时钟配置
配置时钟信号为80 MHz
注意:时钟频率过低会影响printf等函数的功能
STM32的8通道ADC配置
STM32Cube的ADC配置

STM32Cube的DMA配置
配置为DMA通道1
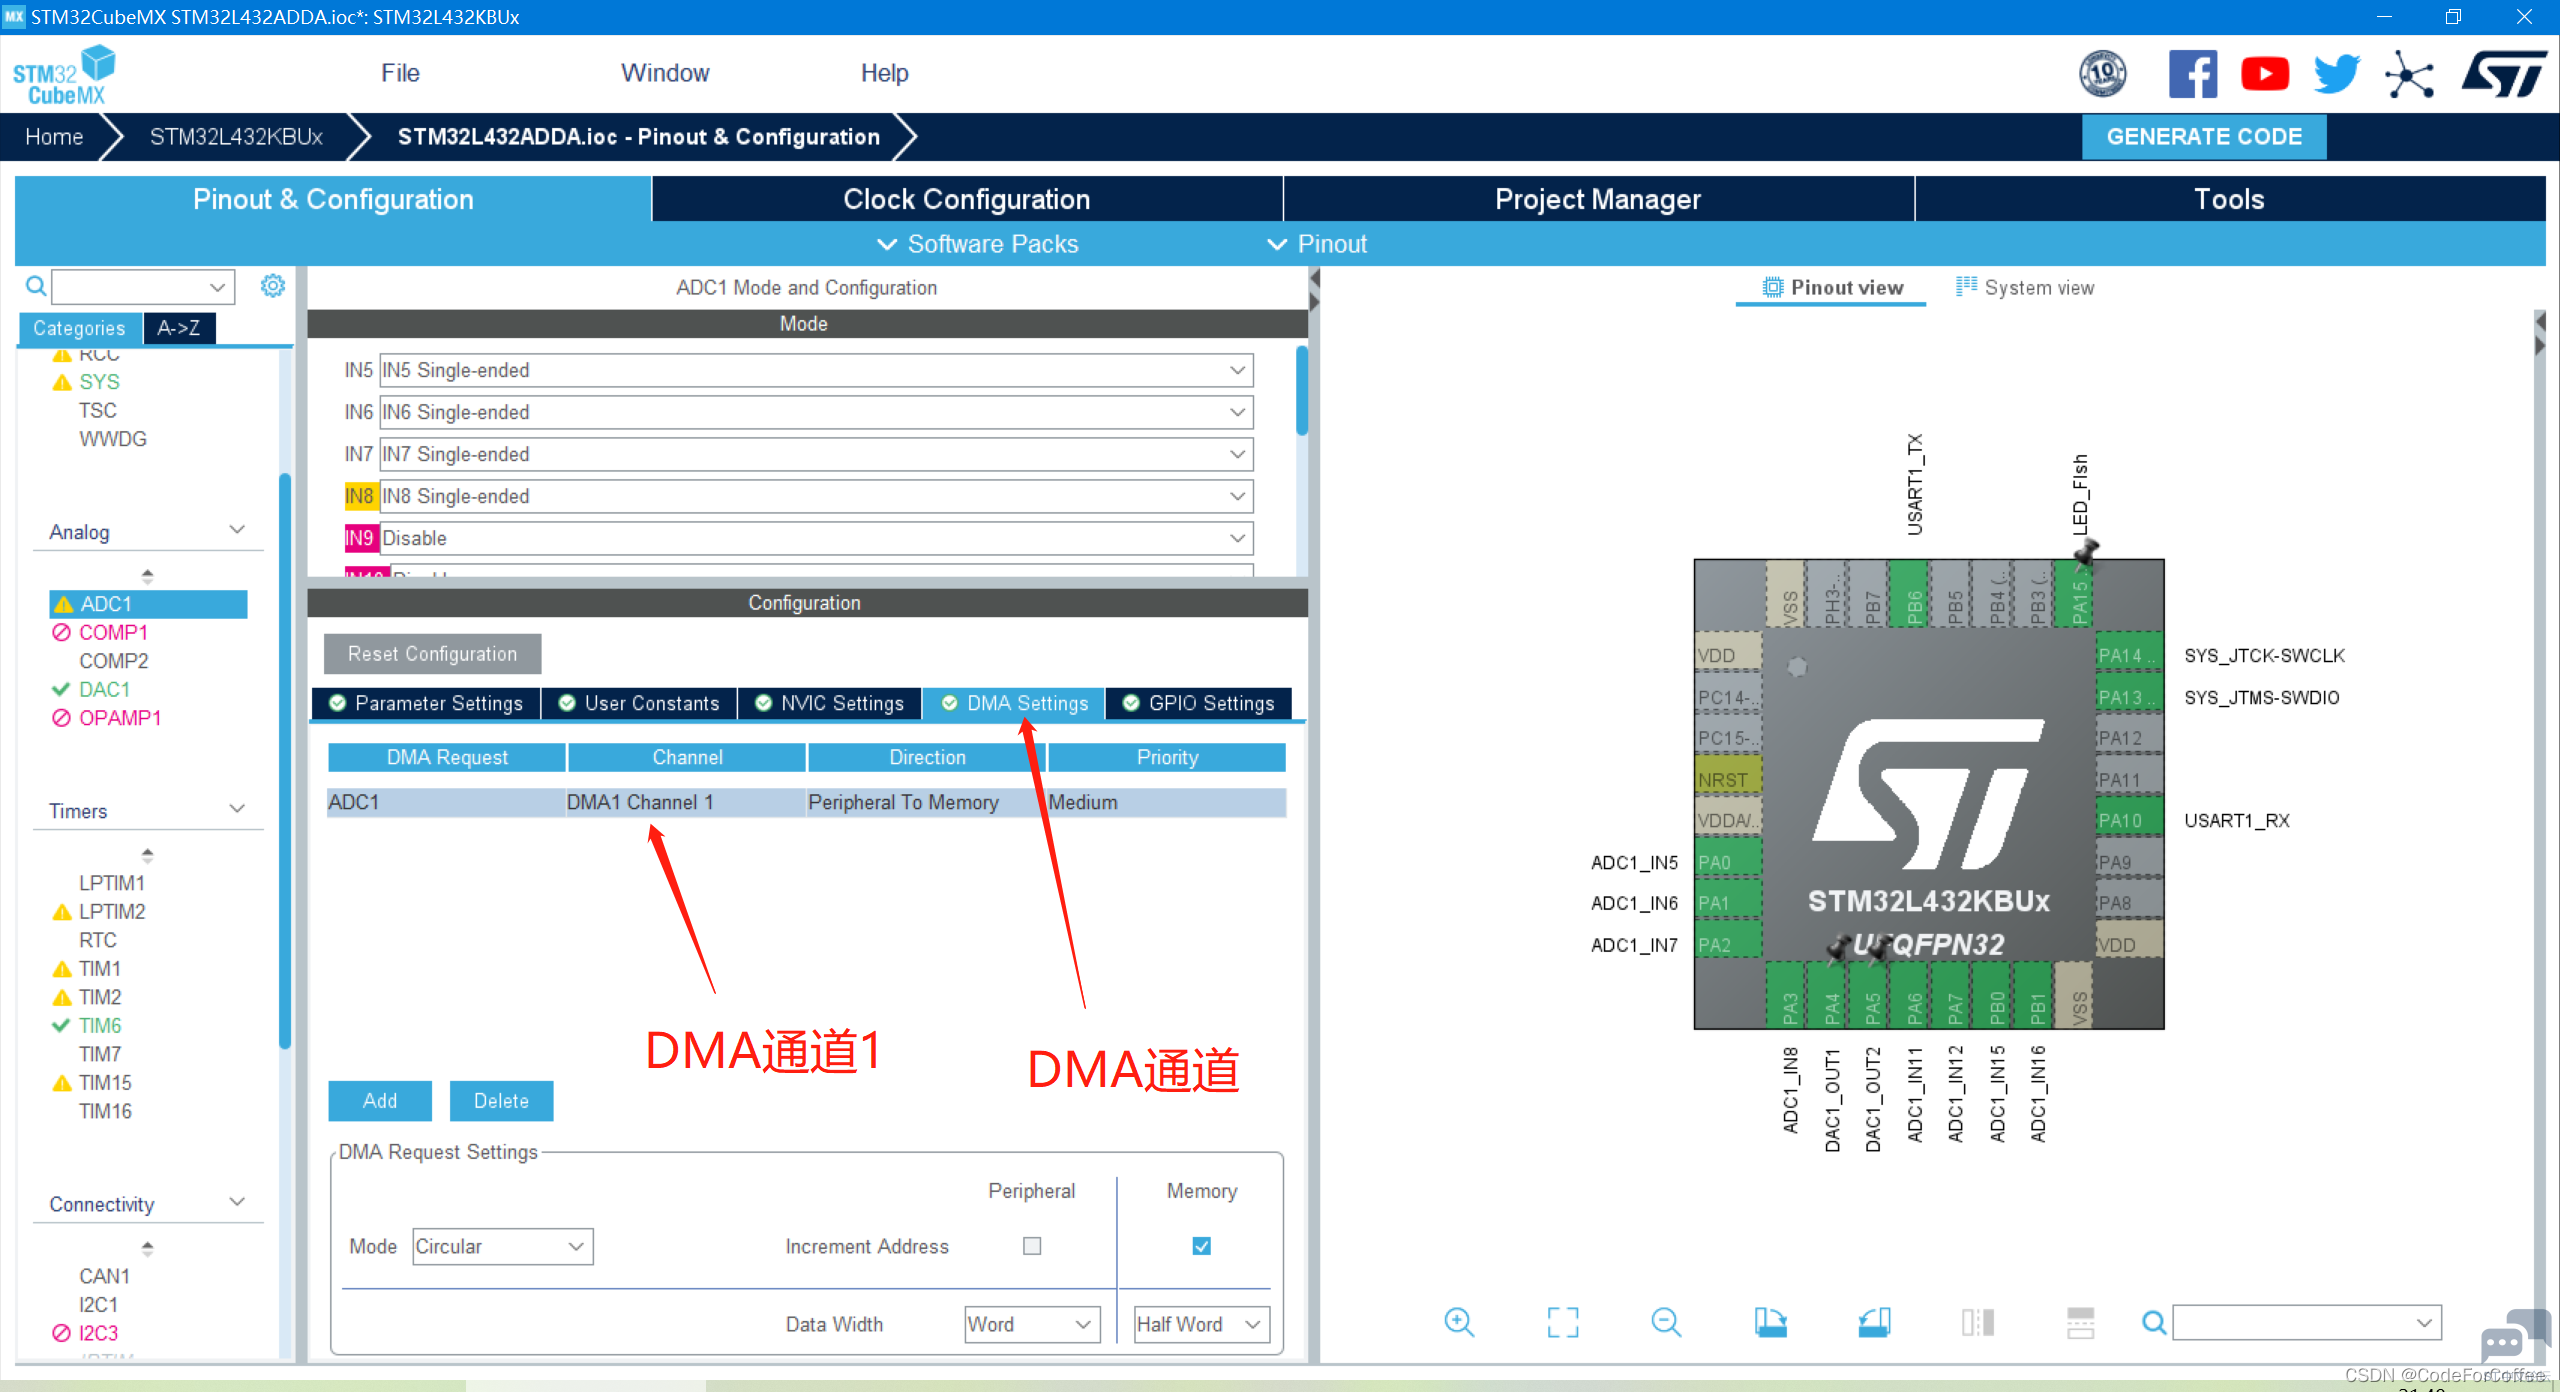
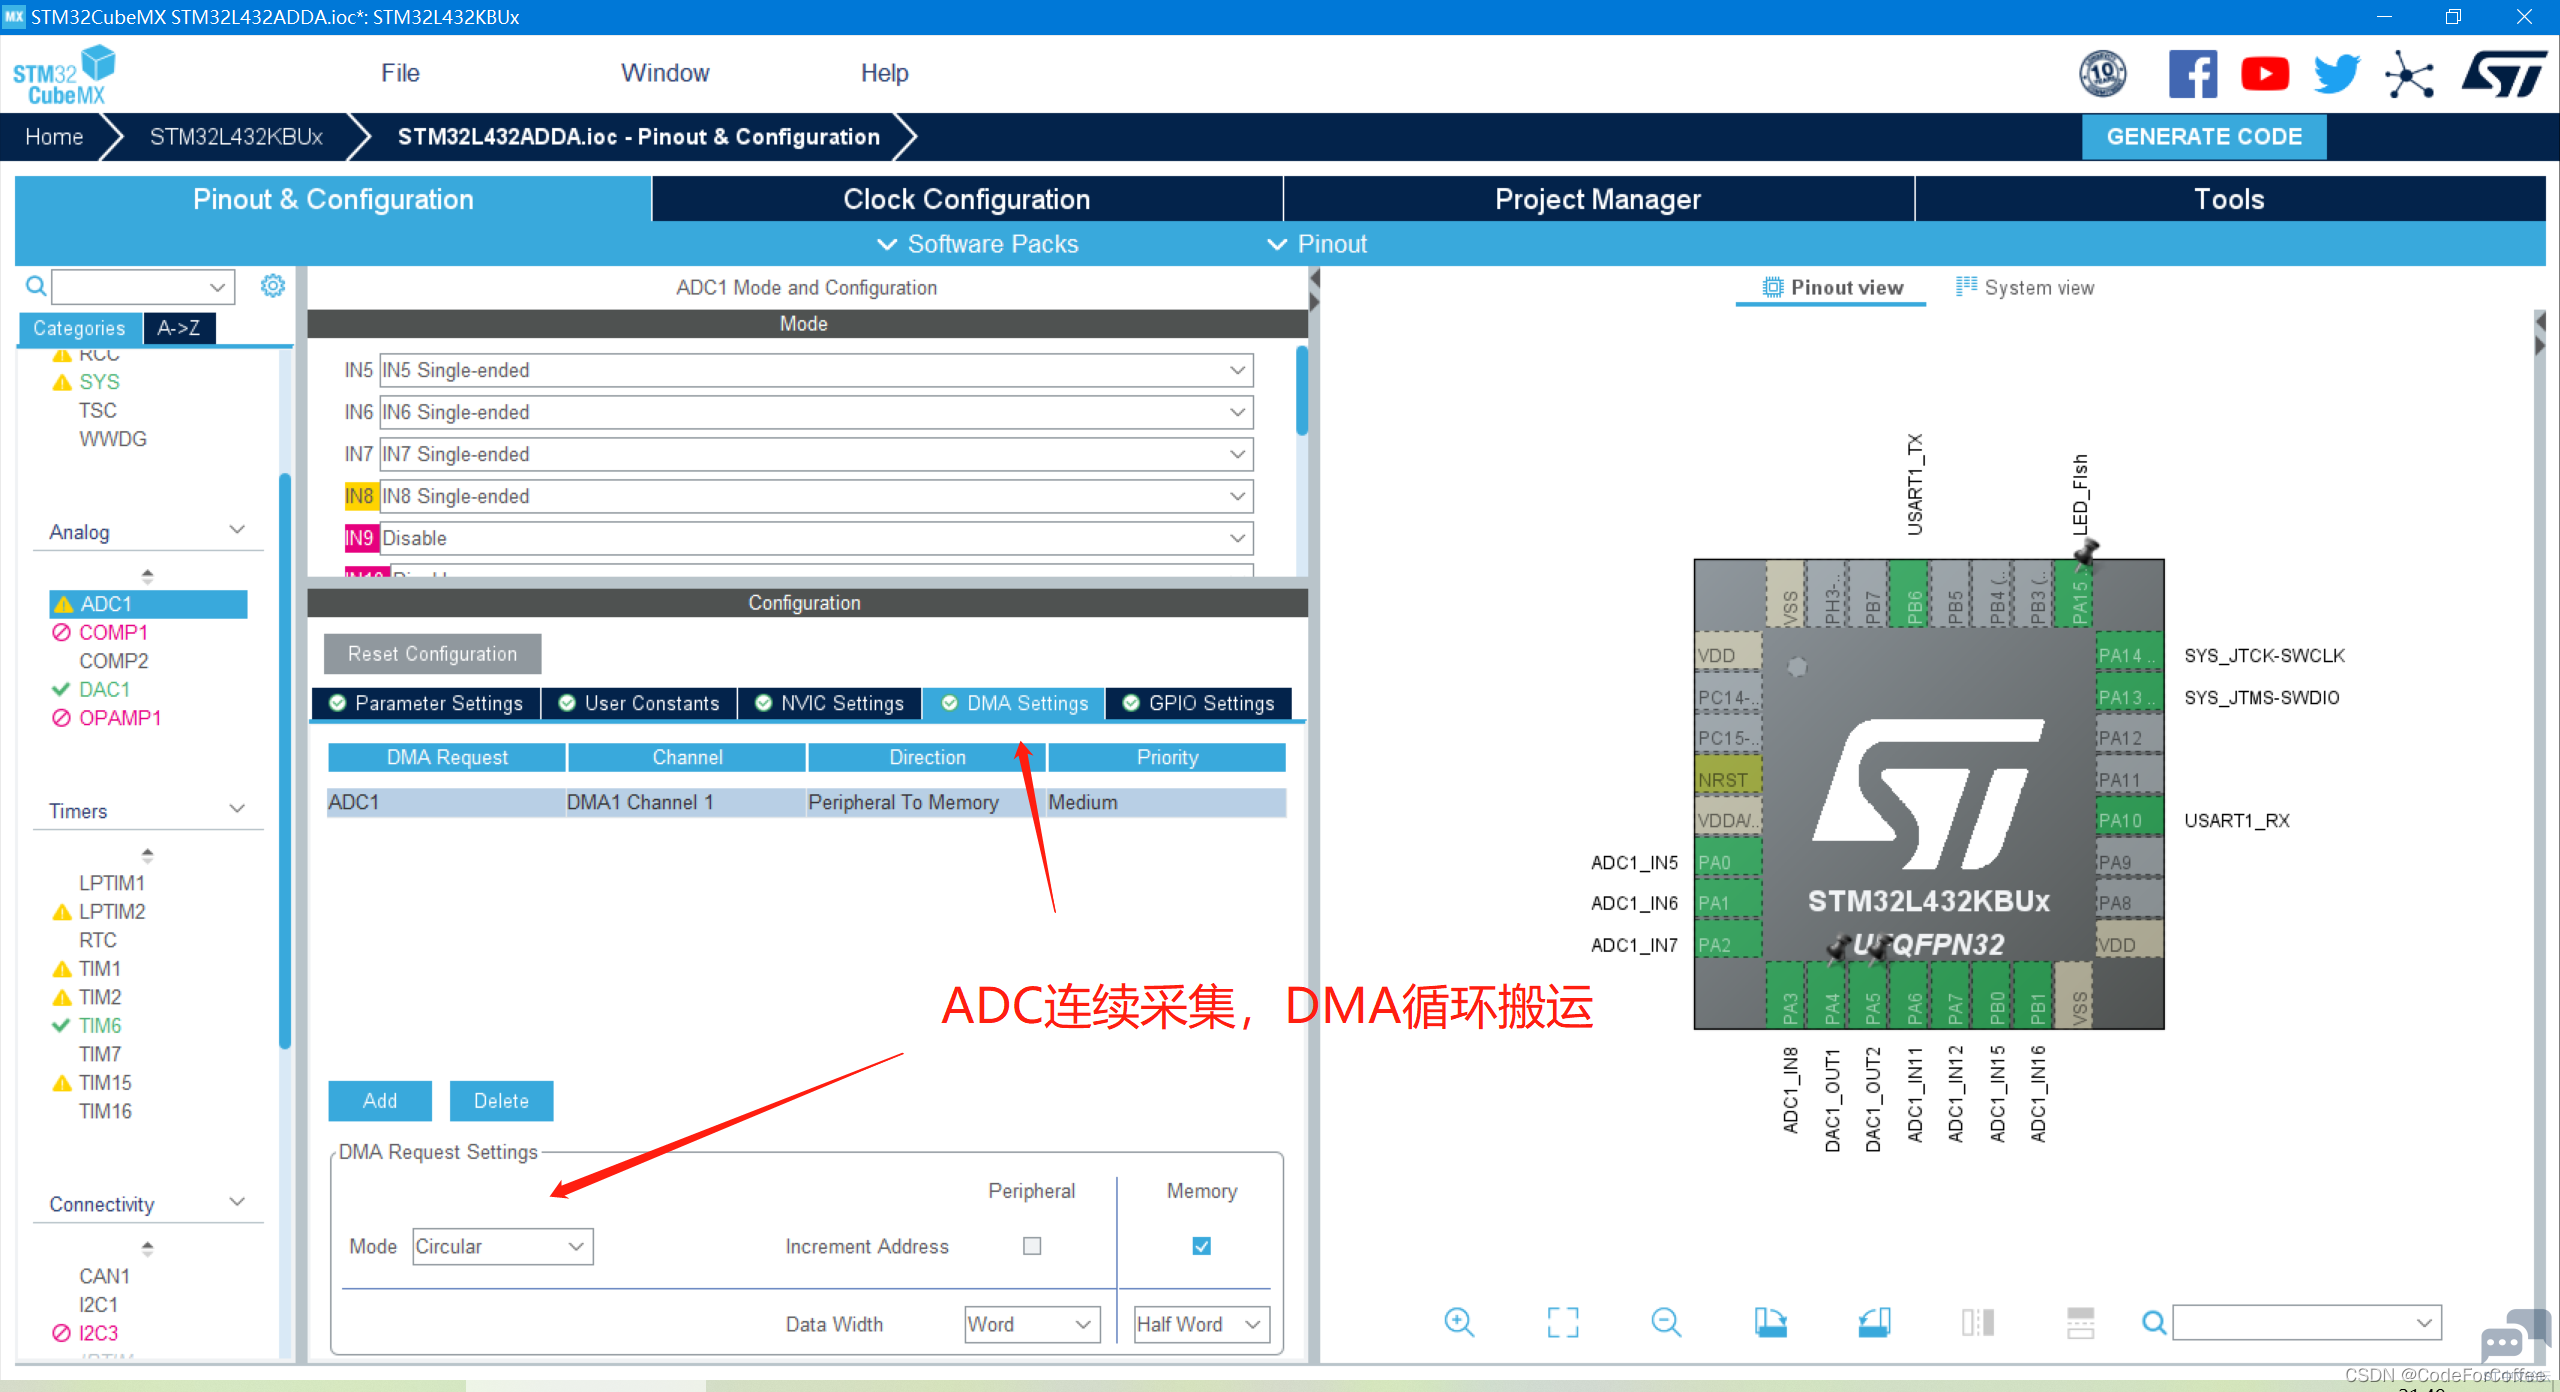
设置DMA的循环搬运
开启DMA中断
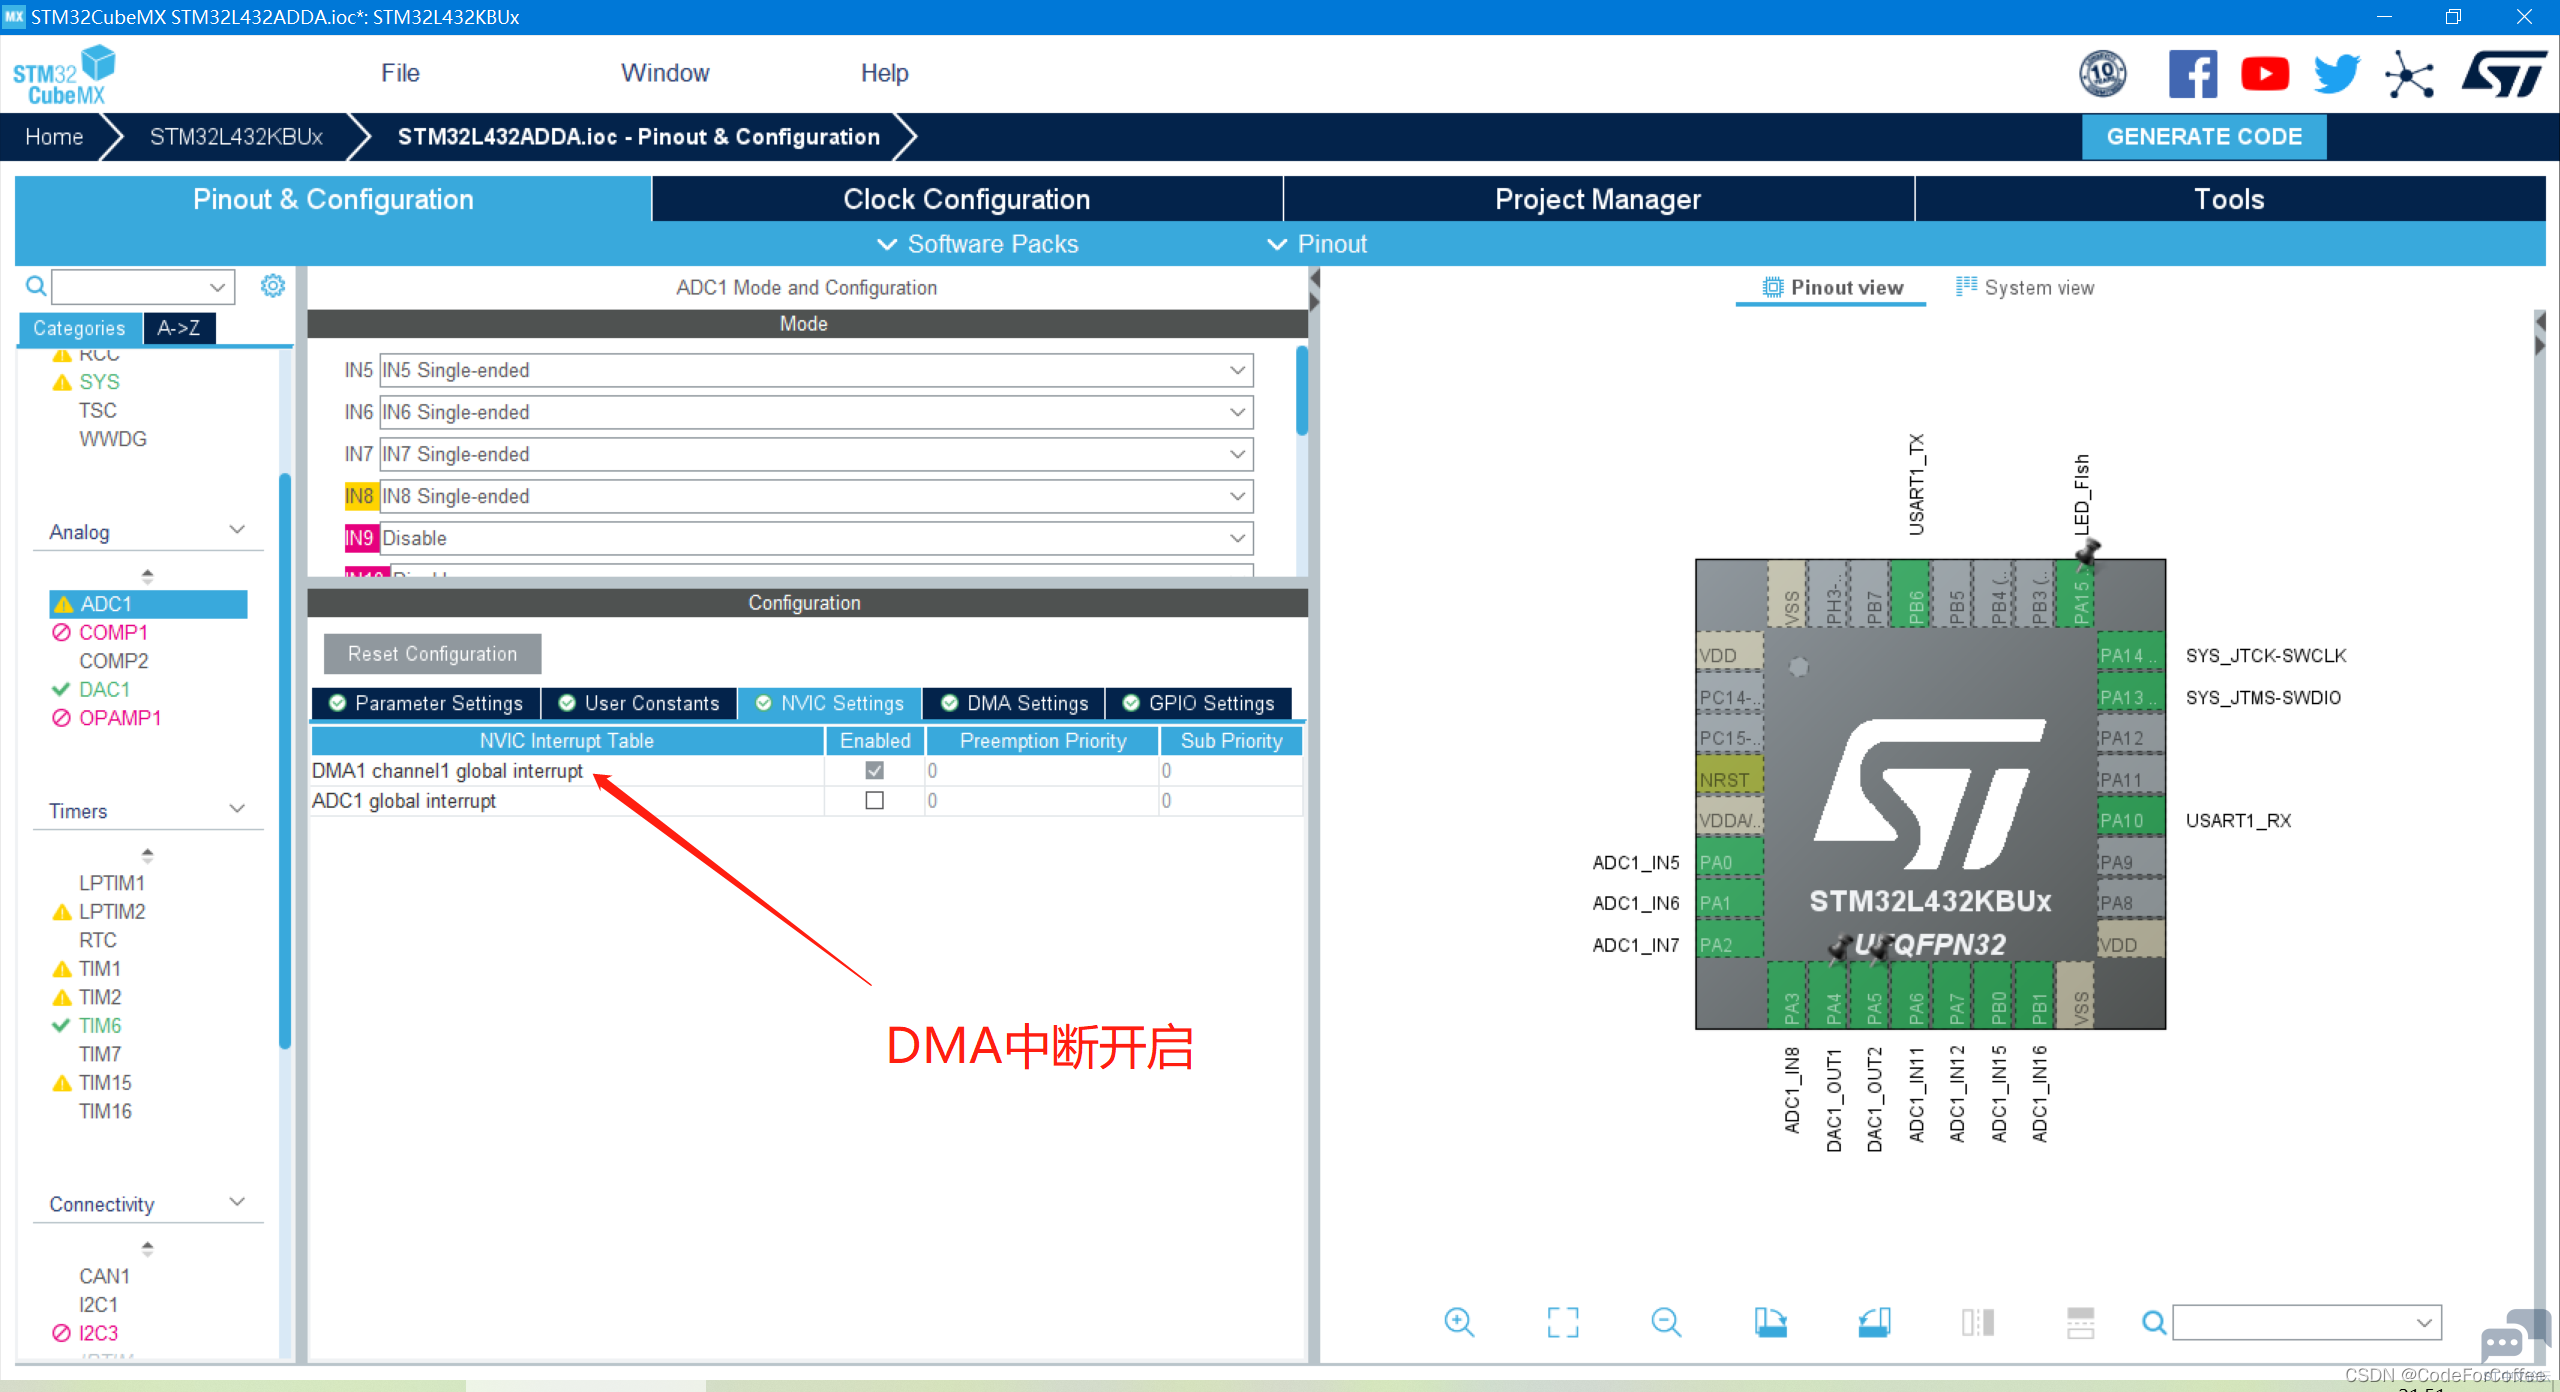
ADC的DMA中断
DMA的中断服务函数可以通过以下方式寻找
首先在.s启动文件中找到对应的中断服务函数

可以看到,其调用了HAL_DMA_IRQHandler函数
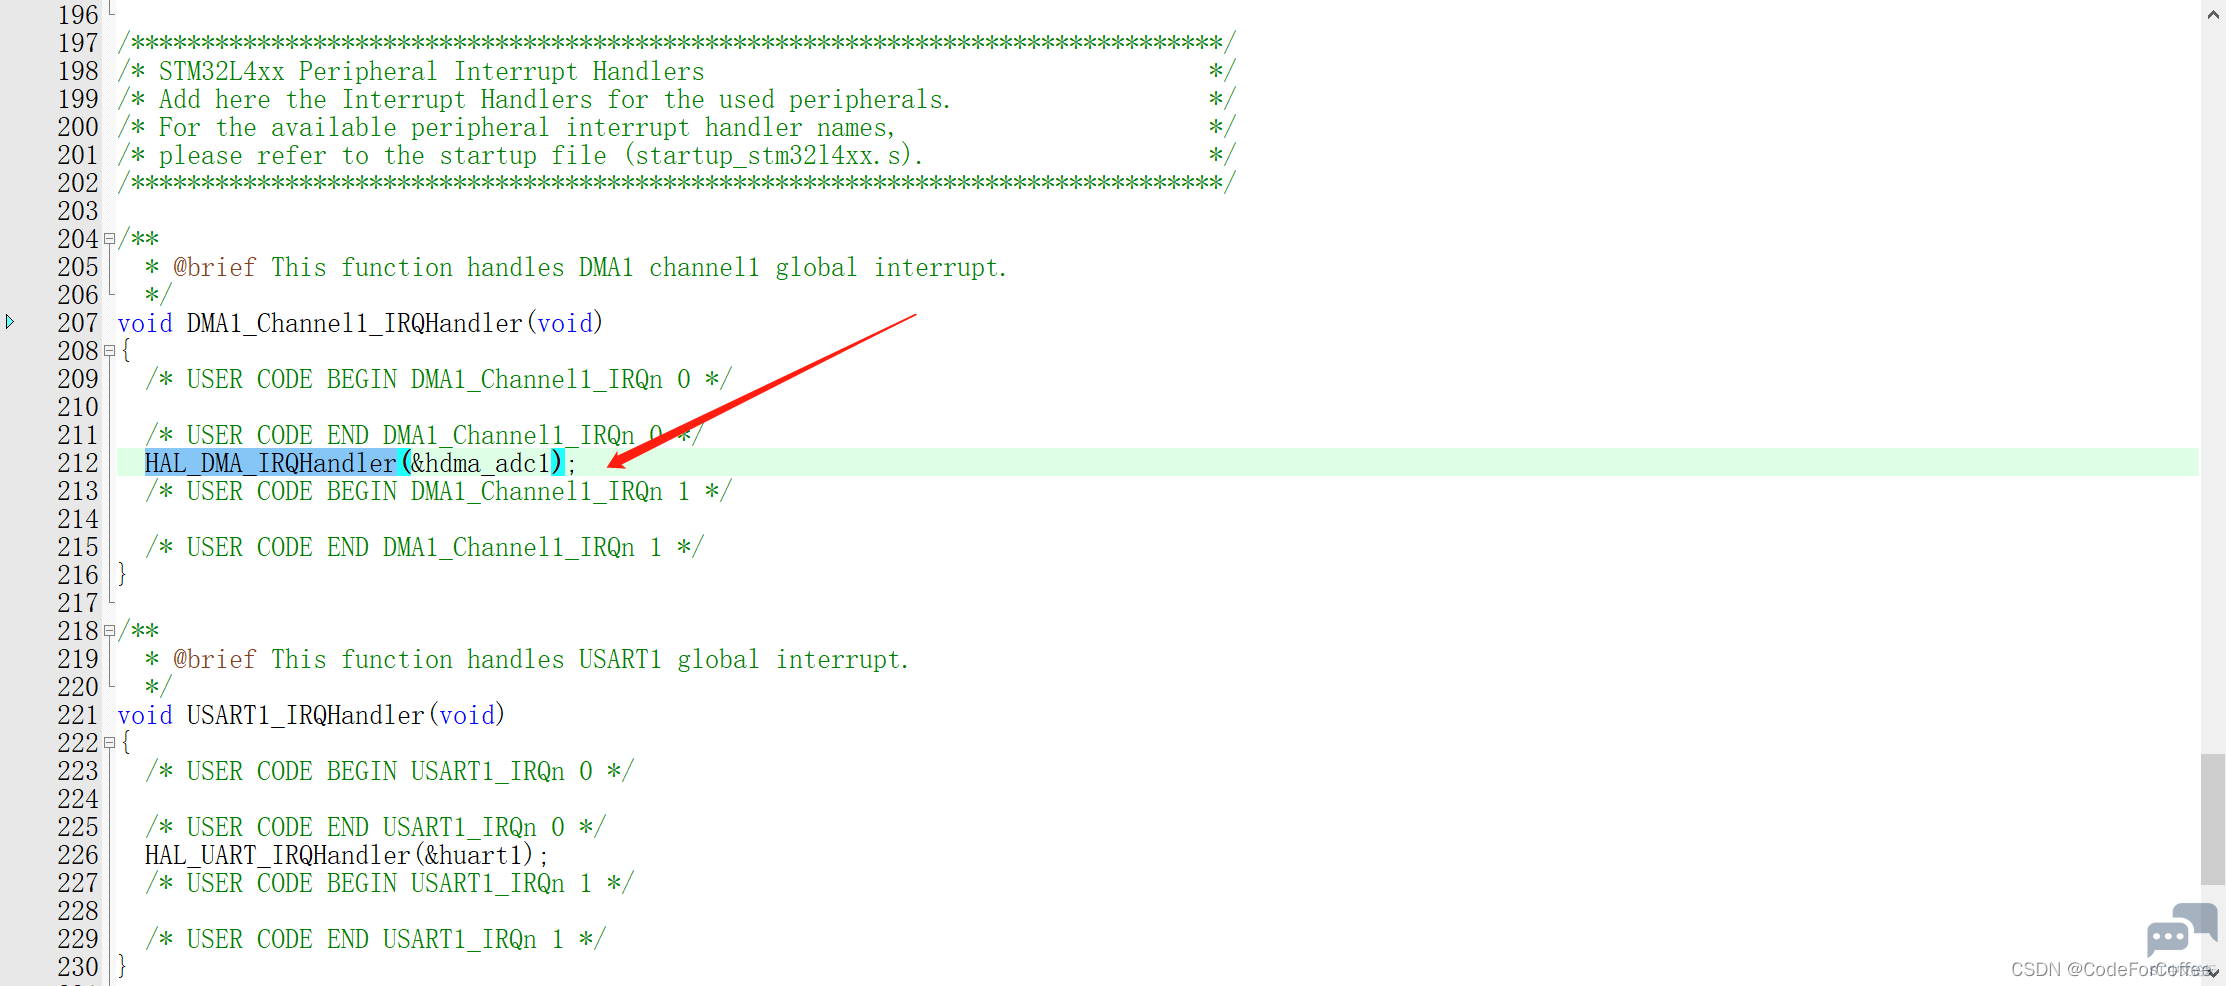
继续跳进去
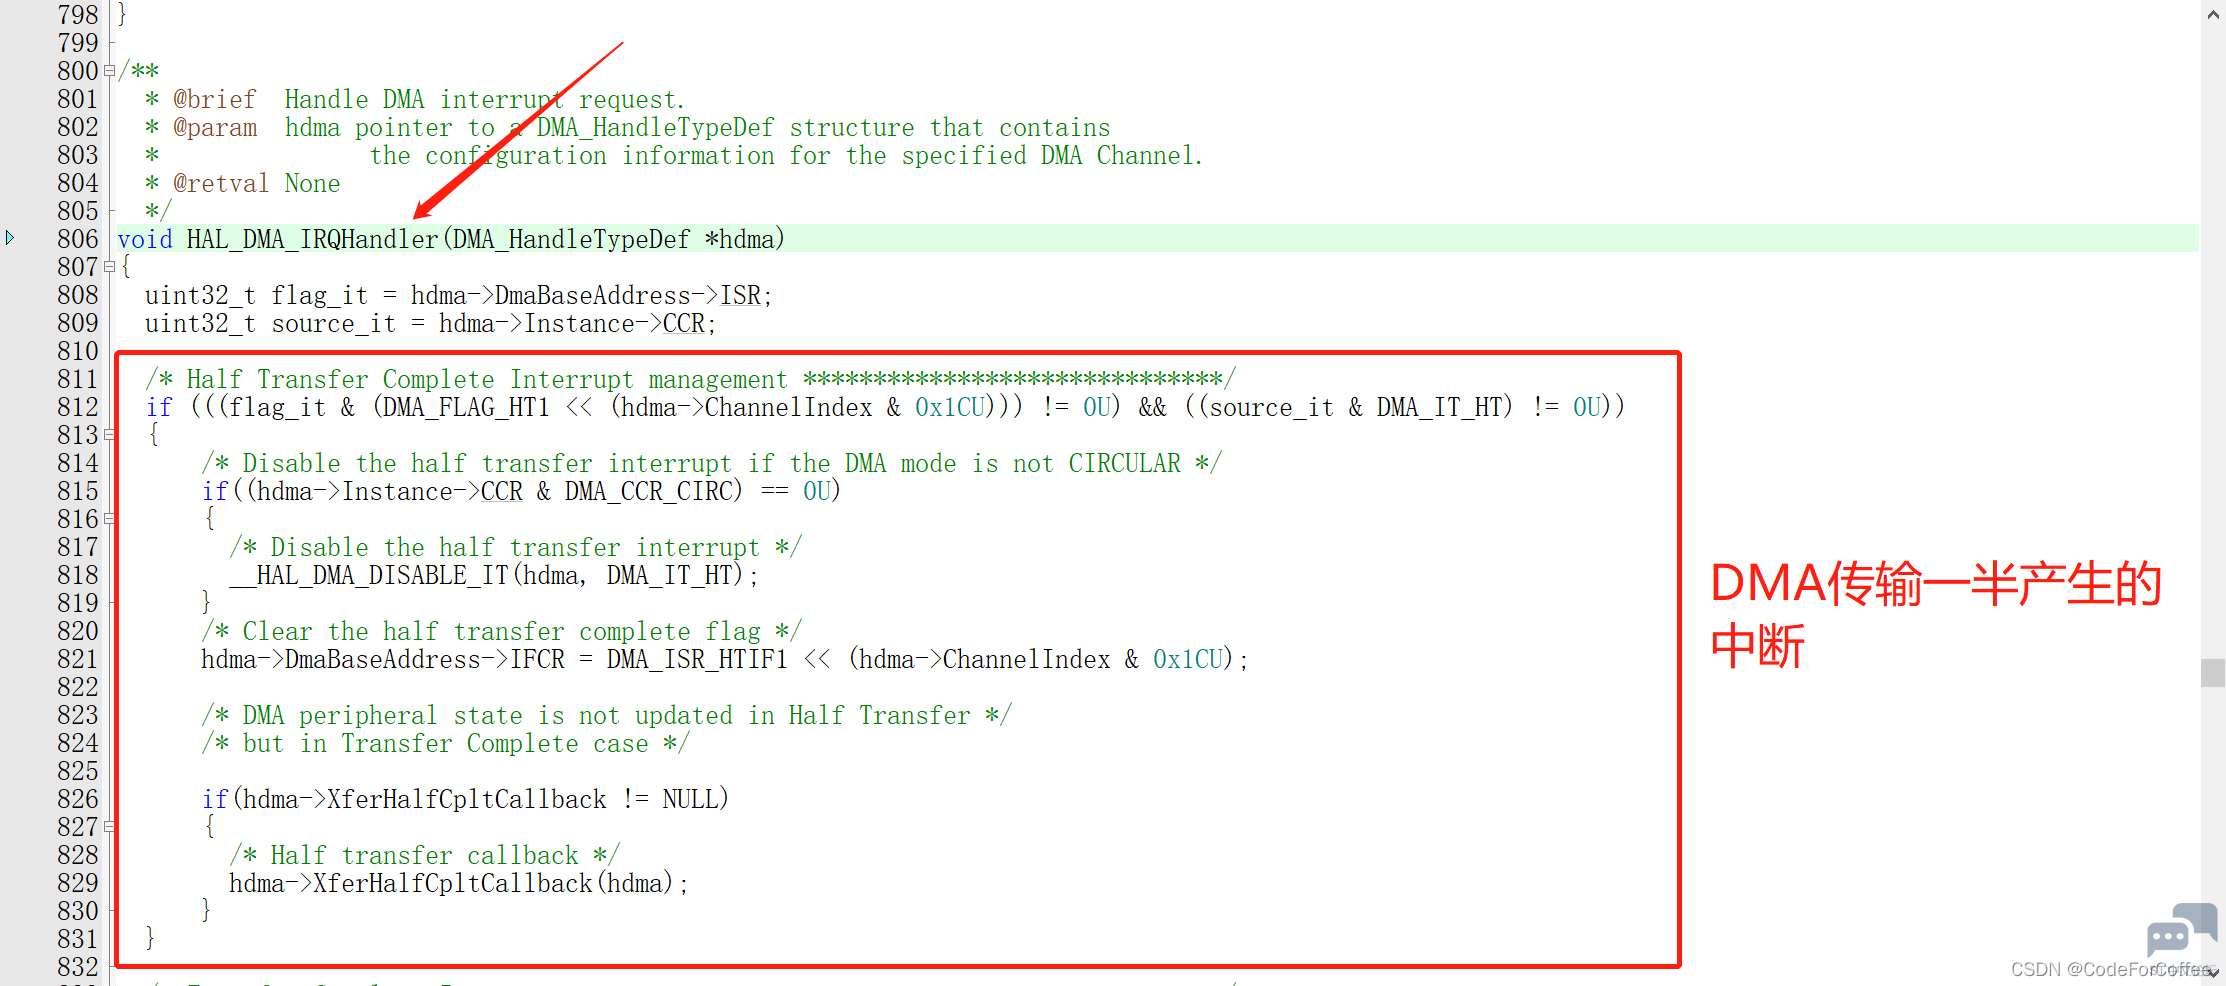

这里的XferCpltCallback是一个函数指针,我们看一下他的定义
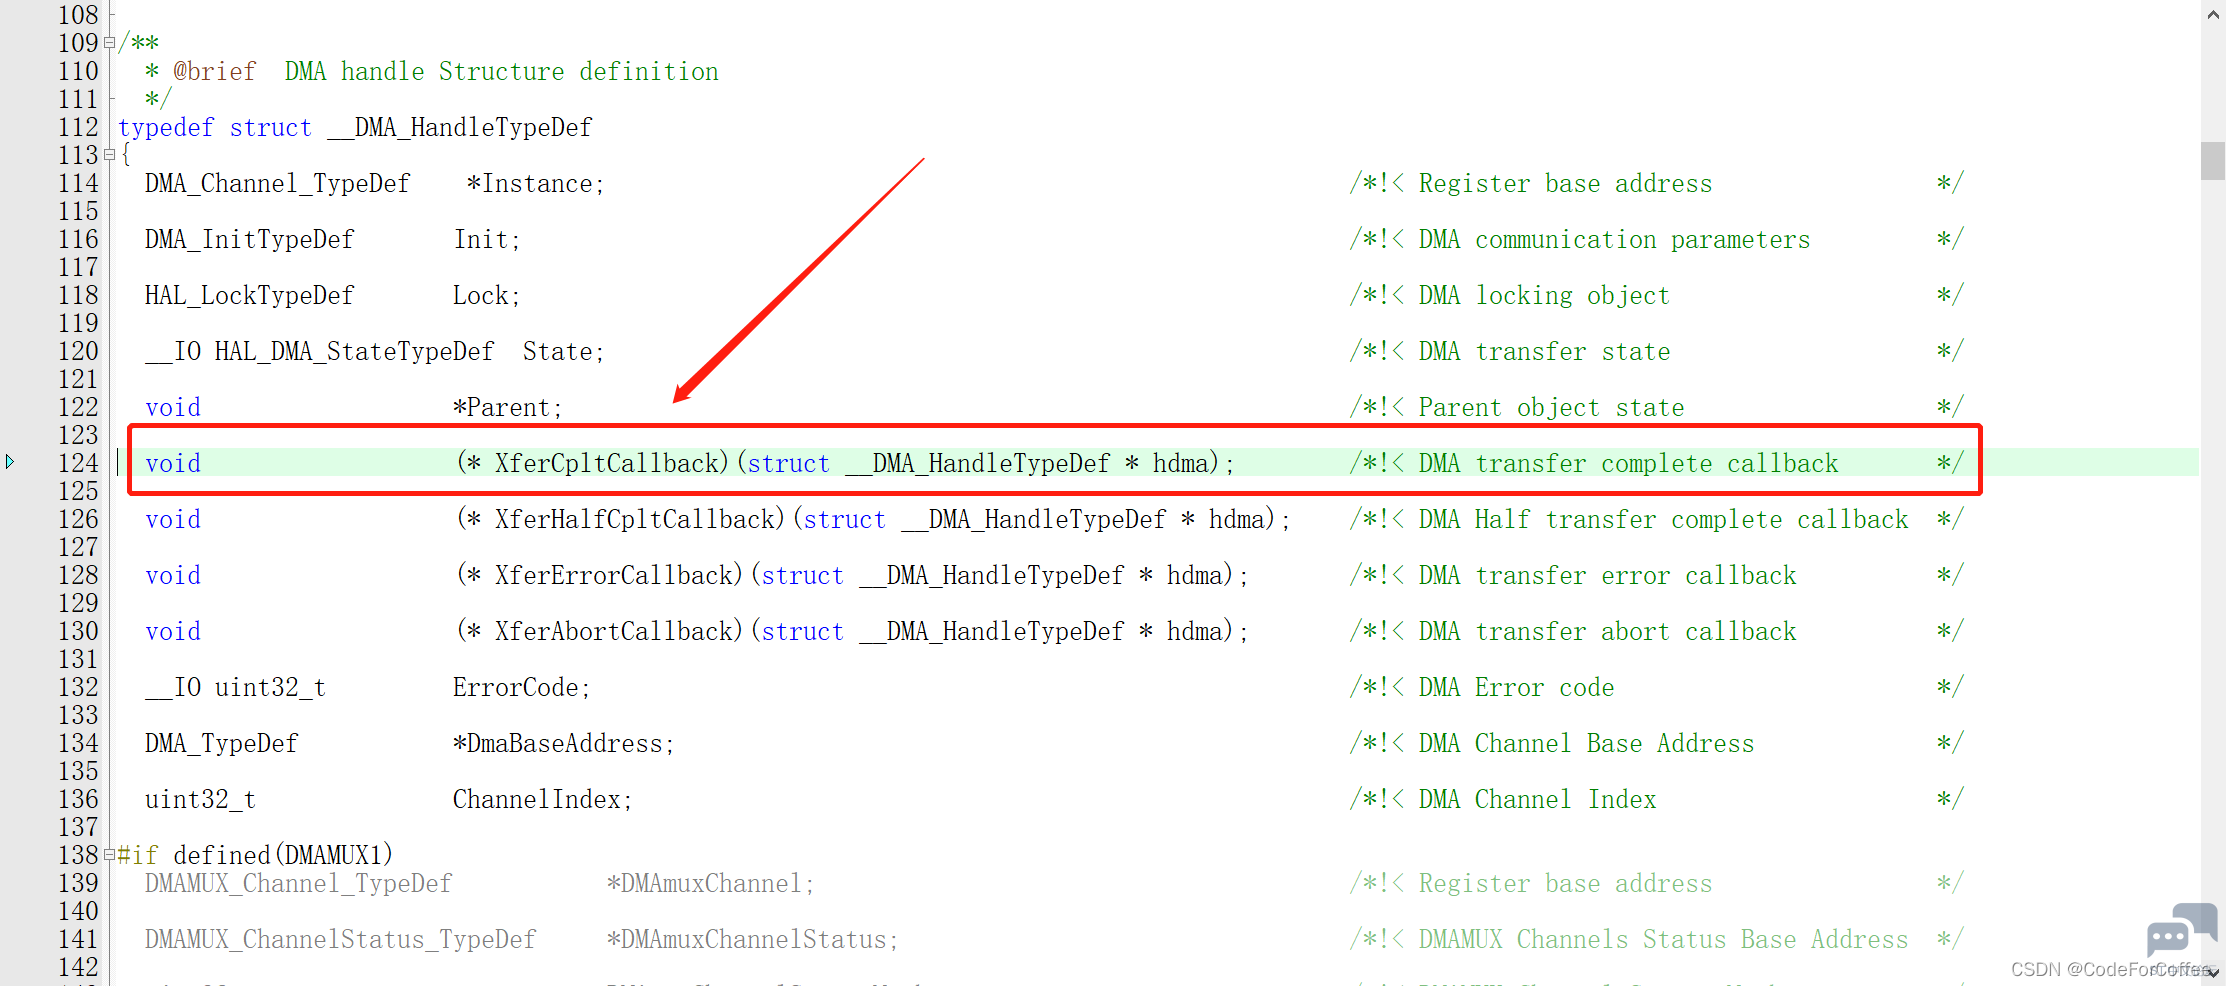
这个函数指针成员到底指向了什么,你直接去追是追不到的,实际上在DMA启动之后会为这个成员赋值。
这个赋值的操作是在HAL_ADC_Start_DMA函数中完成的
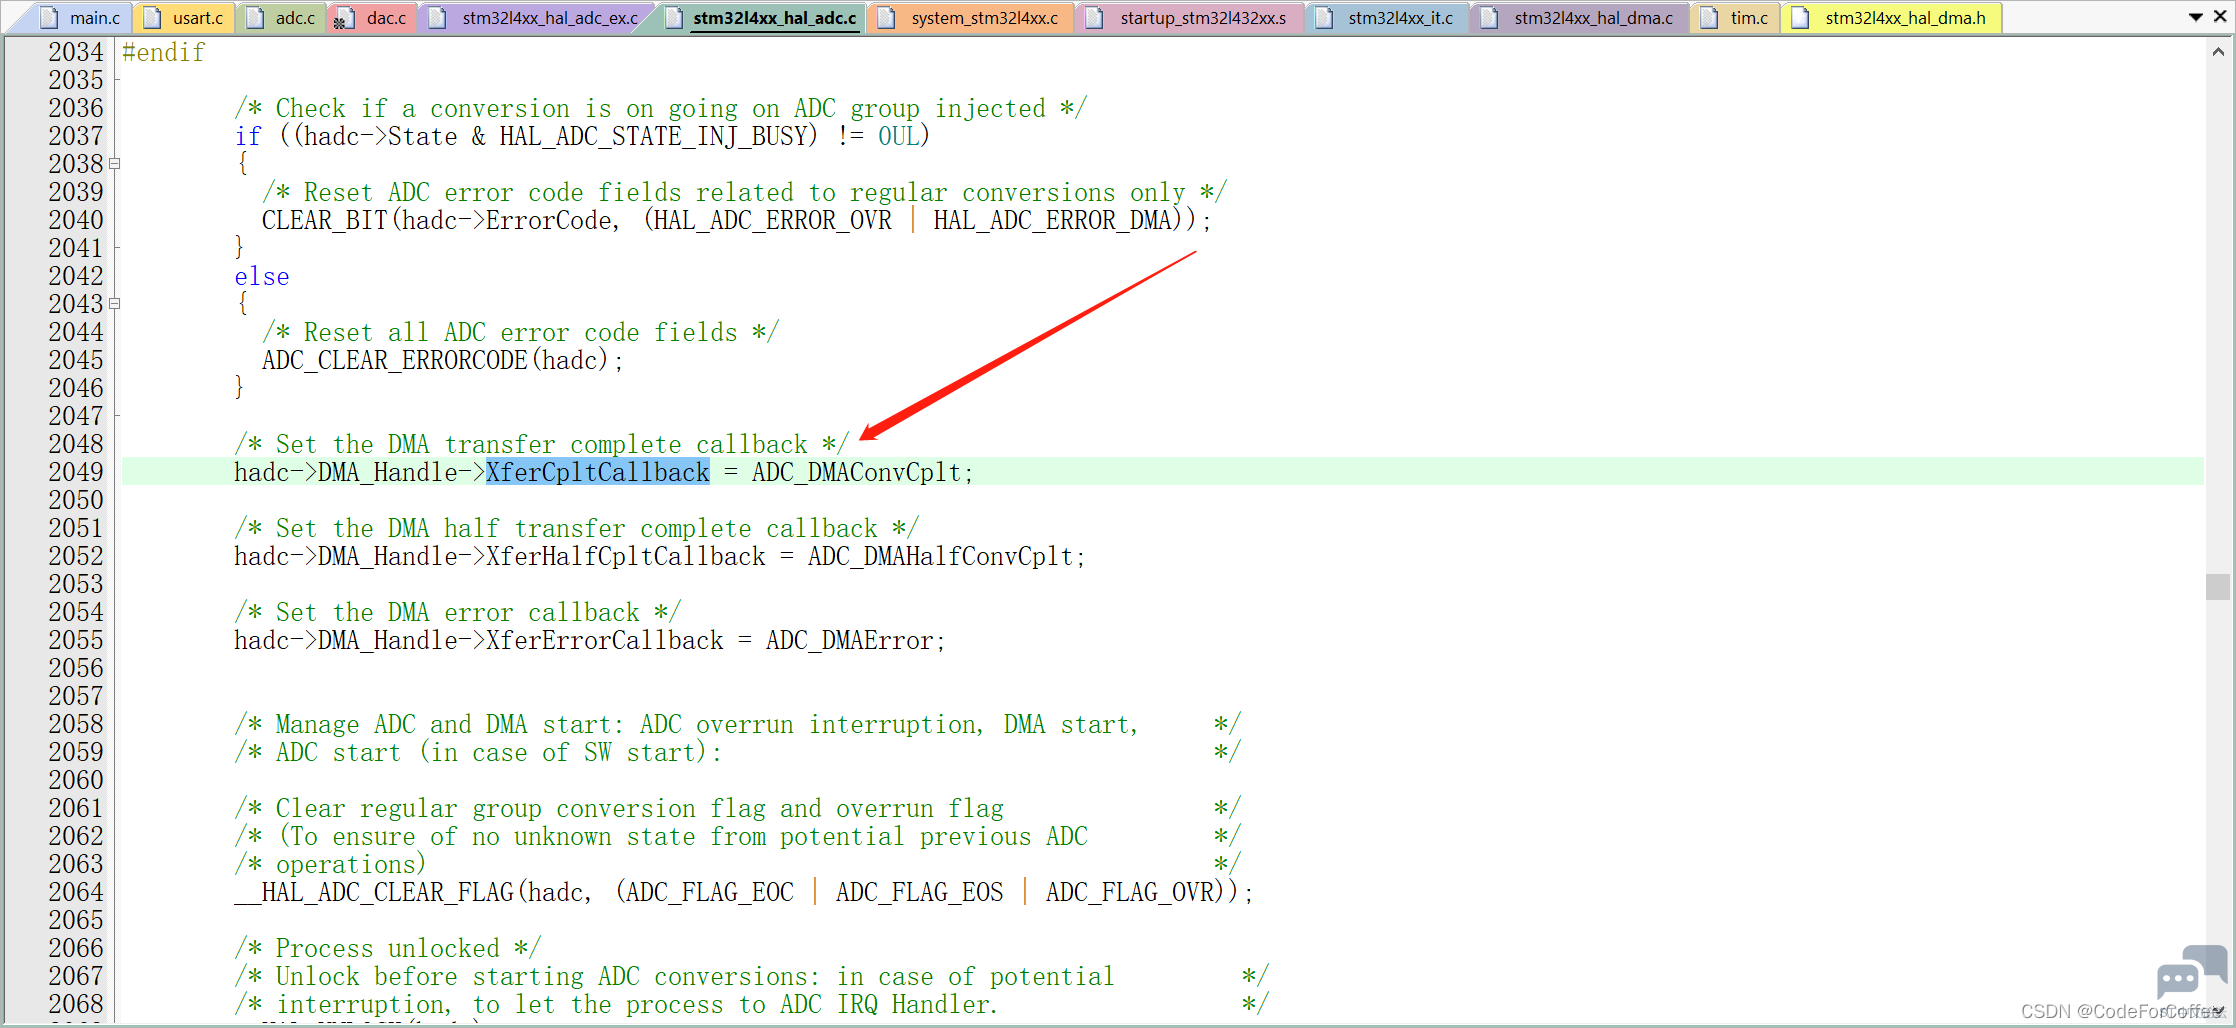
这个ADC_DMAConvCplt就是ADC DMA的回调函数
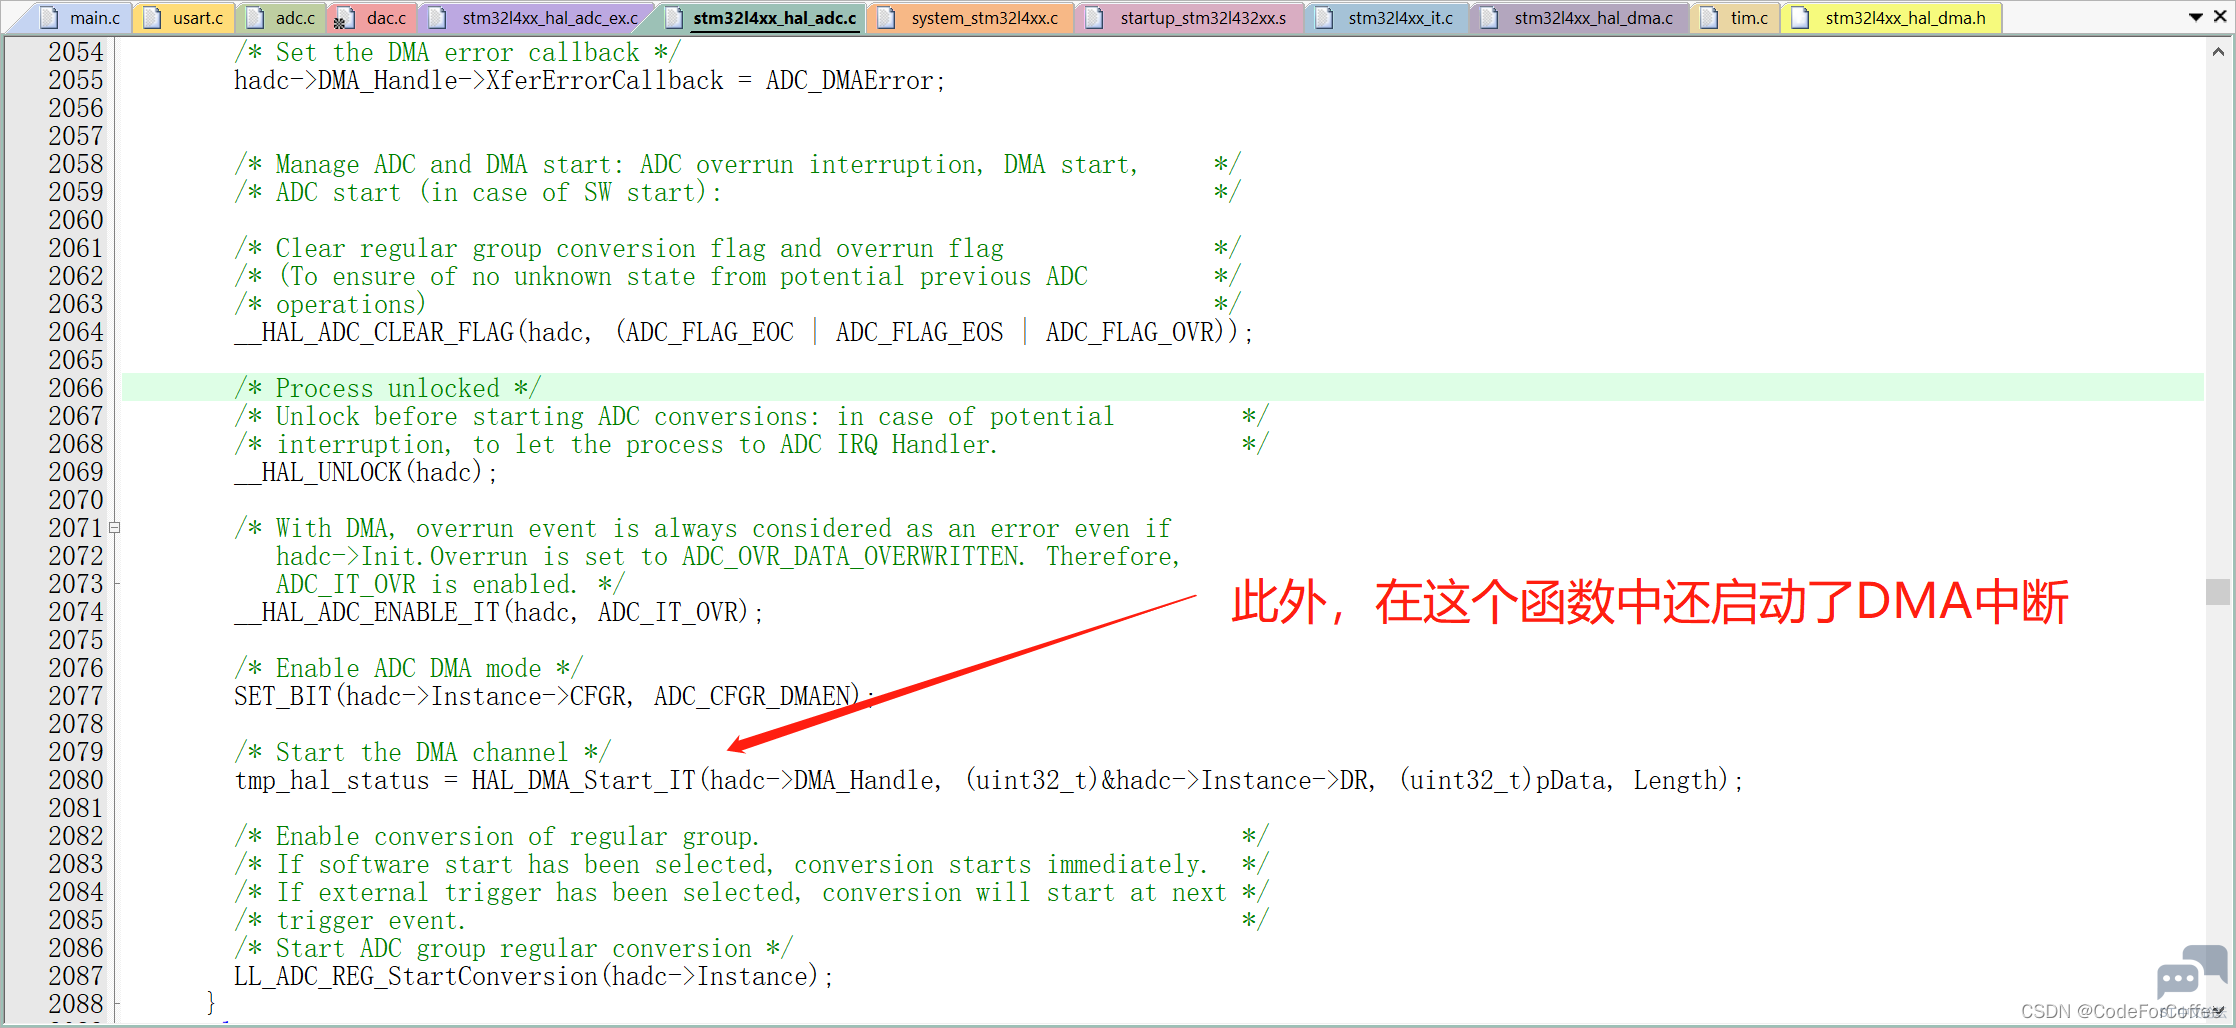
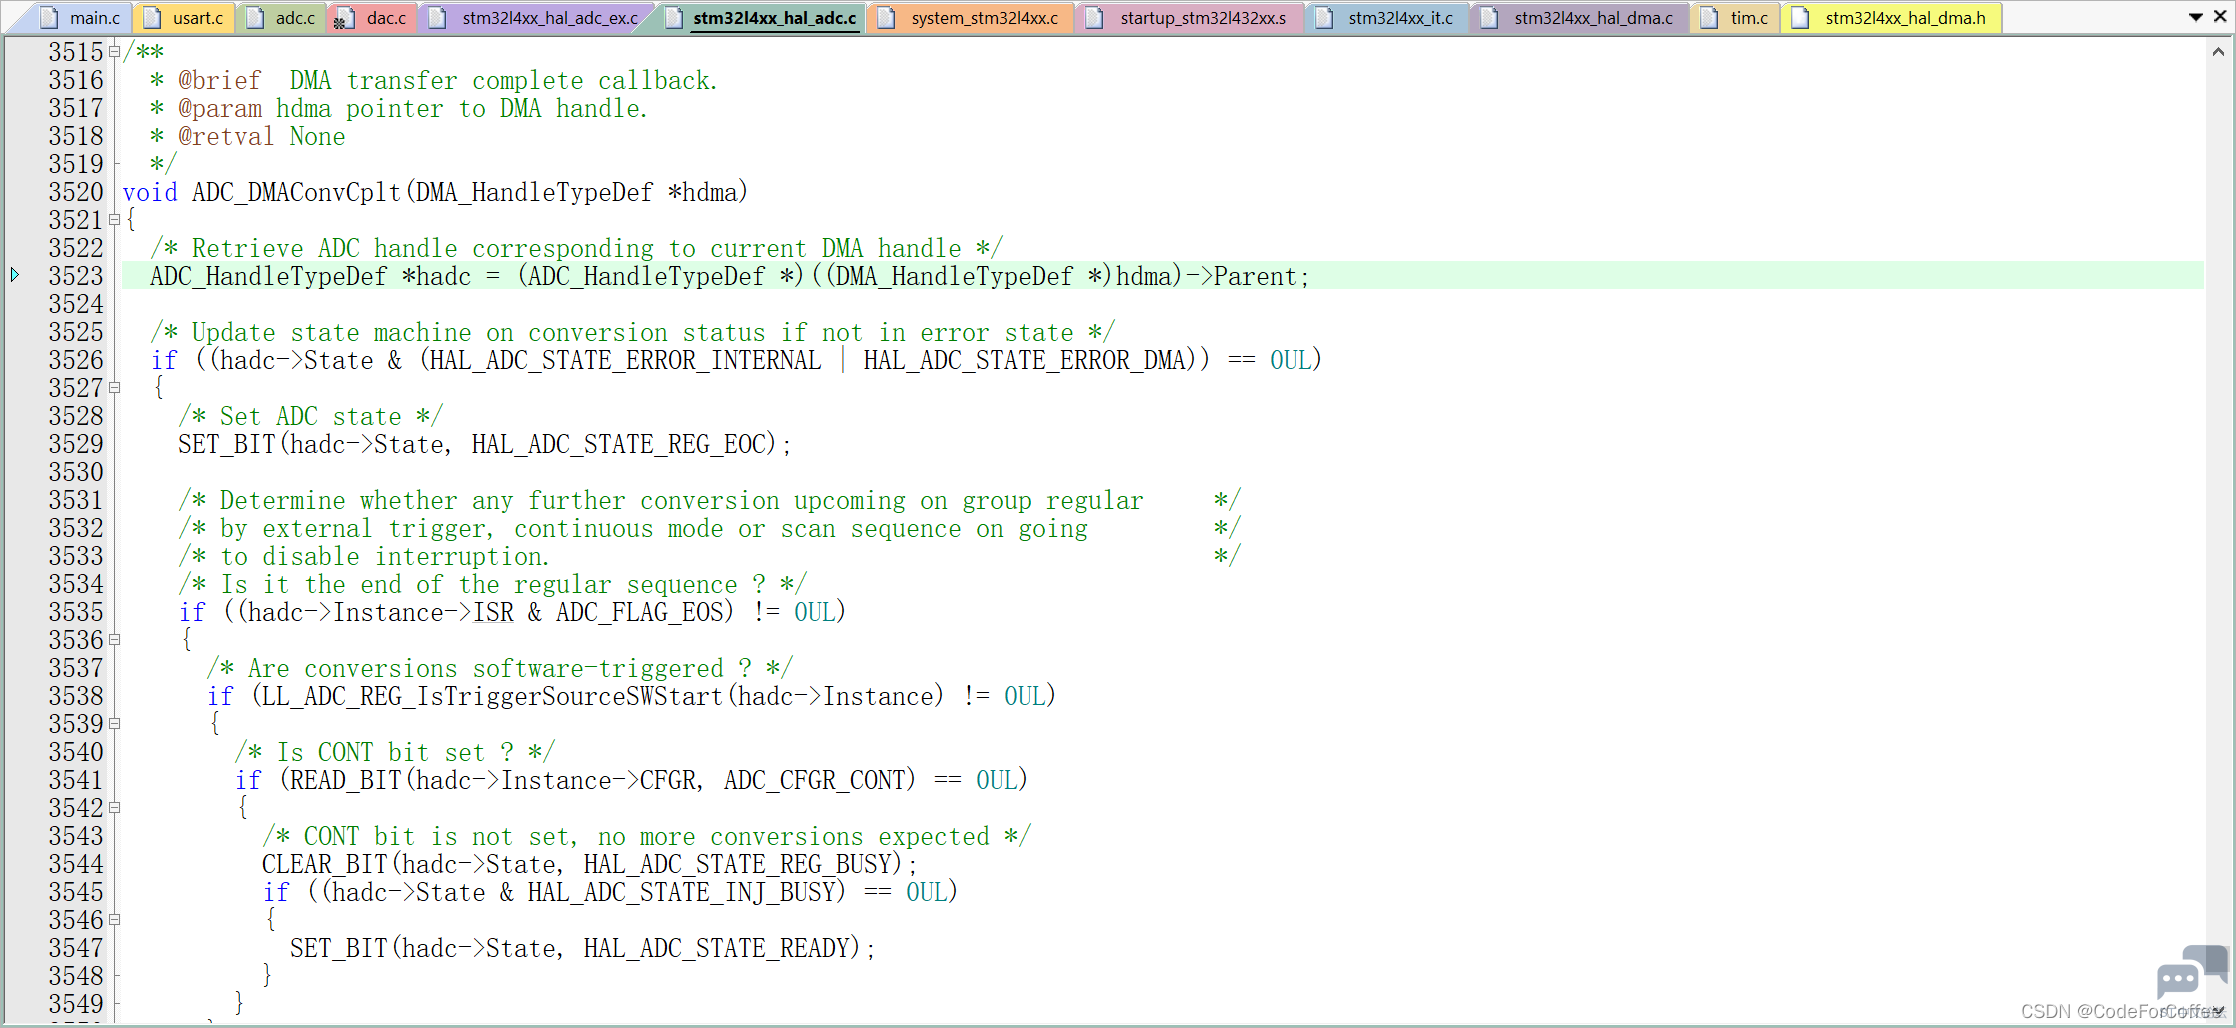
这个ADC_DMAConvCplt回调函数最终是调用这个
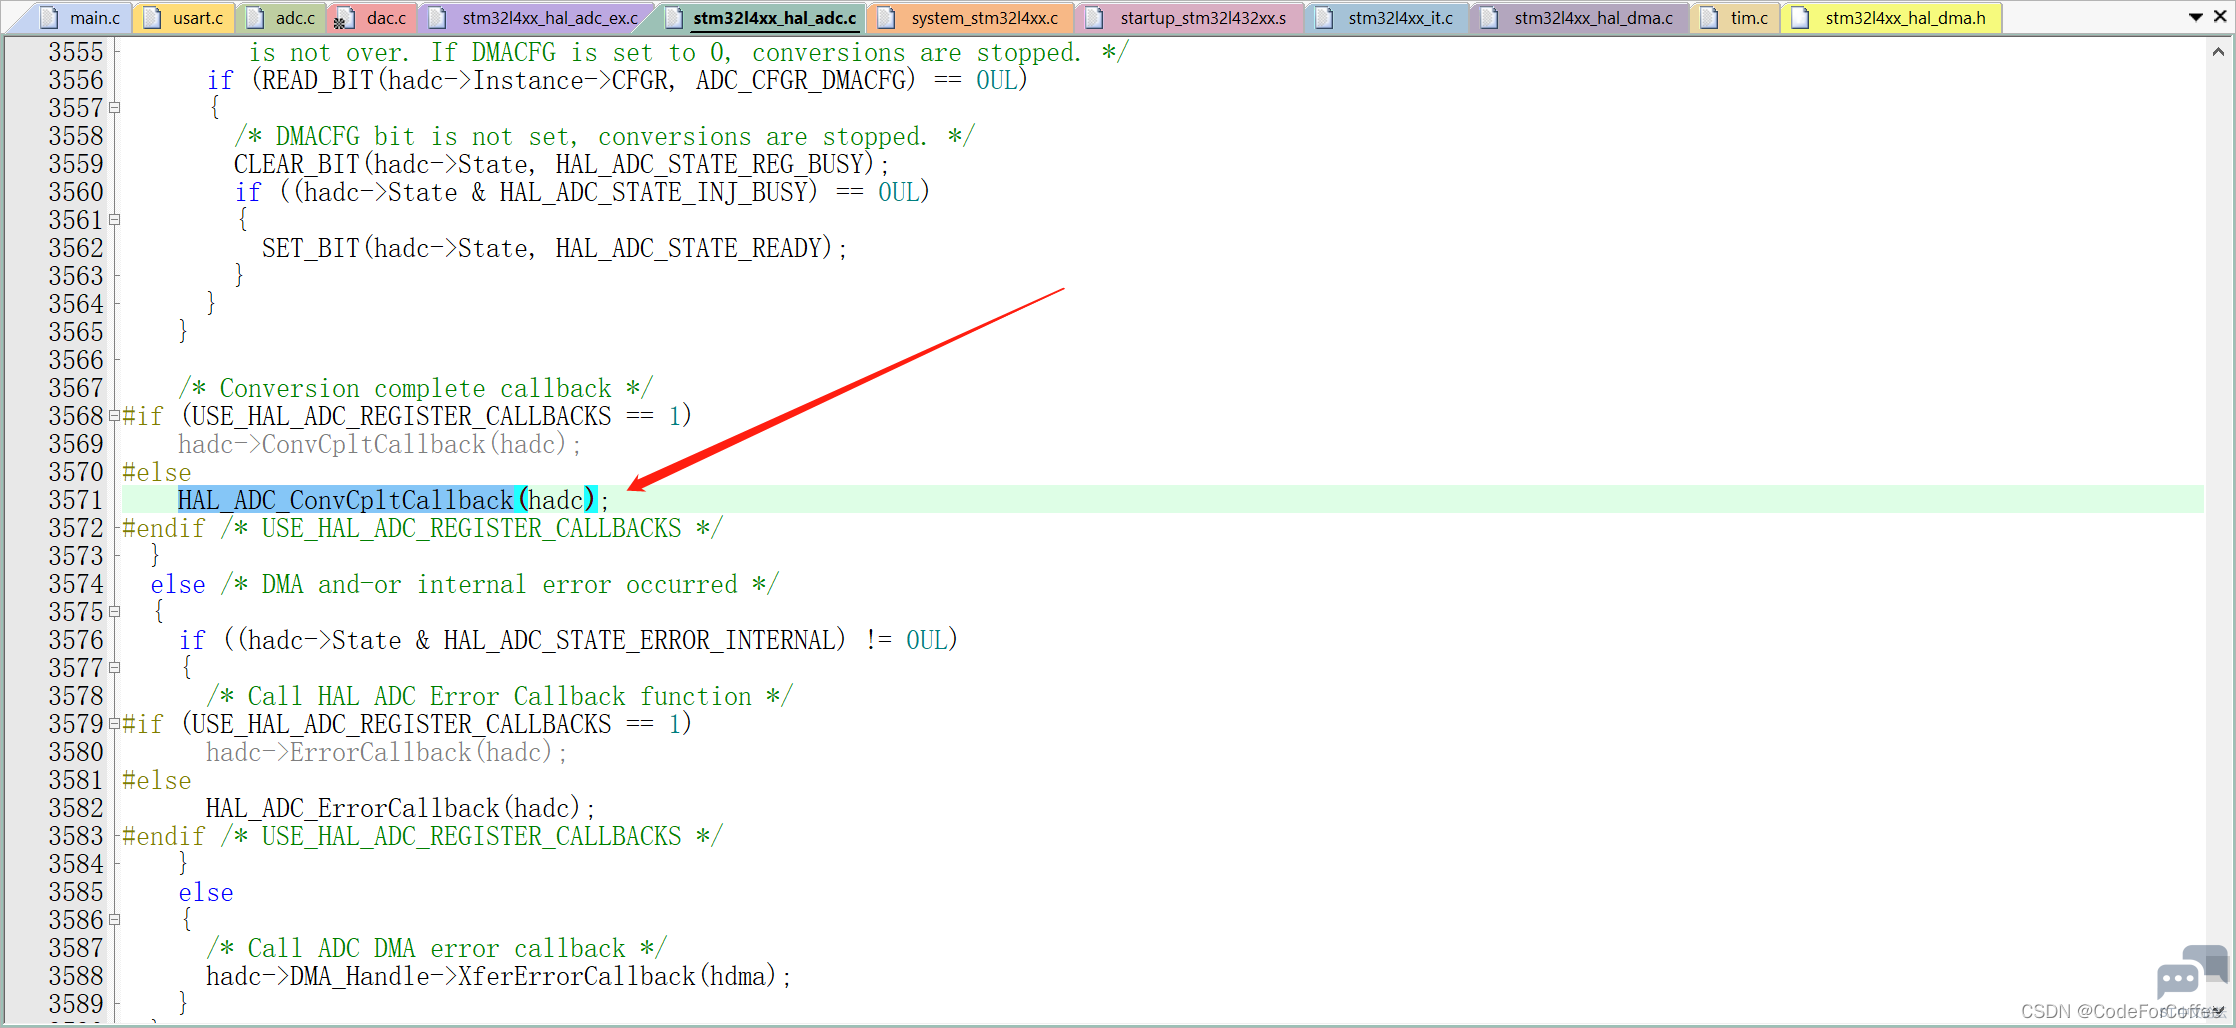
也就是这个HAL_ADC_ConvCpltCallback函数,这个中断处理函数是weak的,因此我们可以进行重写
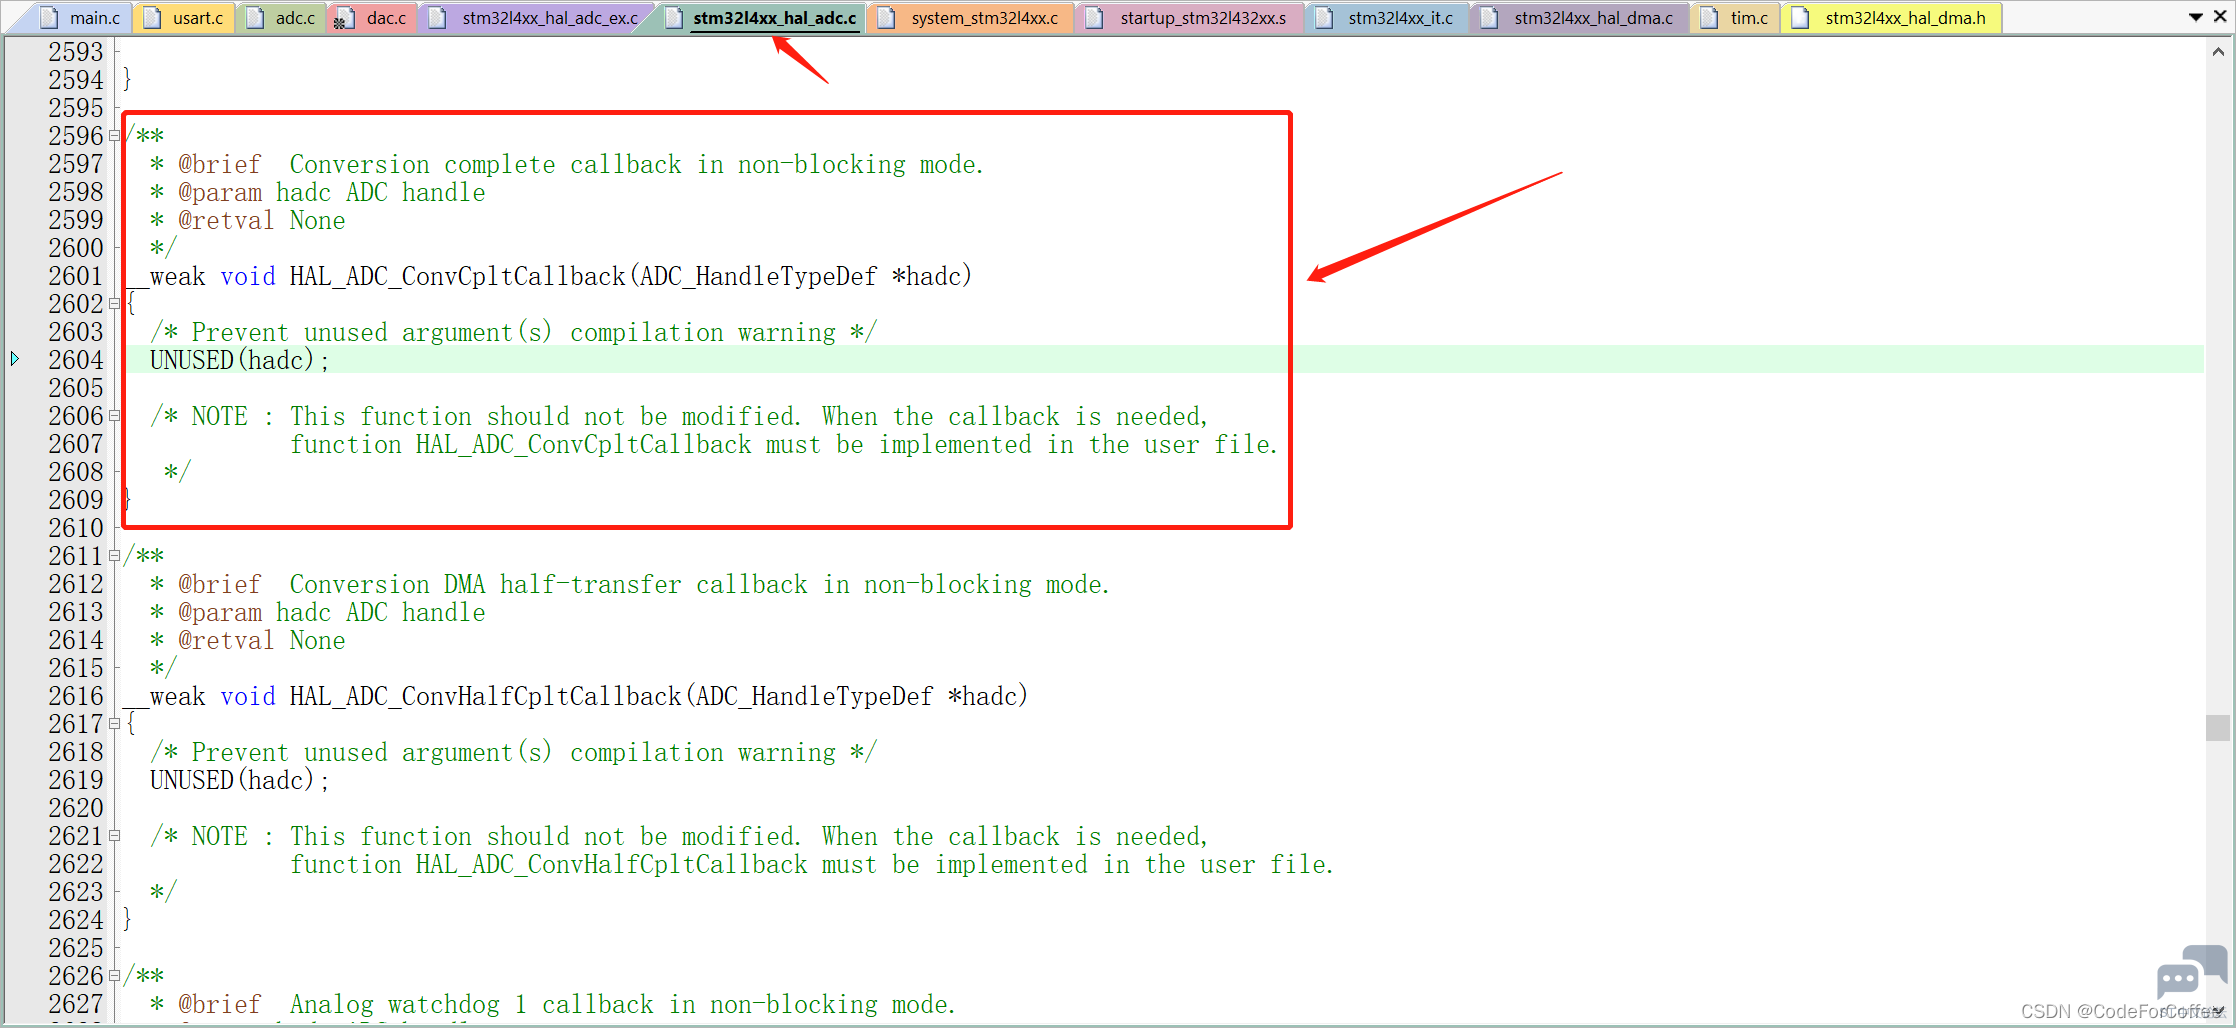
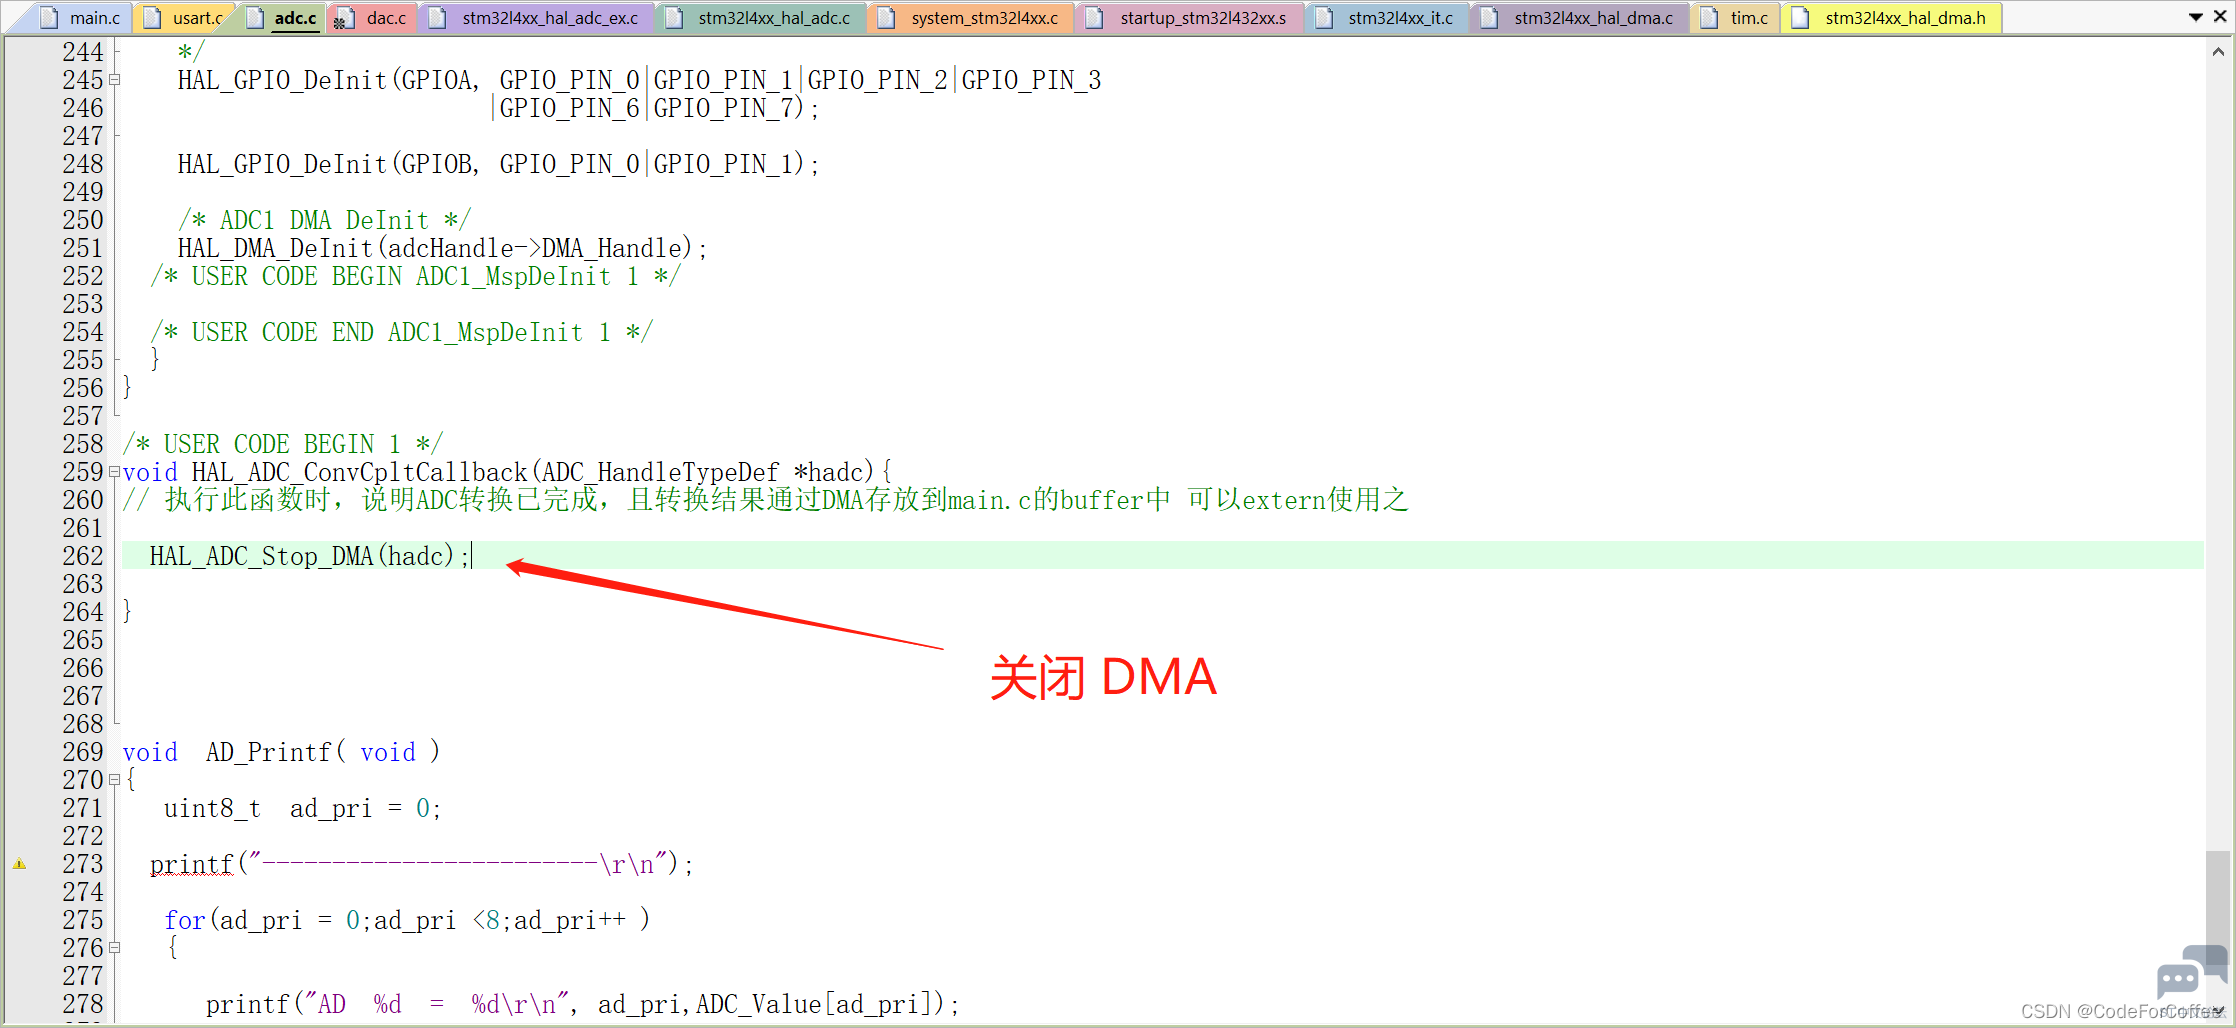
我们把这个函数在adc.c文件中重写一下

可以在里面关闭DMA,这样一次ADC转换DAM存放完成后就结束了
如果需要开始下一次,直接调用HAL_ADC_START
————————————————
版权声明:CodeForCoffee
|

.png) STMCU小助手
发布时间:2022-12-24 17:41
STMCU小助手
发布时间:2022-12-24 17:41


 微信公众号
微信公众号
 手机版
手机版
